Image Map

Wednesday, February 29, 2012

Spring Top Tutorial: Flamenco Ruffled Tank, Spring Top 1


I found some tank tops on sale at two for the price of one so I bought them.
I wanted to make some sort of ruffly top for spring so this is how I made the 
Flamenco Ruffled Tank

I drew lines on the tank to guide my sewing.
I cut up the other tank in strips the same a little wider then the lines I drew so they would overlap a little when I sewed them down. Then I made each ruffle strip about 3 times the length of each line I drew, ruffled them by gathering and sewed them down.
Pin It Photobucket

Tuesday, February 28, 2012

Patchwork clogs: Ready for Spring Craftiness!

Lately I have developed an obsession with the Dottie Angel blog.
I love her English crafty chicken raising and vintage patchworky ways.
It's just one of those blogs that inspires me to make things. 
 Tif loves clogs. 
 I always considered clogs a bit schoolmarm granola-ish. However, I did enjoy wearing a pair when I was pregnant because they were so comfy.
Tif from Dottie Angel has a pair of really cute flowered clogs posted on her blogs by Sanita.  I wanted a pair like them, so I searched the internet and I found myself not only a flowered pair of clogs but a pair of patchwork flowered clogs from Sanita.
How incredibly crafty will I  look when I am wearing these?
I feel happy when I look at them!

So readers how do you feel about clogs? Frumpy or fabulously functional?


Pin It Photobucket

Monday, February 27, 2012

Vintage 1942 Pattern: Raspberry Wool Toddler Overcoat


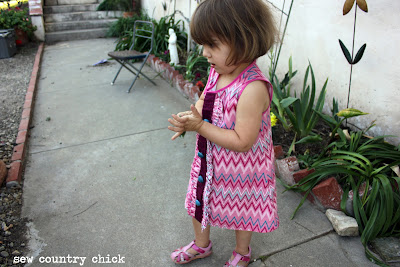
I'm finally done with Gigi's overcoat.
Just in time for spring and summer !! 
This was a long project and since it was pretty tedious, I only did a little at a time so it took me over a month to complete it.
It's so much easier to just whip up a quick tunic knit dress but projects like these are really satisfying once they are done, if they ever do get done. And if it still fits your kid by the time you are done.
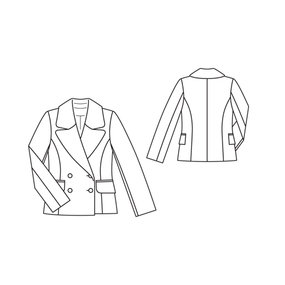
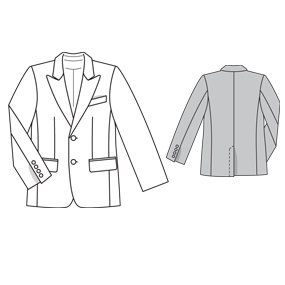
McCall's 5315 1942
I found this pattern at a flea market in Seattle for two dollars. I have always wanted to make an old fashioned child's wool overcoat. I was going to make a little hat but Gigi would just pull it off.
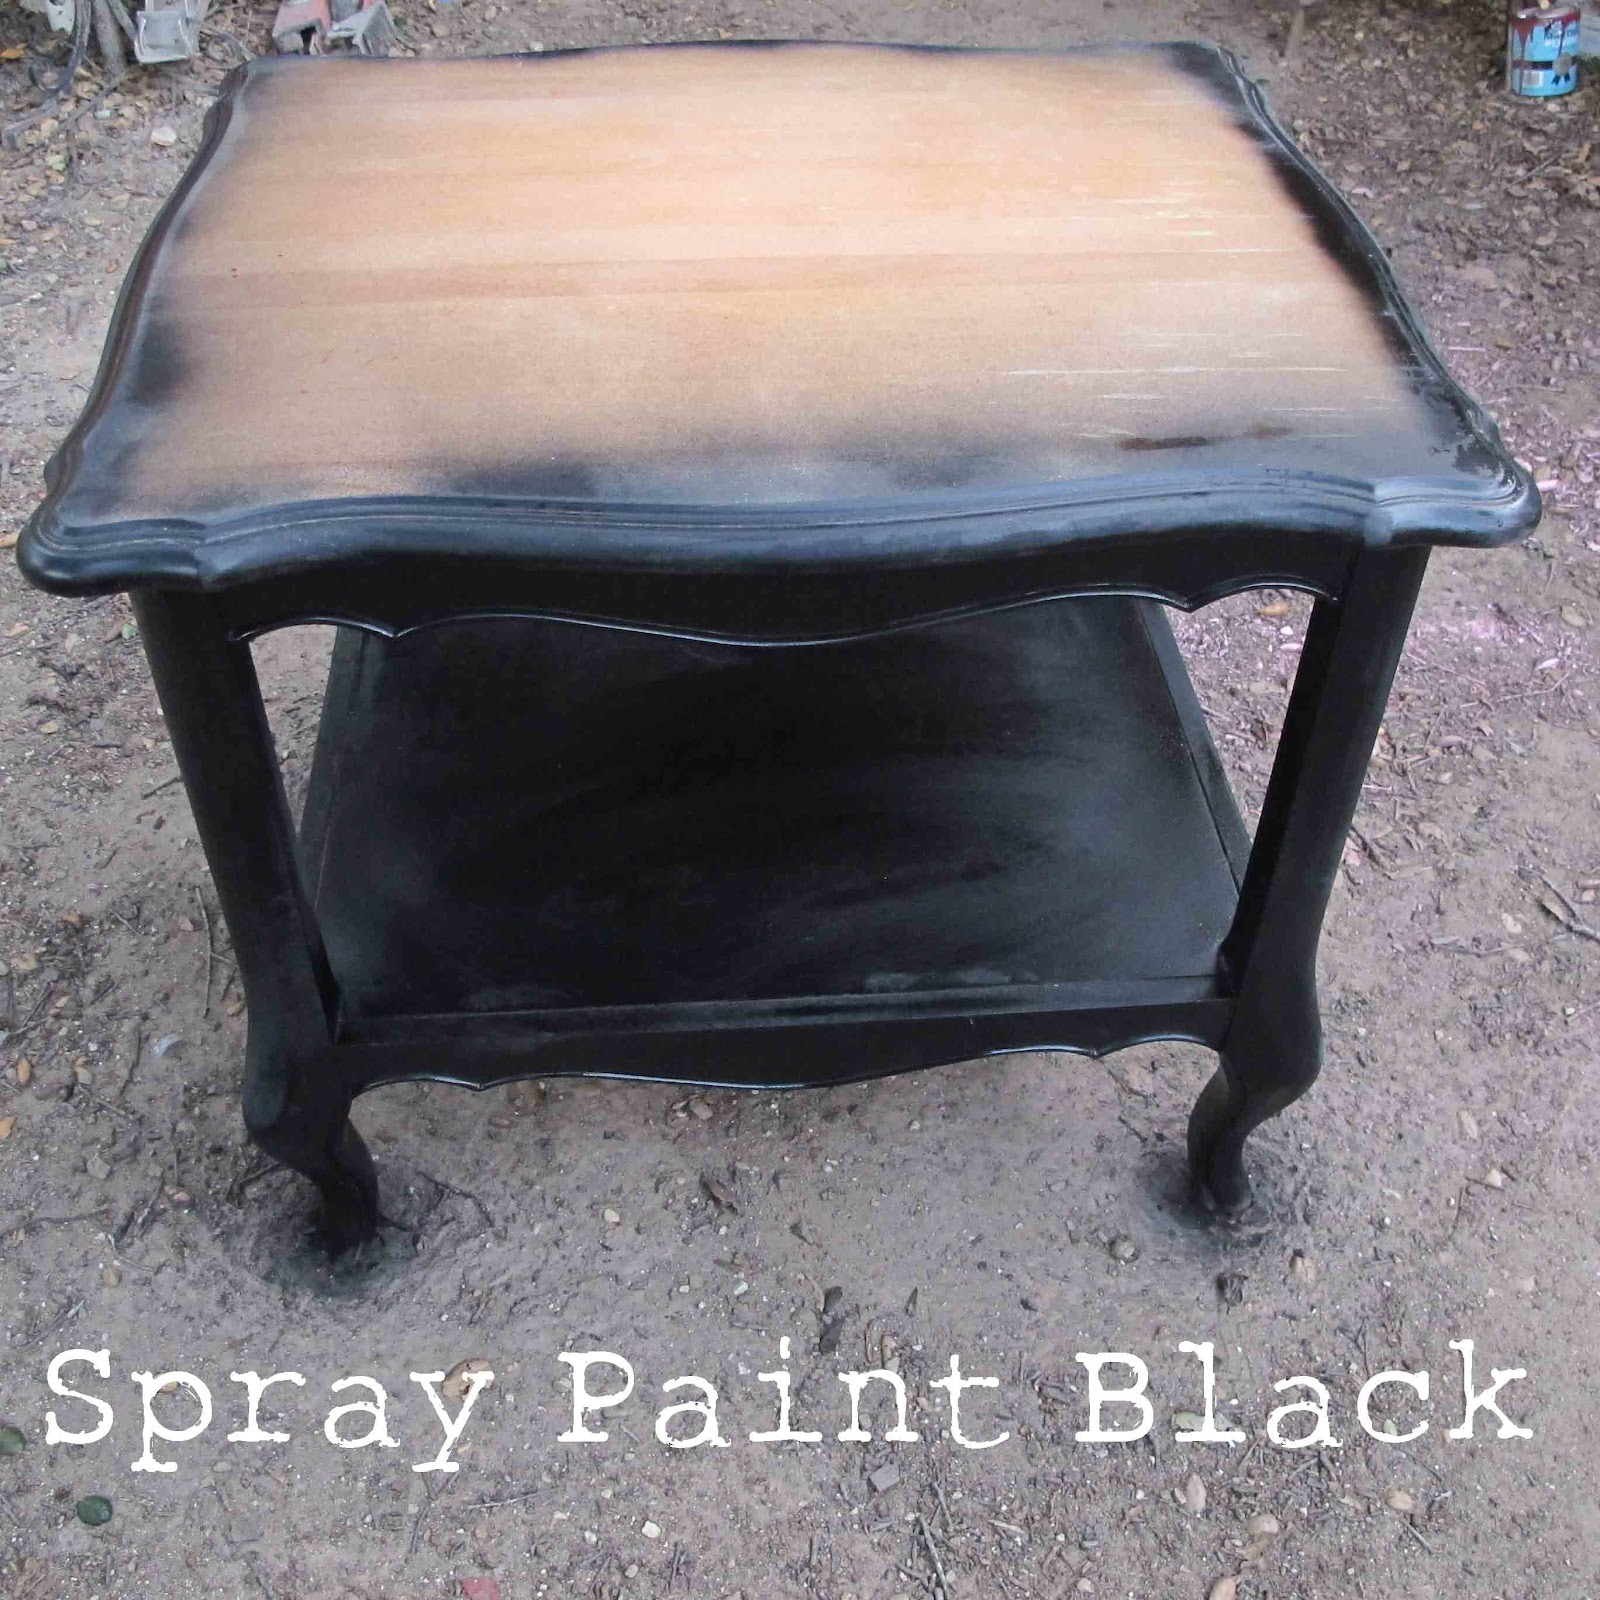
When I opened the pattern I was a little shocked at how complicated the directions were to make a toddler's coat. So to add to the complications I decided to do an inner lining on the coat and pad stitch the lapel.
Hand made shoulder pads: check
Flannel interlining:check ( or is that innerlining?)
Fell stitched hand sewn lining: check
Hand sewn prick stitched detail around edges: check
Hand attached lined patch pockects: check
A pad stitched lapel facing: check
All that work and I didn't bother to make sure the sleeves were the right length! ( They are too long.)
Good thing the lining is so cute that the sleeves rolled up look planned that way.
Toddlers love pockets, don't they?
Maybe Gigi is starting to get into the preschooler stage. Not that she will go to pre school yet. But I think she is getting too big to be called a toddler.
( sigh....)


I had some extra fabric left after the lining was cut so I designed this simple little center ruffled dress. I used a shirt placket from my thrift shop pile to put down the center of the dress. It should fit her perfectly by summer.
All the fabrics came from my quickly shrinking stash. The interlining flannel was left over from a Christmas project I never got around to making and the chevron zig zag lining I bought last year for an idea I had to make several little girls dresses to sell that I also didn't get around to making.
Can anyone say sewing ADD ?
I was tired of seeing that zig zag fabric lying in my bin and I'm glad I finally put it to good use. Don't you love that?
 The wool I actually found at the thrift shop on half price day  and the buttons were bought at a yard sale where I found a big shoe box of vintage buttons for three dollars.
Total cost: about $ 6. 50.
 I have been using up my stash at a rapid rate. Good thing because I am going to the garment district tomorrow with a friend. Now I can start hoarding up all over again!

I bought these "Made By Mom" labels in a French fabric shop,
C'est jolie, n'est pas?


Pin It Photobucket

Friday, February 24, 2012

Sew & Tell Saturday 2/25/2012

Welcome to Sew & Tell Saturday!
I like to call this a sewing soiree instead of party. When attending a soiree you should always extend yourself to meet new people so please visit some of the posters and leave a comment!
I was so inspired by this little girls dress from Pinafores and Pinwheels. I have a collection of vintage pillowcases and I am so inspired by this.
Lady Danbury at Thinking in Shapes made this cute retro looking top inspired by the eighties band The Clash. I was a huge Clash fan when I was a kid and I loved this!
This quilt by Nat Sprat is so happy and cheerful I love the raw edges on it.
Please leave either a text link or you can copy my badge below and paste it on your party page if you have one!

Photobucket


Pin It Photobucket

Thursday, February 23, 2012

Decoupage A Table With Sheet Music!

I found a side table at a rummage sale for ten dollars. It had an ugly finish on it but I could tell it was well made.
I also had a box of old sheet music found at an estate sale. Having made a few crafty projects with it already I was itching to try a bigger project.
I decided to give the table an antique black slightly distressed finish with the top of the table covered with the antique sheet music from the 1920's.


I also found this old locker basket recently . I think I will put some polyurtethane on it and use it in my kitchen as a bread basket.


First, sand off the original finish. You don't have to go crazy like I did and sand it completely either.

I spray painted the piece black.

I covered the top with the sheet music and let it dry. then I trimmed the edges and added some polyurethane to the top to seal it.

I then sanded it up and rubbed walnut colored stain onto the sanded parts to make it look old. The music was already faded so I didn't have to age it.


I would have to say I like how this turned out!

Pin It Photobucket

Tuesday, February 21, 2012

Learning About Tailoring


Prince Philip who has his suits made by Norton & Sons of Savile Row
Tailor, Tailoring
Two words that have always intimidated me. Words that conjure up English gentlemen on Savile Row, the bearers of generations of secret sewing and fitting knowledge. The domain of the elite wealthy, those who live in the rarified world of bespoke suits and it's sister,Haute Couture. 
Tailoring was discussed in hushed tones in Fashion School and we never did delve into the intricate details of a tailored suit although we did learn how to draft jackets and drape them. But all the intricacies of the work involved to create a hand-tailored garment? There was a special class for that but since I was 20 and interested in making clubby mini dresses I stayed away from it. So years later, I have yet to make a fully tailored garment. 
Tailors tools circa 1900

To add to the mystique of the tailor, here is a description from one of my favorite sewing books written for the home sewist,"The Better Homes and Gardens Sewing Book from 1961"
"Custom tailoring requires great patience, and precision. It takes years of apprenticeship to master it. This book doesn't attempt to make a tailor of anyone. Only years of working directly with a skilled tailor can accomplish that."
I think words like that would definitely put most home sewists off of the idea of ever trying to make a tailored garment!They create a divide between the home sewist and the trained tailor or fashion designer. But there are a few stalwart souls that might decide to ignore unencouraging advice like this, to say the least.
I can compare tailoring a coat to cooking. The tailored suit is like a really fancy holiday dinner that you plan for weeks and spend  days cooking. The average person does it maybe once a year. There is no reason that with a little self-education that the average person can't cook this way as well. Of course, it might not taste as good as a professional, but it can come close.
 Like gourmet cooking,tailoring is not something you want to rush through and a project can take weeks to complete. Just take it slowly, do a little everyday, and you will eventually finish!The traditional bespoke coat is 85% made by hand so it will take you awhile!
Of course,your first tailored jacket isn't going to be anywhere near as well made as a professional the first few times. But the knowledge you will learn from trying the traditional tailoring techniques will add to your sewing arsenal. 
In working with commercial jacket patterns you can add these steps to create a much better fitting and well made jacket. Most pattern directions won't tell you about all these details and you will have to use a sewing book with a tailoring chapter instead of following the directions in the pattern.I recommend some of the older sewing books as they seem to have more extensive chapters on tailoring.
Here are some common characteristics of the bespoke or custom made blazer or coat. There are many but I will stick to the most common and basic aspects that I have learned about in my study on tailored garments. You can adopt some or all of these techniques to improve your own jackets and coats:
  • Custom fitted and designed pattern for each customer. You can achieve this in your home sewing without pattern making knowledge by simply making a muslin of a store bought jacket pattern and spending some time making adjustments on it so it fits perfectly.
  • Hand sewn canvas or horsehair interfaced facings tacked down by hand with a pad stitched area at the part of the lapel that folds over called the roll line.This helps the lapel lie flat.
  • Two pieced sleeves with hand made pads at the sleeve head and a horsehair strip interfaced to the sleeve hem to make it more stiff.
  • An under collar made of hard flannel cut on the bias and with a center seam.Often the under collar will be interfaced with horsehair canvas as well.
  • Corded or bound buttonholes.Hand worked keyhole buttonholes are also acceptable depending on how casual of the jacket.
  • A full lining attached by hand. Often there will be a smaller pocket on top of a larger welt pocket, called a ticket pocket.
  • Angled welt pockets or hand attached patch pockets.
  • Buttons that are attached by a tiny button on the other side to make the attachment stronger.
If you would like to try your hand at tailoring here are a few patterns that would be great to start with:
Burdastyle # 105 from 10/2011
Burda# 122 A from 9/2011
Burda# 6049 The Ehren for men

I just finished my first tailored jacket.I chose to make a coat for my two year old from a vintage pattern from 1942. I figured that If I made mistakes they wouldn't look as obvious on a tiny garment!
So how about you readers? Have you ever tried a tailored project or is it something you have avoided for years as well? 


Pin It Photobucket

Monday, February 20, 2012

So Scrappy Lampshade


this is a scrap busting project fun for kids to make. 
A lampshade made from strips of fabric.
How to make it?
Remove the fabric from an old lampshade.
Tie strips of fabric around each section.
Easy Peasy!
My 16 year old daughter made this for her room and I love it!
I have to say that this isn't my original project. I saw it on a blog in the days before I started pinning.In searching for the source I found several more.Doesn't it stink when you find out lots of others have already done your project? Creative ideas are often that way. I call it the collective creative conscience.
If someone knows of the same tutorial can you send me the link so I can post it here?
Have a crafty week!
Pin It Photobucket

Friday, February 17, 2012

Sew & Tell Saturday 2/18/2012

Welcome to my sewing linky party!
What have you been working on?
I'm working on a design for the Vintage Modern Design Challenge by Indygo Junction hosted on Burdastyle 

True, pure and lovely has been working her way through all of the patterns in the "It's A Girls World "Sewing book by Jennifer Paganelli.This adorable tunic dress was made from one of the projects in the book.

Cation Designs shows how to make a no pattern maxi dress perfect for spring.
Taly's Creations shows how to insert a modesty panel into a too low top. This is very practical information!
Mary from Bibliolog showed off not one but four pairs of trousers! To see the rest stop by her blog.

This week a posted a tutorial for making an elastic waist tunic knit mini dress from a t-shirt.


Photobucket


Related Posts Plugin for WordPress, Blogger...