Image Map
Showing posts with label clothing refshions. Show all posts

Wednesday, December 26, 2012

Blueberry Punkin'

I thought I would share a project I never posted on the blog. 
I made this little dress as an entry for Project Run & Play but then anded up making a different one.
It was made from a white bedsheet that I dip dyed purple. Then I hand stamped some gold flowers onto it with sponges.
The pattern I made myself.
I have been going through all of my posts from 2012 to do a recap on all of my projects made this year when I found these photos.
They bring back memories of late summer for me.
A nice respite to the recent cold days of winter.
Can't you almost just feel the sunshine?


Pin It

Sunday, November 11, 2012

Boho Sweater Poncho Tutorial

 
Lily designed this sweater for our guest post over at the Kids Inspiration For Design series at Me Sew Crazy last week. Lily was so excited to show off her design! Here is a small excerpt of her post.

My mom asked me to design something for a popular blog Me Sew Crazy..So what do you think I said? YES! She said I should do something "Fallish" so I decided to make a fall colored poncho. I was very inspired by a scarf in a sewing book. My poncho is made up of wool and cashmere patchwork squares. My mom sewed it for me"

I made it from a pile of my thrifted sweaters. It was really easy to make. I cut out 6 inch squares and sewed them together in rows. then I left a little opening for her neck. Sewed on some trim, and voila , I was done!
Making a template
laying out he design
As you can see here, I used a serger. It took about an hour to mak eit. the longest part was cutting all of the pieces.
Would you believe this got thrown in the wash yesterday and it SHRUNK?
Hopefully I can wash it again and stretch it back out.  That's what happens when kids do the laundry....

Friday, May 18, 2012

Les Petites Souers: My Signature Look? Vintage, French and Refashioned


I love creative challenges because they sometimes make you dig deep to figure out who you are creatively. Of course, as creative beings we are always changing but for me, there is one influence which often guides me.

I have been deeply influenced by France. When my older kids were little we bought a small 16th century village house in a town called Pezenas in the south of France in the Languedoc departement  and restored it. I was lucky enough to spend six summers there. They are some of the best memories for me.
I loved to sit in cafes and I loved the style of the French. Yes, they do really wear these striped tops ! I brought back some for the family and we have worn them out.

This dress I made for Gigi was inspired by the French Mariniere top originally made for French sailors.
It was made from a plain white adult t shirt I refashioned. I hand painted the stripes and added the small wooden anchor buttons.

The bistro chairs and table are from a real Parisian bistro and they are very old. I bought them in a little village called Isle Sur La Sorgue, which has a big outdoor antique show every August. 
The Ricard Pastis bottles were also brought back in my suitcase years ago. I used to love sitting at the Cafe Moliere in Pezenas to have a glass of the cloudy milky colored Pastis in the heat of summer.it was clear in the bottle but when mixed with water, it turned white. The licorice taste is such a specific one. It's so refreshing, mais tres forte!


This little dress was very time consuming! Painting the stripes took awhile but I love it!

Lily's ensemble is sewn from a 1943 sewing pattern. The shorts are made from vintage denim I bought at an estate sale . The fabric is a Japanese knit. I loved the hand painted look of the stripes. That and a post about hand painting stripes on fabric from one of my favorite children's wear bloggers You and Mie, inspired me to try hand painting the stripes on Gigi's t shirt dress .


Une belle jour chez nous!
P.S.
If you are stopping by to post on Sew & Tell saturday, sorry I didn't get the post up. This project took me until the last minute!
Have a bon week- end!
Pin It Photobucket

Monday, April 23, 2012

Ragamuffin Patchwork: Everyday Is Earth Day !

Everyday is Earthday when it comes to my wee ones wardrobe. If it's not handmade then a lot of it is thrifted or  handed down.
For instance, this outfit here.
A collaboration of my design, my nine year olds design, some thrifted , some handed down, and a little bit of Tokyo fashion too.

My nine year old Lily designed and sewed this patchwork skirt for her little sister from scraps in my scrap bin.
 I love how it turned out and Gigi loves it too, especially since her big sis made it.

The sweater was made by me . I cut down an old shrunken sweater and added some Liberty of London  bias tape to the neckline.
I brought the t-shirt back from Tokyo. It has the word CUTE appliqued on it.


The shoes are from the seventies!I bought htem for a dollar at an estate sale. They reminded me of a pair I had and loved as a litle kid.The scarf was my mom's and the tights were big sister number one's.

This is one of my favorite silk souvenir scarves from the 1930's that my mother gave to me. Gigi got some saltwater taffy I brought back from the SNAP Conference stuck in her hair and I couldn't get it out in time to leave for the zoo today so I threw this scarf on her head. A happy accident! We finally got the saltwater taffy out after many tears and holding her hair under warm running water to melt the taffy off.


linked to

Pin It Photobucket

Wednesday, February 29, 2012

Spring Top Tutorial: Flamenco Ruffled Tank, Spring Top 1


I found some tank tops on sale at two for the price of one so I bought them.
I wanted to make some sort of ruffly top for spring so this is how I made the 
Flamenco Ruffled Tank

I drew lines on the tank to guide my sewing.
I cut up the other tank in strips the same a little wider then the lines I drew so they would overlap a little when I sewed them down. Then I made each ruffle strip about 3 times the length of each line I drew, ruffled them by gathering and sewed them down.
Pin It Photobucket

Monday, February 6, 2012

Valentines' Rafashion:The Love Tunic created from a mens T-shirt


I have been in some kind of refashioning mood lately.
I need to stay away from the thrift shop because I already have bins of fabric piling up in my back room. You probably know how hard it is to say no to an amazing fabric or vintage sheet especially at the thrift shop when it's dirt cheap. " Oh, I can squeeze it in somewhere", I tell myself.
Just say no!
But for those of you who want to make something today, here is a simple project for Valentine's Day you can make your kid from a red mens t-shirt you can find in your closet or at the aforementioned thrift shop. If you buy a shirt big enough you can make one for yourself too! 

Take your mens T and fold it in half.
Lay a shirt that fits well on top and trace around it, The sleeve will become a dolman sleeve, like you can see above. Do you see how the original t shirt sleeve becomes like a long sleeve on your new shirt?no hemming involved! I also like the way the original armhole sleeve seam becomes like a design element.I decided to make a few more decorative seams in the top, including a yoke.

I cut into the top of the shirt to create a yoke. Then I cut the excess length of the bottom and folded it in half widthwise, creating a band around the bottom. 
For the words I took some fabric scraps and cut out the love letters, then zig zagged them on to the shirt.
Easy Peasy and your kid can show off her "recycled" creation at school,(but mine won't because she wears a uniform), earning points with the teacher!!

Pin It Photobucket

Thursday, February 2, 2012

Dandelion Dress: Toddler Dress Tutorial Made From Thrifted Mens Shirts

I have been sewing for the Project Run and play weekly Flickr group challenge. It's been fun and has increased my creativity with regards to my kids designing.
I wanted to create a dress from some thrifted men's shirts. Here is what I came up with!
A little dress perfect for picking dandelions.

looking for fairies,
making wishes,
and cooking up some fun!

Yet comfy enough for climbing,
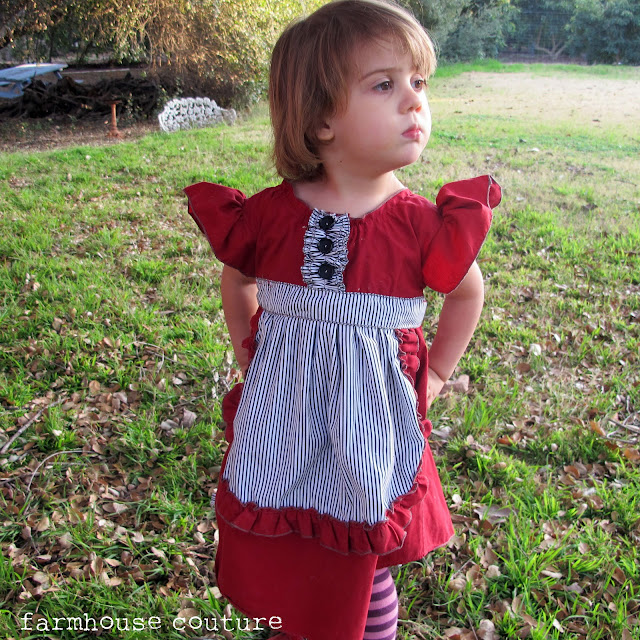
and with a built in apron for playing house!

Sorry, I don't have photos for every step, but I will do my best to explain the process of making this dress.

I used the red shirt for the dress bodice front skirt, sleeves, and half of the back ruffles.

I used the striped shirt for the apron, the back under skirt panel,
and the ruffles on the bodice and back skirt.

BODICE 
1. Cut off collar from mens shirt.
2. Lay a shirt that fits onto the shirt and trace it onto the mens shirt. Add seam allowance.
3. Sew up the side seams of your resized bodice.
4. To finish the neck I serged a rolled hem and then shirred around the neckline with elastic neckline to make the neck smaller.
5. From the striped shirt sleeves, I cut some strips of ruffling 2 inches wide and three times the length of the bodice placket. I made two ruffles and sewed them onto the original button placket. Then I sewed on some decorative non functioning buttons.
 SLEEVES
1. For the sleeves cut off the top parts of the sleeves. I made mine about 5 inches wide but I didn't take a photo. If you cut the sleeves from the original sleeve you will already have the correct sleeve head shape.
2.I used the rolled hem of my serger to avoid hemming the sleeves and gathered the  sleeves  and sewed them into the resized armholes.

SKIRT FRONT:
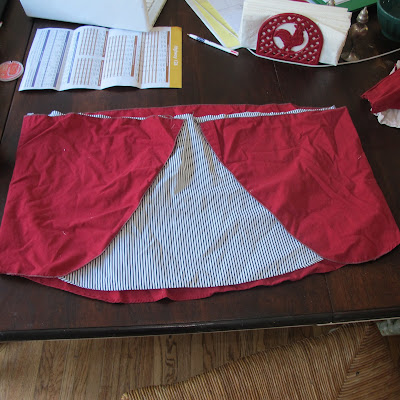
1. For the skirt cut off the bottom of the main dress shirt. Rounded off the edges of the red shirt front so I could add a panel underneath that peeks out. If you have a serger you can use the rolled hem stitch to finish all the edges of the dress so you don't have to hem anything.
SKIRT BACK:
1.I cut an under panel the same length as the front skirt to put under the opening of the overskirt.
2. I harvested fabric from what little red fabric I had left and from the sleeves of the striped shirt. I created several 3 inch wide ruffles to attach to the underskirt so they would peek out like a Little Miss Muffett dress.

 SKIRT APRON
1. I created an apron for the front skirt from the leftover striped shirt fabric and sewed a ruffle from the contrasting red cotton around the edge. I sewed it to the front skirt, gathered the whole thing and sewed it to the bodice.
2. To finish off the dress I created a tie for the apron and sewed it directly on the dress with a fell stitch, hiding the waist seam.
So there you have my toddler ruffled back and aproned dress made from two men's shirts.
If you create one I would love to see a photo!


Pin It Photobucket
Related Posts Plugin for WordPress, Blogger...