Image Map
Showing posts with label wedding dresses sewing and patterns. Show all posts

Sunday, April 10, 2011

Wedding Dress link up Party!

Hi everyone and welcome to the wedding dress link up party! For the last couple of months I was making a wedding gown and thought it would be a fun way to wrap up the whole project with a photo party of readers' dresses through the decades. Let's start  from the newest to the oldest photos..
READ MORE AND SEE THE PHOTOS..


From Christine who was just married last month 
" I used Vogue 2717 as a starting-off point for my pattern.  Yes, we were just married last month, March 12, 2011."
Congratulations Christine! Your dress turned out lovely and so are you! Christine's blog was invaluable when I was making my dress as she really had some great photos and descriptions of her dress. Find her at featherpetalsilk.blogspot.com


Christine's dress had fully functioning buttons and loops with no zipper. Let's hope she didn't have any popped buttons!She also added some pretty little petals near the hem of her dress. 


From Ashley at  Refurl.blogspot.com

I love the lace train Ashley and these photos are gorgeous. Ashley got this dress at David's Bridal but it looks like a million dollars on her!


From Abigail who blogs at Farmhousegarden.blogspot.com

"This is a fun idea! I was married 3 1/2 years ago, and we had our reception at a great 20s dance hall on the Florida gulf coast. My dress was handmade for me, and I felt so wonderful in it! The inspiration photos I showed the sewist were of 50s party dresses. Sadly, because we had a photographer friend take photos (he is not a wedding photographer) and though he did take tons of great photos, there aren't many straight on of my dress without flowers or something in the way. Attached is one of my father walking me down the aisle. Because the whole experience of having the dress sewed for me was amazing, and because it led to my love of (obsession with?) sewing, I will probably do a full post on this one of these days, including Bob's original sketches."
I love the organza  Abigail.You were adorable !


These two above photos were from my best friends wedding in the late 90's This was a gorgeous silk gown and it was so lovely on her. The setting was the historical Adamson house on the beach in Malibu.There I am on your right.


Here is my own wedding 17 years ago. I had an empire waist but never really got any nice shots of my dress. I got married at a vegetarian restaurant called "the Inn Of The Seventh Ray" in LA's Topanga Canyon.


These puffy sleeves were really in in the early nineties when I got married.
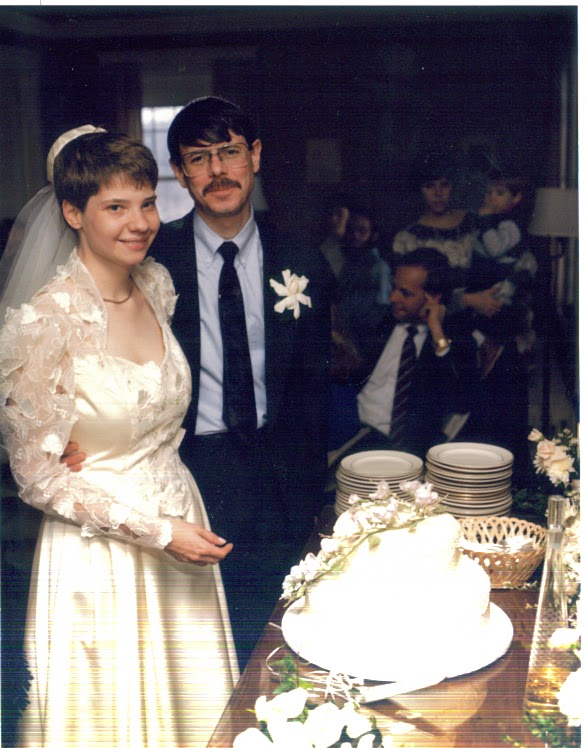


From reader Beth


"My wedding was on December 16, 1989.  The dress was sewn from a Butterick pattern, unfortunately not by me as I was busy with stupid law school finals until 4 days before the wedding. Anyway, I'm still married to the same guy and we have two kids."
Beth, you don't look old enough to be married here!


These are Christine's parents. This is so sweet and so seventies! My own parents got married at City Hall and my mom was wearing a minidress and they didn't take any photos. How dare they!


This is a photo of my husband's parents who were married in Lynchburg, Virginia in 1950. I'm really starting to like tea length dresses again.


These are Christines maternal grandparents above. It looks like her Grandfather may have been a World War Two soldier here. 
Christine's paternal Grandparents. Thanks for all these photos Christine. They are really great!


And last but not least this is my Italian Grandmother,from New York City on her wedding Day in the 1930's.


Wednesday, March 30, 2011

Wedding Dress : Finished !


 I finally finished Maria's dress. I didn't get any photos of her in it but it does looks beautiful on her. I'll have to wait for the wedding pictures. 

I added horsehair braid to the hem of the lace to make it more crisp. Everything that was made on this dress was learned either from an article, class , or tutorial online. I had no idea how to make this when I told Maria I would do it. To see my tutorials 
I used go to my tutorial page on my sidebar and click
"wedding dress tutorials"


Sleeve lace applique with hand beading.

Randomly pleated sash with bodice overlay. I added some more pearl beads to the bodice scallops after I took this photo.


The applique lace on the sweetheart neckline. I like the little fringe on the edge. you can never know the hours I spent worrying how to do the lining on this bodice!


The back with the train down. There is a lapped zipper under the fully functioning button and loop closing for extra security. I hope to God the zipper or buttons stay on all day! There will be a low bustle which I still have to finish sewing in but first I have to search the internet on how to do it.
it was a huge amount of work but you never know what you are capable of until you try , do you? I was so afraid it would be a disaster because I didn't think I could sew something like this. Thanks for giving me the opportunity Maria and 
I know you and Matthew will have a great life together!
I guess I pulled it off!
On to the next project.....

Monday, March 28, 2011

Wedding Dress Tutorial Links

Hi everyone. Well, I have wrapped up my wedding gown project and will be posting some final pictures soon and I'm ready to move on to something else. I did want to share with you some great links and tutorials on wedding sewing I have found during my wedding dress sewing process. If you should happen to be making a wedding dress now or in the near future you should check these out because they helped me . I hope these tutorials can be a help to you!
How to make your own Crinoline  from fabricate and Mira
tea dying lace from me!
working with tulle from sew for dough
fixing boning problems from sew for dough
removing stains from gowns also from sew for dough
creating a french bustle from sew for dough
putting gussets in bustiers from sew for dough
sewing with bias from Threads
randomly pleated sash  from Project Run and Play
sewing darts in lace from Sew News
How to applique lace from Burdastyle
More on boning from Fehr Trade
Making a ruched sash a discussion on patternreview

Wednesday, March 23, 2011

Wedding Gown update: Pleated sash tutorial

So making this wedding dress has at times made me  question my sewing skills in a big way. But I've had a great time and I would probably do it again. I especially enjoyed the fittings with Maria and her beautiful sisters and mother. Their home is like  a modern day version of Little Women. They don't own a TV, instead listening to opera music or reading classic novels together in the living room in front of the fireplace.
This project has been a humbling experience, from not making the lace overskirt correctly and messing up the lace applique seams on it, to making a lopsided sash and sewing on the buttons crooked. A crash course in couture sewing. First we couldn't find any patterns that looked like the dress Maria wanted so I had to make my own pattern and make sure all the little things like armholes and princess seams and bias skirt seams were all lined up correctly. That took about three muslins to do. Then I had the fiasco with the lace overskirt being too baggy. Thank god I had enough lace left to drape the skirt on top of the bias skirt making it much more fitted. I used the old skirt front for the train and I had just enough of the border left to apply around the edges. Then there was about 8 to 10 hours of racking my brain over how to make a sash look like the Oscar De La Renta dress which was impossible since I didn't have a good close up photo to study or directions on how to do this type of pleating.
Just remember.... making a wedding dress the first time is like remodelling your house. It takes twice as long as you think it will!
Well, I wouldn't give up on the pleated sash idea so I posted a desperate plea on the wedding sewing boards of patternreview and an angel by the name of Susiestitcher came to my rescue and linked me to this tutorial at Project Run and Play and I finally figured it out. Third times the charm I guess. I have to say without those boards at patternreview I would have been lost because the wedding contruction book I have is from 1993 and didn't have enough information about a lot of things. Here some some photos of my progress:

The first sash I made. I thought is was tacky. Looks like a cheap prom dress.


If I worked with this shirring technique for awhile I may have succeeded with this.


Here was the second sash. The pleats looked good at first...


But they didn't line up in the back and look at those buttons! It looks like I was drunk when I did it! I can laugh about it now, but I can assure you I was almost in tears at this point. I had to remove the sash and in doing so, remove the buttons and zipper to redo the whole thing.

Here is that last sash after being on the dress form for a day. As you can see the pleats have taken on a sad, lopsided air to them.


Here is the method I learned last night from the Project run and Play tutorial. I ironed the pleats down like I did the first time. Last time I stitched each pleat down which gave the whole thing an overworked look. This method was a lot easier. I started with silk three times the width I wanted to end with.


When i finished ironing, I  flipped the whole piece and ironed on some interfacing to the wrong side, making sure the sticky part was facing the fabric. I trimmed the interfacing to size. This keeps all the pleats glued down.

I cut another piece of the same fabric the same size as the finished sash and ironed it right side to right side, leaving the end open so I could attach it to the back of the dress. Flip it right side out again and press.


Here is the result.

This is the dress after re-draping the front skirt which was too big before because I used the pattern and didn't drape it over the bias skirt instead.

Her is the new sash and the appliqued neckline. I added a different trim there.

I used the old front piece of the skirt to make the train. Note the Fisher-Price telephone on the floor. And how I keep this dress clean with a one year old around? I throw a white sheet over the whole thing and pray nothing happens!

  I appliqued  the border pieces to the bottom hem and train. I'm considering adding a horsetail trim to the underside so the lace has more body on the bottom.

So the next steps are reinstalling the lapped zipper and buttons and loops. I also have to trim the sleeves and hem the underskirts.


Tuesday, March 15, 2011

Tea Dying Lace

So the dress I am working on has a lace in a very subtle off white shade which was very hard to match with store bought trim. I found some pretty trim I wanted to use on the neckline and sleeves but it was a little too white and stiff to shape around the neckline. Here is how I made it work:

If you are only tinting trim or a small amount of lace use a clean bowl. Pans sometimes have flakes of burnt things in them that might come off with the hot water and stain your lace. I used a bag of Earl Grey tea. Pour in hot water and let the tea steep for a few minutes. Add some ice cubes to cool the water.


Dip your lace into the water checking every few seconds to see if you are getting the color you want. Don't let it sit too long or the lace might get too dark.  Carefully remove the lace and blot it with a towel. Lay it flat to dry.

The bottom lace is the lace I was trying to match. It's hard to get an exact match when dying lace but with practice you will get it right. Try only a small swatch first before you dip all your lace in the tea, then you will get an idea how long you need to let the lace steep. The top lace is what I started with and the middle lace is how it turned out after dying it. It's very close to the main laces' color.

This is the lace trim pinned to the neckline. It's a tad bit darker but I think I am going to sew some pearls to it . I sort of like how it stands out a tiny bit. It looks like antique lace now. Also when the trim was still wet I shaped it around the neckline and it was so much more pliable than when it was dry.

I got this information from an out of print book which is known in bridal sewing circles as THE best book on bridal sewing and is available here: It just seems to keep going up in price. I hope they will reprint it.


The next day.. Well Maria came by and we both decided the lace was too dingy so I soaked it to get some of the tea out. Here is how it looks now:

Monday, March 7, 2011

Feather headpiece

I'm thinking of making a feather headpiece for Marias' dress and here are some great ones I'm being inspired by:


Which one is your favorite?
P.S. If you have any headpiece photos you would like to share click the Facebook Badge in my sidebar and post them On the Sewcountrychick wall.


Friday, February 25, 2011

Marias Dress: Coming Along

It's been raining buckets today so I've been stuck inside the house all day . Today I attached the lace to the finished bodice of the wedding dress.

 First I made a muslin pattern to use to trace the lace bodice . It had to be sewn together first and then pinned to the lace.


I traced around the pattern with contrasting colored thread basting. You don't want to cut out lace like you would regular fabric since an applique seaming method is used. I then pinned the lace to the bodice and trimmed it and basted it to the bodice. You want to leave at least an inch and a half allowance outside the threaded tracing to give yourself some working room.


A pinned on sleeve. I think I will make it a little shorter. On closer inspection I saw that this sleeve had a little hole in the lace. I'll have to cut a new one. Now I need to find some trim to add to the neckline..
Related Posts Plugin for WordPress, Blogger...