Image Map

Thursday, May 30, 2013

Announcing Fabric Weekend 2013 !


         Yay! Fabric Weekend starts tomorrow!
And what , you might ask, is Fabric Weekend?
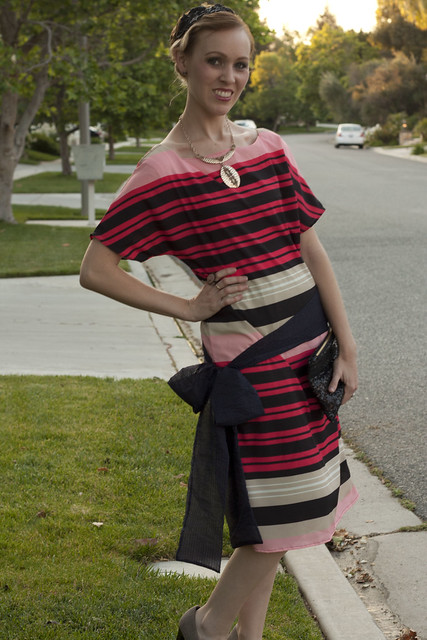
Just a super fun weekend filled with shopping at the Fabric district in Los Angeles with about 20  blog buddies and new to me bloggers I can't wait to meet! The brainchild of Andrea from A Train To Crazy, Fabric Weekend is all about shopping for fabric, getting to know each other, and eating! I look forward to meeting some of the bloggers I've known online in person, and having a regular girls weekend without any kids in tow! Being based near LA myself, and growing up in the city, helping to plan some of these events has been a lot of fun and I hope everyone flying in has a great time in the City of Angels.

Sorry I won't be posting Sew & Tell Saturday this weekend but I do have a Craftsy Class Giveaway up this week. Stop by my post here to check it out.

There will be  a private shopping tour and lunch at of one of my favorite shops I've been going to since I was a kid, Micheal Levine.  Micheal Levine has been one of my favorite fabric shopping destinations in downtown since I was a teenager eons ago. The funny thing about the Fabric district in LA, is that it's one of those places that hasn't changed much over the years. In a city that seems to change it's identity on a weekly basis, that's something I find comforting.
We will be shopping at the new and improved Mood Fabrics store on La Brea,  the funky little mom &
pop fabric and pattern supply shops in downtown, have a tour at FIDM and will be ending the weekend with Girls Night Out, a bloggers dinner party.


They have smoking deals,  and now offer them up on their website Low Price Fabric . 


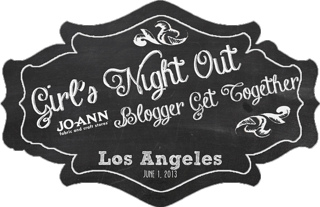
To end the weekend, Jessica from Me Sew Crazy will be hosting her popular bloggers event, Girls Night Out, a dinner party hosted by the generous folks from Jo-Ann Fabrics . The Los Angeles GNO event will be held at Industriel Farm, a swank new hot spot in downtown LA. Thanks Jo-Ann!


Follow Our adventures in fabric shopping on Instagram! 
#GNOLosAngeles #FabricWeekend


If you would like to see more sewing and craft related posts consider adding Sew Country Chick to your rss feed reader. Or follow with Facebook, Twitter, or Friend Connect!

Wednesday, May 29, 2013

Craftsy Class Giveaway: Decorative Seams


I am really excited to be offering a Craftsy Class Giveaway to my readers today!
I love the classes over at Craftsy and the one I'm giving away today looks really interesting:

Decorative Seams taught by Katrina Walker

"Katrina Walker is an educator and designer specializing in textiles, construction and surface design techniques. She also writes and creates designs for publications such as Threads and StitchMagazine.

Work through each seaming technique with Katrina as you build a reference notebook of techniques you can apply to any garment. Katrina will show you the creative possibilities of vintage seaming techniques and design details with stunning inspiration samples. Learn a variety of tailored effects including topstitching, padded and welt seams, piping and double piping, strap seams, lace insertions and more. Design bold garment elements using faux tucks, prairie points and Seminole piecework. Katrina puts it all together in three renditions of the included Vogue Pattern 1329 to show you how decorative seams can transform simple garments."

This certainly sounds like a great way to improve your sewing skills and add to your arsenal of decorative techniques,  doesn't it? I love using piping and have done welted seams, but have never tried faux tucks, prairie points or padded seams! I 've read about these techniques and have to say I'm intrigued.

I like that the Craftsy classes are in video segments so you can watch them over again and come back to the class after you've finished for a refresher. 
Have any of you ever taken one ?
 I have Susan Khalje's The Couture Dress class and Kenneth King's Jeanius class on my to do list.

If you would like to enter simply click here after you finish reading about fabric weekend
and you will be redirected to the sign up page for my readers at Craftsy. Bonne chance mes amis!


If you would like to see more sewing and craft related posts consider adding Sew Country Chick to your rss feed reader. Or follow with Facebook, Twitter, or Friend Connect!

Tuesday, May 28, 2013

Trousers And Shorts: Fitting Tips

Hi readers! 
 Today I'm  doing some fitting on a pair of shorts I 've been working on over the weekend : McCall's 6756
Mccall's 6756

Lately, I've been cutting my patterns a size smaller than the envelope says to, because I don't like a lot of ease. But I could tell this pattern ran smaller just by looking at it so I cut out the recommended size 12. And it was almost too small.
 This pattern actually fit really well without a lot of fiddling, except for the center back, which was riding up. It doesn't have tons of ease like usual. I'm actually sort of shocked my butt didn't fit into them. (I've never been that well endowed in that department.) I guess all those lunges at the gym are working!

shorts fitting McCall's 6756

I have no idea what the official fitting name is for the problem but let's just say kids in California called it a murphy or a melvin when I was growing up. If you have to tug your pants from behind because they keep creeping up you know you have one. And boy did I get them a lot with those high waisted pants I wore as a kid in the  80's....

Ok I just aded my daughter if she knew what a Melvin was and she looked at me quizzically. I explained to her the meaning and she laughed. " Oh you mean a wedgie!" So from here on out I will refer to it as a wedgie.

So how do you fix the dreaded wedgie?

Since every trouser or shorts pattern is going to be a little different, I would advise you add 1/2 or more, maybe 1 inch would be safer,  to your center back and front crotch seams to allow for letting them out in this area if you need to. It's a shame to cut into some beautiful fabric, sew it up, then find out you  have this problem. If you haven't added any extra like I advise at the seam, you can let it out, only to realize you need more fabric but don't have any left . Such a bummer.

As you can see above I had to let my shorts out a good inch to get rid of the problem.

  1. When tracing your pants trace the original stitch line. Your seams will be very wide so you wull be confused where it is if you don't.
  2. Sew up your pants and only baste the center back and front center front seams.
  3. Try on pants.
  4. If they are tugging or riding up let them out in 1/4 inch increments..
  5. Keep letting them out until they fit comfortably.
  6. If you let them out as much as you can and they are still too wedgied, you can try letting out the side seams.
  7. If that still doesn't work then ....hmmm.... next time you need to just add more width to your crotch seams.

If you would like to see more sewing and craft related posts consider adding Sew Country Chick to your rss feed reader. Or follow with Facebook, Twitter, or Friend Connect!

Sunday, May 26, 2013

Woven vs.Nonwoven Interfacings

There are many interfacings to choose from. I'd like to recommend my favorite type when it comes to choosing which interfacings to use for your garment sewing:
Woven fusible interfacings.
It's a light cotton that's backed with glue and is available in both black & white. It also comes in different weights, just like the non woven fusibles.
If you don't live near a serious fabric store catering to clothing construction, you may have to buy it online.

Woven interfacing available online from B. Black & Sons . B. Black & Sons is an awesome shop in downtown LA for tailoring enthusiasts, family owned and operating since 1922.


Fusible woven  is so much nicer to work with than icky non woven fusible interfacings. Plus, it's so much easier to use than the couture method of sew in only interfacings.
Did you know couture sewing forbids the use of any fusible interfacings? In some exclusive sewing circles, the nonwoven fusibles that they sell in most chain fabric stores are considered cheap and tacky. Like drinking Two Buck Chuck with Russian caviar instead of Dom.

But who has hours upon hours to hand sew silk organza or hair canvas onto the back of each pattern piece? A painful and tedious process....I've done it and it's exhausting.

Woven fusible interfacing is a nice compromise. It doesn't give you that weird papery crunchy effect that some non woven interfacings give your clothing, but you can still save time by ironing it on your fabric instead of hand sewing each piece.
Not that non woven interfacings don't have their merits. But I would save them for making bags, crafts and things that don't need to be washed.


Now here is the most important thing to remember to do when working with ANY fusible interfacing , woven or not. I can't stress it enough because it's the reason for lots of my failed projects:

You have to preshrink it.
Soak the interfacing, woven or not in very hot water, then let it air dry....

If you don't, the interfacing will shrink when you iron it on, and slightly over time, resulting in little ripples and twists in the garment. Not pretty. It's happened to lots of my garments in the past and I had no idea why.

This is a blouse I just made and I forgot to preshrink my interfacing. See the little ripples? That's because my iron shrunk the interfacing while I was pressing it.
It's not horrible but it will get worse if I throw it in the dryer.

 How about you? Do you have any tips for working with interfacings?

Is there a method or type you prefer?

If you'd like to read more about the wonderful and exciting ( ahem) world of interfacings here is a handy chart from Threads magazine you can print out


If you would like to see more sewing and craft related posts consider adding Sew Country Chick to your rss feed reader. Or follow with Facebook, Twitter, or Friend Connect!

Saturday, May 25, 2013

Sew &n Tell Saturday 5/25/13

Welcome to Sew & Tell Saturday
We have some lovely projecst featured this week!

A pretty summer blouse made from a  40's pattern by Farmhouse Garden.

Original design dress and jacket by Amy Stebbins.

Adorable Burdastyle skirts from Used to bees.

Cute upcycled bed sheet dress accessorized with a pink cast! McCall's 5613 by Amy from Sews N Bows.
If you would like to see more sewing and craft related posts consider adding Sew Country Chick to your rss feed reader. Or follow with Facebook, Twitter, or Friend Connect!

Thursday, May 23, 2013

Peplum Top and Floral Pants: Sewing My Basic Wardrobe


OK, these stretch floral pants don't exactly count for being basic but if I wore them with a black T shirt they might be, right?
The peplum top is a great basic. I'll probably end up wearing it with jeans a lot.
The top is made from double knit I bought at Britex in San Francisco and the pants are made from stretch cotton woven from Mood in Los Angeles.

These are the second and third projects I have sewn from my recommended pattern picks for a basic wardrobe post:
Simplicity 1696
Vogue 8813
I recommend both of these patterns because the instructions are excellent and the fit was good without many adjustments. I cut a size smaller than recommended for my measurements as usual, a size 10 instead of a 12, and everything fit almost perfectly out of the envelope.
The pants have extensive instructions on fitting and come with one inch seam allowances to allow for adjustments. I also sewed a zipper fly, my first time, without too much trouble.

However, the peplum top recommended facing the neck and arms with bias tape and top stitching. I traced the pattern and made old fashioned facings instead.


I'm trying to take more care with my sewing and one of the things I am trying to do is remove ANY SIGNS OF STITCHING from my outer garment. I was taught to sew in a time when machine stitching on the outside of a woven garment was a sign of poor quality, unless you were wearing jeans and knit clothing items like T shirts.

The hems on fine clothing were always supposed to be invisible. I'm always a little taken aback when a pattern tells me to just turn a hem over twice and stitch it down with my machine.
Since most home sewing machines don't exactly do a great job of top stitching, mine included, a machine sewn hem always looks a little shoddy and "homemade" to me.

BTW, I need to tack down that neckline facing! Sewing things the old way takes more time but if you are interested in really getting good at sewing it's worth it. I have a few sewing books printed from the 1940's to the 1960's that I like to consult. Get an old sewing book and you can't go wrong!

Walk into any designer boutique and look at clothing from Chanel, Valentino, or Gucci. You most definitely will never see a machine sewn hem.

So I'm surprised patterns recommend this shortcut instead of doing a hem the right way, which is a blind hem or a catch stitched hem.
Just my two cents here, readers!
I used an exposed zipper on the back of the top. It's a little hard to see but I like it!
I'm entering this outfit into the Project Sewn Sew Along Pool. The challenge is 80's fashion. The peplum top and the floral pants were huge trends in the eighties. I know because I'm old enough that I actually wore both. I've heard the saying that "If you are old enough to have worn a trend the first time around you shouldn't be wearing it again". Well I say, go for it!


Here are some nitty gritty details:
Side pockets, zip fly, bias bound waistband, belt loops, mock back welt pocket.
Self fabric top facings, hem tape used for the hems on both the top and the pants. I love hem tape.


If you would like to see more sewing and craft related posts consider adding Sew Country Chick to your rss feed reader. Or follow with FacebookTwitter, or Friend Connect!

Tuesday, May 21, 2013

Vintage Fabric Square Pillowcases And A Pink Bed

 I am finally finished sewing for Lily's room.
Hooray!
Bunny is very old. Lovingly handmade perhaps a hundred years ago and dressed in antique calico grain sack fabric.
 I have loads of vintage fabrics I have collected at various flea markets over the years and I'm on a mission to use my fabrics and finally enjoy them!
These pillowcases were so simple to make but I have misplaced the directions I wrote for how to make them.
Perhaps I'll write a tutorial when I find my little sketchbook....
I have a nice little sketch book to write all of my ideas in but somehow I am always losing it.

The quilt on lily's bed is an old piece I bought at a flea market in a small French town called Isle Sur La Sorgue. I bought it when she was one, thinking I might someday use it on her bed. I have always loved it and it's perfect on the old wood bed, which I recently painted a cheery pink.
It had been previously painted white with a "Shabby Chic" finish, but over the years it had become more shabby than chic, with marker drawings and all sorts of nonsense scribbled on it.
I was tempted to leave it as a memory, like the wall I have in my kitchen with all of the kids heights marked on it.
But the urge to paint something pink was stronger.

A quick reminder that my ShotRockers online digital photography class giveaway is still going on. Stop by here to enter!

Monday, May 20, 2013

Sewing A Stylish Basic Wardrobe: Spring / Summer 2013


Has your sewing expertise grown to a level where you are making your own clothes and loving it? But do you find yourself impulsively buying your fabrics and patterns, creating garments, but none that really go together? This is a common problem for those of us who make our own clothes. I'm also guilty of  sewing "the icing on the cake" when it comes to sewing projects. Bold patterns, colorful items that I don't exactly know how I am going to pair together. I have made lots of flowered dresses, but only one in basic black one, which gets worn the most. I get so distracted when I shop for fabric!
What to do?
 Make a SEWING PLAN.
Create  mini collection of basics that you can build on and that you can add to with pieces of colorful, fun pieces you may have already made. And bring your list of patterns you plan on making with you when you go shopping for fabric so you can focus.


My Must Sew List Of Basics:
Below is a list of basics every woman should have in her wardrobe from the April 2013 Harper's Bazaar issue.
 I'm substituting  how to sew the basics instead of where to shop for them.

A plain, neutral colored pencil skirt:
You can make it in a black stretch woven, a khaki woven or even in denim, depending on your wardrobe. I would recommend sewing it in a stretch twill. It's durable and comfortable to wear. A woven cotton pique is also a nice choice fro summer.
Two pairs of trousers:
One in classic black. I would sew these in a stretch woven twill. Stretch cotton pique would be cute for summer.
A more trendy pair, perhaps a tuxedo style pant or in a bright color. Or even try a floral print.
A Pair of Tailored Shorts
You can sew these in a basic color or go wild with a print. Some fun options for summer might include cotton lace over a lining, a super bright color, a floral print, or something more classic like seersucker.
Two dresses
A little black dress which will be a basic wardrobe staple you should sew in a timeless style.
Another more festive style in a print. Maybe a maxi style, always nice in summertime.
Three to Five Tops:
Two silk blouses
One button down
Two knit tops
My Pattern Recommendations For A Basic 
Handmade Wardrobe
Spring Summer 2013

Pattern recommendations for the pencil skirt:

Pencil skirt patterns you can buy:


Basic Slim leg trouser pattern:

I have just finished this pattern in a stretch floral and will be blogging about it this week. I highly recommend this pattern. I like this pattern because it gives lots of info on how to fit your pants properly. The pattern is a bit more advanced with slash pockets and a center zip fly. But the instructions are very thorough.

Tuxedo Trouser Pattern


Tailored short pattern:


Basic peplum top pattern

This peplum top in a solid color and sewn sleeveless is a fashionable and flattering choice for your wardrobe.
I would sew it in stretch woven cotton or double knit.
I will be blogging about his top later this week. I made mine in double knit with an exposed zipper.

Dressy blouse pattern

This makes a dressier top for summer and would look great with a pencil skirt or even jeans.
I would sew it in a silk print and I have. To see my version click here.

Basic Button Down Top Pattern
I like this pattern choice for a button down because it comes with cup sizes, an awesome feature!
For summer, I'm planning the sleeveless version in chambray.

A dolman sleeve knit top. That sleeveless top on the bottom right would look great on most people! I love tops that have a draped neckline.

Knit dress patterns for summer
I love the ease of throwing a knit dress on when it's hot out.

This little knit dress would make a great LBD to wear in the summer time.

Simple maxidress pattern

To see my version of this pattern, click here.

I have been loving the McCall's patterns this season, as you can see! They just seem to very fashion forward lately.
How about you? Do you find sewing basics boring and only like to make the fun stuff, too?

Saturday, May 18, 2013

Sew & Tell Saturday 5/18/13


Welcome to Sew & Tell Saturday!
Thanks for dropping by to post your sewing projects and to check out some new talent!


Here are the featured sewing artists from last week:

Great Gatsby Dress by Bethany of Lil' Bit & Nan made with an altered McCall's pattern. Did any one else participate in The Gatsby Challenge? What a fun idea!
Vintage sheet skirt made from the Miette pattern by Marie from A Sewing Odyssey
Tutorial to turn plain pants pattern into cuffed capris by Veronica of Sew Very from the Hosh pants pattern.

Scarf collar top, a Jalie pattern sewn by Sewing with Shirley

One shouldered dress,McCall's 6547 from Judy at Sew Blessed Maw
Feel free to garb a button!

Photobucket


Photobucket


 I'd also like to let you know about a giveaway I have going on from my last post. It's a full months' worth of online classes on how to improve your photography from Shot Rockers. I learned a ton from this course and I know you will too. To enter to win a shot at this class which sells for $119 you can follow this link after you post your projects!


Related Posts Plugin for WordPress, Blogger...