Image Map

Sunday, July 31, 2011

PatternReview Online Class Review

I have to recommend a class I have been taking on patternreview.com. It is called "Bust Adjustments"
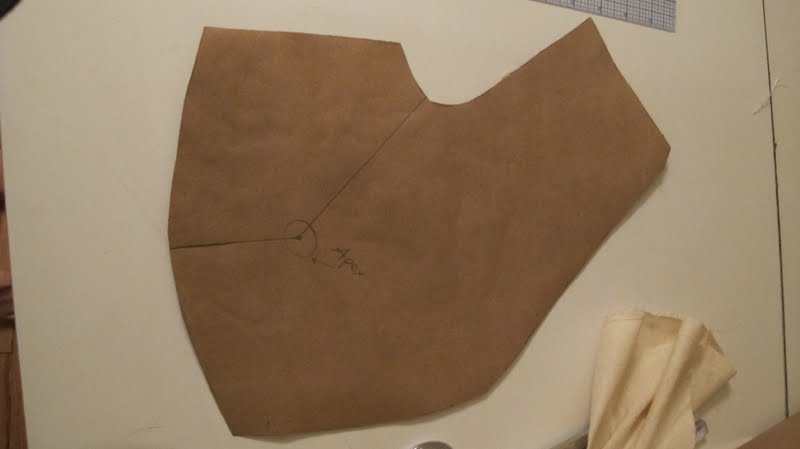
A pattern after a full bust adjustment
Here is a description of the class from patternreview :

"Most commercial patterns are developed for a bust with a B cup. If your bust size is larger or smaller than a B cup, it's probable that you will need to alter your pattern to reflect your bust size. If this is your situation, making a full bust adjustment (FBA) or a small bust adjustment (SBA) to the pattern puts you one step closer to getting a pattern that fits.
In this 7-lesson class, you will learn the concepts of making a FBA and SBA, as well as how to actually make the pattern manipulation for side bust darts, armscye princess lines, shoulder princess lines, and bodices with raglan sleeves. Several variations of the traditional FBA/SBA are included. In addition, one lesson will cover the basic patternmaking practices of truing dart legs, walking seams, and making parallel darts."
Anyway, it has  been invaluable in walking me through the whole pattern adjustment process. Full bust or small bust adjustments are actually pretty simple after taking this class. Sarah Veblen is the instructor and there are lessons, question boards and online chats. The class is about 30 dollars but it's well worth it as I have gone to many blogs and not found something that was easy for me to understand.

Photobucket

Friday, July 29, 2011

We Interrupt This Sewing Blog For Project Runway, Episode 1 Season 9

So Project Runway had its first episode last night. Lily and I were at the TV with a big tub of popcorn. 
Episode 1 Challenge :
 Creating an outfit from your jammies and the bedsheet you slept on.
I hoped they washed this stuff first...
  I just finished a vintage bedsheet dress, but the contestants didn't have such a cool sheet to work with. Instead, they had plain grey or white poly cotton blend sheets to dye with some provided dyes. I was really impressed by the  former Miss Trinidad and Tobago, Anya Chee who has only been sewing for four months. Her pants fit great and the top was really cute. 
Anyas palazzo pants and silk blouse made from her nightgown.
My favorite contestant last night was Burt Keeter, the 57 tear old recovered alcoholic who had stopped designing in 1992 after his partner died of AIDS. In the 70's he worked for  heavyweights  Bill Blass and Halston, although in what capacity they don't say. Everyone loves a comeback! His dress was made from his boxer shorts and a bedsheet  and was pretty good! However, what is up with all the  super short skirts and dresses?  I can't help feeling those outfits would look better if they were just a wee bit longer. I mean one of the contestants was praying the butt cheeks of his model wouldn't come out of the skirt!  They had a sheet to work with, not a pillowcase.
Burts' dress made from his boxers and his sheet.
Burt Keeters's winning outfit made from his gingham boxers and a bedsheet. I think this skirt is way too short and would look a lot more chic if it was a little longer. But I love the draping around the bodice.
And last but not least, this weeks losing outfit:


Photobucket

Thursday, July 28, 2011

Collette Oolong Pattern: Pattern Tips and Bias Sewing


My Pattern Tips
On Sewing Bias Grain Pattern Pieces:
If any of you are considering buying and sewing this pattern, here are some tips I found that aren't listed in the included directions. I learned these tips from a class I took with Master Couture Sewing Teacher Susan Khalje.
Working with bias can be tricky.
 Make sure you lay your pattern on the true bias before you trace and cut.
As soon as you have cut each piece of bias pattern, draw onto the pattern piece or thread trace your seamlines. I use a light pencil or a water soluble marking pen.
Why trace seamlines?
Once you stretch and press your bias pattern pieces as directed to by your instructions, seamlines can shift. A 5/8 seam stretched on the bias can mysteriously turn into a 1/2 inch seam. If you don't mark your lines, and use your machine guide and still sew at 5/8 allowance your skirt will be too small, comprende?
Stretch your pattern pieces out and iron them with steam before you sew them. This helps prevent some but not all of the wierd stretching out that often happens when a bias cut garment hangs for a few days. Also stretch each piece slightly as you sew it and don't forget to press each seam after you sew it. The pattern directions say to hang each pattern BEFORE you sew but that isn't necessary. 
What IS necessary is to hang your finished dress for about 2 days before you hem it because it may stretch a little more and it often stretches more on one side so you dont want to hem it until the fabric has relaxed.
Notes on The Pattern.
When connecting the bodice to the skirt in this pattern, the booklet recommends folding the pattern over and topstitching it, creating a welt seam. I wouldn't recommend this. It looks sort of homemade this way and creates what I thought was a weird looking tuck. I also don't like to see a lot of machine stitching on the outside of a dress I make because I think it can look shoddy. I  sewed the skirt to the bodice in the normal way, right side to right side, and felt it looked better and was less work.
I turned the sleeve pattern into a cap sleeve because the pattern was too tight around my arms. It was a size 4. I just chopped the pattern shorter.
Problem with the back bodice pattern piece:
When you cut out the back skirt pieces and sew them together and then sew it to the back piece you will get a funny gap because the back bodice piece is straight on the bottom and not curved to match the skirt piece. I had to alter the back bodice pattern piece to remove this extra fabric.
Thanks for reading and I will post some photos of this dress on me soon! I like to see dresses on models but I was too lazy to get dolled up today.
Photobucket

Tuesday, July 26, 2011

Stop Staring Dresses and Making a Nautical Knit Sheath


I love this line of dresses by Stop Staring shown above. They are retro yet still feel fashionable to me. How do they achieve this fit? By using fabrics with some stretch in them which make them easier to sew up and fit because of the stretch.  For those of us into sewing vintage patterns, it's a bit like cheating, but why not try to make one anyway? They have to be much easier to make than your standard vintage bombshell dress pattern which must be fitted perfectly with lots of darts and things. Stop Staring dresses come in sizes small, medium, and large, which you would never find in the fitted, woven dresses from the actual forties and fifties. I want to make a sheath dress with a fit like this so I have been trying to figure out how I am going to do it.
Stop Staring is actually adapting looks which  probably have already been designed but what they DO do differently is use the fabrics with stretch in them. I could just buy one and copy it but that would make it too easy, wouldn't it? 
 I'm thinking if I use a stretchy, woven fabric like a stretch twill or bengaline, and a vintage pattern, but cut the pattern in a smaller size to account for the stretchiness, that might work.
On My Sewing Table
 I am working on a simple stretch dress right now. It's going to be a navy and striped sheath and it was inspired by this week's nautical theme over at the Sew Weekly.  I can hopefully finish this before my trip on Saturday.
My fitted Sheath Project:
Vogue 8689
I am using the Vogue pattern which I made in black here as a base for my sailor design I am working on as a part of the Sew Weekly Challenge. I'll be using a navy stretch double knit for the skirt and a navy and white striped stretch cotton knit for the bodice for a sailor look. 
Starboard Dress Modcloth
Of course I'm a bit late in the summer for a nautical dress!
Now dear readers, Have you ever made a dress from a pattern meant for normal non stretchy woven fabric out of knit fabric? Did it work out?


Photobucket

Sunday, July 24, 2011

Collette Crepe and My Alfa

We took our 67 Alfa Romeo Giulia Sprint out for a drive yesterday. This old gal only makes a rare appearance around here because she isn't kid safe and her clutch is a tough one to operate. I liked how the red complimented my Collette Crepe, which I am modeling for you here. If I make it again I will make the neckline lower.
Click here for my review on this pattern.


This is my one of my lovely daughters who you have probably seen modeling the clothes I make. She was a baby when we bought this car and now she's old enough to drive it! She'll be sixteen in two weeks. 
Photobucket

Friday, July 22, 2011

FBA on Collette Oolong pattern And Hideous Pictures!

This is one of a few posts about my adventures or misadventures in sewing and fitting the Collette Oolong pattern.

I sewed up the size 4 bodice. It was too tight in the bust . Once the center front is gathered up it would  be way too short.This is one of the reasons I started sewing for myself. Dresses never fit me in the bust.
 I probably should have just tried a size 6 but I had the bright idea to go and do a Full Bust Adjustment on the pattern. Here is how I did it:
Take your upper bust measurement then your full bust measurement. The difference between the two is your cup size. My upper bust is 33 and my full bust is 37, giving a 4 inch difference : A D cup Pattern adjustment.
Here is how you determine your cup size.
1" or less: A cup
around 2": B cup
around 3": C cup
around 4": D cup
around 5": DD cup
Here is the amount you will have to slash and spread your pattern at the apex to allow more room for an ahem, ample bust.
These measurements are based on altering your average size B sewing pattern.
 For a C cup - 1/2", for a D cup - 3/4", for a DD cup - 1".
Now Collette patterns are drafted for a C cup instead of the usual B so I may be making this a bit too big. But it felt pretty tight so I am going to follow the chart recommendations.
Creating the new pattern:
On your muslin you tried on mark your apex.
Now trace your muslin onto paper .
With a ruler mark a straight line from the waist to the apex, then from the apex to the armhole.
Cut the lines and open up your pattern. I opened mine till the apex cut was seperated by 3/4 of an inch.
Tape paper under the cut part of the pattern.
Your waist will be longer on the altered side to give more room for a full bust.
Take your original muslin trace the waist and redraw it on the unaltered part of the pattern. it will be longer now. But not longer in the side seam.
Do you see how my new, altered, pattern is longer and wider now?
Now before I cut out the new pattern I have to figure out what I am going to do with the extra fabric I now have at the bottom of my bodice pattern. It won't match the width of the skirt because it's wider now. I am going to have to lose that extra inch and a quarter that was create by the FBA.I will create small gathers under the bust line.I think that would match the pattern better than a dart.
Now I have to cut two new muslin fronts. I mustn't forget to lay them out on the bias.
I will sew them to my original back muslin piece.

This is bigger now. It's going to be gathered up the front so it will be shorter but I can see I'm going to have to scoop out some excess length from the bottom. 
Next post : Fitting my altered muslin.


Photobucket

Thursday, July 21, 2011

Simplicity 2886: Sewing With Bedsheets


I was inspired by Sew Weekly's Make This Look Series. A cute dress from a shop is chosen and a pattern is picked out that might resemble the dress. I wanted to make an empire waisted sixties style like the cute polka dot dress above, but with an old bedsheet .


Here is my almost finished version of Simplicity 2886 . I still have to add a horsehair braid trim at the hemline to make the hem flare more stiffly. But first, I need your help. Should I leave the waistband plain  or add the white flowers? This dress is going to be worn by a teenager. I don't think this pattern looks much like the polka dot dress from Boden. I would have to lower the neckline and change the skirt to a flared a- line without pleats.

This dress was made from an old sheet I bought at the thrift shop. I soak old sheets in Oxi Clean to remove any old stains or odors. Yuck!
I cut some bias strips from green poplin ironed them in half, and ruffled them to create this pocket ruffle which was sewn down to the pocket before the pocket facing was added. 
I sewed a hand picked lapped matal zipper. I have a collection of old metal zippers and I love them. They give a vintage style project a really authentic feel.
This dress was underlined with white cotton. I will put the horsehair trim inside the hem allowance. In couture sewing, dresses are often underlined because it gives them nice body. You can sew your hems and facings down on the underlining fabric part only, so you don't have any thread marks on the outside of your garment.
So please help me, with the flowers or without?
Thanks!

Photobucket

Wednesday, July 20, 2011

Butterick Walkabout Dress Pattern Winner


There were 52 entries for my Butterick Walkabout Dress pattern giveaway. We wrote all the numbers on little slips of paper, Lily put them in a canister, shook it and chose the winning number.
The number was 10 so fellow sewing blogger Little Betty won!
She makes herself and her toddler some really cute creations and you should drop by her blog for a visit!
 I will be shipping this pattern off to lovely Australia where it happens to be winter.
Photobucket

Monday, July 18, 2011

My Blue Mason Jars


I found some old blue Mason jars at a yard sale. I just made several batches of jam but didn't want to use these jars because they are so pretty! The orange jam color didn't look very nice with the blue jars so now they are lovely vases. 
I put some of the jars outside on the picnic table which I covered with an oilcloth tablecloth I made.
The others are on my windowsill flanking my Anthropologie number 2.
P.S. Stop by tomorrow for the results of my pattern giveaway if you entered. Lily will be picking the winning number out of a Mason jar!
Photobucket

Sunday, July 17, 2011

Yellow Gingham Collette Crepe

This is my version of Collette's popular Crepe dress pattern.
I chose the sweetheart neckline pattern version, adding piping and lace trim to the neckline with a white sash  trimmed with the lace. The fabric is vintage and was donated to me from a man clearing out his mother's fabric collection. It's a bit stiff and will hopefully soften up with washing.
 
Most wrap dresses open from the front. The Crepe pattern opens from the back as you can see.  Personally I love this because I am always having to tug at the V on my wrap dresses as they tend to gape open at the bust. Sometimes I even safety pin them.

Like most wrap dresses, there is a little opening on the side to pull one side of the tie through. Can you see the arm facing popping out? They will have to be basted down.


Observations about this pattern :
I would recommend underlining at least the bodice of this pattern. Because the facings are rather short they should really be basted down and if there is an underlining they could be basted to the underlining without the stitches showing on the outside.
I will to do a full lining on the bodice if I make this again, eliminating the hassle of the facings.
The bust of the pattern runs pretty large. I usually have to do a bust adjustment patterns on most commercial patterns. If you are smaller than a C cup this pattern will probably be big in that area and you will have to adjust the pattern. I also think the  pattern sizing may be a bit generous . I am a size 6 and had to make this in a 4 and I think maybe even a 2 would still fit.
In conclusion this was a fun dress to make and I would recommend it for a beginner as there are no closures to deal with!
The sweet little instruction booklet really holds your hand through the process explaining everything in very easy to understand terms. I can see why these patterns are so popular. It took me a while to jump on the bandwagon as I never buy patterns at full price and balked at the eighteen dollar price tag for this pattern!
Photobucket
Related Posts Plugin for WordPress, Blogger...