Image Map
Showing posts with label vintage patterns. Show all posts

Thursday, July 4, 2013

A 1941 Sailor Girl Dress: Darla's Day Out

Today in The United States Of America we celebrate Independence Day.
Our family will be visiting with friends on the beach in beautiful Malibu, attending a cookout in the afternoon, and then watching the fireworks from the pier!
I though I would share one of my all time favorite patriotic sewing projects from my archives.
The 1941 Sailor Dress from April 2012....
Let's pretend.
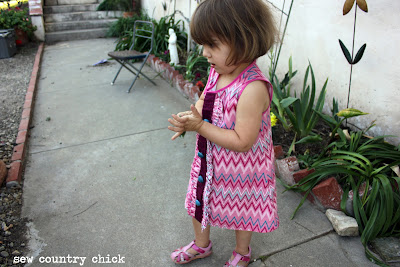
It's 1941 and this little girl's daddy is a soldier coming home on leave today.
Her name is Darla.
Mommy and Darla came to the station early and Darla wants to look at the train tracks!

Darla is wearing her best dress made by mommy especially for today.
It is so patriotic, isn't it!
Mommy and Darla took a special trip to the city to buy her new leather shoes as well.
The man in the shoe shop gave Darla a pinwheel and she loves it.
Darla also loves to go to the train station because it's fun to explore there. Mommy often takes her out for an ice cream on days like this too.
She has such a nice mommy, doesn't she?
This is an old farming town and only one train comes a day so Mommy lets Darla play around the tracks.
Things were a lot different back then!
Children Darla's age played unsupervised outside for hours and no one called Child Protective Services!
Darla loves to find pretty rocks.
Darla also loves to play with her pinwheel. Lucky for Darla there is a nice breeze so her pinwheel affords her endless amusement!

Darla is starting to get weary of waiting....
There is the train off in the distance...

Daddy will be here soon!
Hip, hip, hooray!!!

Back to reality....
I used this pattern from 1941.
Read More....

Friday, May 18, 2012

Les Petites Souers: My Signature Look? Vintage, French and Refashioned


I love creative challenges because they sometimes make you dig deep to figure out who you are creatively. Of course, as creative beings we are always changing but for me, there is one influence which often guides me.

I have been deeply influenced by France. When my older kids were little we bought a small 16th century village house in a town called Pezenas in the south of France in the Languedoc departement  and restored it. I was lucky enough to spend six summers there. They are some of the best memories for me.
I loved to sit in cafes and I loved the style of the French. Yes, they do really wear these striped tops ! I brought back some for the family and we have worn them out.

This dress I made for Gigi was inspired by the French Mariniere top originally made for French sailors.
It was made from a plain white adult t shirt I refashioned. I hand painted the stripes and added the small wooden anchor buttons.

The bistro chairs and table are from a real Parisian bistro and they are very old. I bought them in a little village called Isle Sur La Sorgue, which has a big outdoor antique show every August. 
The Ricard Pastis bottles were also brought back in my suitcase years ago. I used to love sitting at the Cafe Moliere in Pezenas to have a glass of the cloudy milky colored Pastis in the heat of summer.it was clear in the bottle but when mixed with water, it turned white. The licorice taste is such a specific one. It's so refreshing, mais tres forte!


This little dress was very time consuming! Painting the stripes took awhile but I love it!

Lily's ensemble is sewn from a 1943 sewing pattern. The shorts are made from vintage denim I bought at an estate sale . The fabric is a Japanese knit. I loved the hand painted look of the stripes. That and a post about hand painting stripes on fabric from one of my favorite children's wear bloggers You and Mie, inspired me to try hand painting the stripes on Gigi's t shirt dress .


Une belle jour chez nous!
P.S.
If you are stopping by to post on Sew & Tell saturday, sorry I didn't get the post up. This project took me until the last minute!
Have a bon week- end!
Pin It Photobucket

Wednesday, May 16, 2012

1940's Romper For Me And Springtime In The Garden

The past few weeks I haven't made much for myself and I felt like making something fun for spring.
I have always wanted to make myself a romper so I did.
I have been working away on projects for Gigi and Lily's spring collection, entering them in The Project Run And Play Flickr pool and I have yet to win a challenge over there! It's good fun, anyway. This is the last week so hop by and check it out! I will be posting my project on Friday.
 I also have some guest post tutorials I am working which I am pretty excited about!
The weather has been gorgeous and we have been spending a lot of time outdoors with Gigi, our almost three year old, trying to savor the brief time of her early childhood while her siblings are at school. It goes so fast...

I have to show you one of Richard's roses. He is an amazing gardener.

Fun in the garden this week....

watercolor fun...

learning to catch the ball...

watering the tomatoes..... or is it tomatos?
Back to sewing now....

I quite like how my romper way turned out, as you can see from my pleased expression above.
Yes, I am over forty and  and no I don't give a hoot if people think over 40 is too old for a romper!
The description on the pattern from the 1940's describes this outfit as a "playsuit". Somehow those two words, playsuit and romper do feel a bit too, juvenile perhaps?
How about short suit ?

It was sheer luck it happened to fit almost perfectly as I cut it straight from the pattern and didn't fit it first. I wear a size 16 in 1940's patterns. After getting over the initial shock of wearing a size 16 in anything, I have realized that any size 16 patterns from the 40's always fit me pretty much perfectly and I rarely have to adjust them or make a muslin. 
Love that!
I usually have to adjust modern patterns a lot.

There is a tiny gap below my waist. I'll have to add a hook and eye or cut down on the bread!

I love how 40's patterns fit with the high waistline. And I love the sleeves from the forties!
I will have to wear this "playsuit" on my confident day as it is very LOUD!
The fabric is a vintage madras I had in my stash that I bought for around two dollars.
Once again, I was lucky as I didn't lay out my pattern on the fabric to see if I had enough. As it was, I had to piece together the scraps left to make the undercollar. I had literally NO FABRIC left after I cut all the pieces.

This is our dog Milo. We call him Smilo as you can see from his cheeky grin!

Pin It Photobucket

Monday, February 27, 2012

Vintage 1942 Pattern: Raspberry Wool Toddler Overcoat


I'm finally done with Gigi's overcoat.
Just in time for spring and summer !! 
This was a long project and since it was pretty tedious, I only did a little at a time so it took me over a month to complete it.
It's so much easier to just whip up a quick tunic knit dress but projects like these are really satisfying once they are done, if they ever do get done. And if it still fits your kid by the time you are done.
McCall's 5315 1942
I found this pattern at a flea market in Seattle for two dollars. I have always wanted to make an old fashioned child's wool overcoat. I was going to make a little hat but Gigi would just pull it off.
When I opened the pattern I was a little shocked at how complicated the directions were to make a toddler's coat. So to add to the complications I decided to do an inner lining on the coat and pad stitch the lapel.
Hand made shoulder pads: check
Flannel interlining:check ( or is that innerlining?)
Fell stitched hand sewn lining: check
Hand sewn prick stitched detail around edges: check
Hand attached lined patch pockects: check
A pad stitched lapel facing: check
All that work and I didn't bother to make sure the sleeves were the right length! ( They are too long.)
Good thing the lining is so cute that the sleeves rolled up look planned that way.
Toddlers love pockets, don't they?
Maybe Gigi is starting to get into the preschooler stage. Not that she will go to pre school yet. But I think she is getting too big to be called a toddler.
( sigh....)


I had some extra fabric left after the lining was cut so I designed this simple little center ruffled dress. I used a shirt placket from my thrift shop pile to put down the center of the dress. It should fit her perfectly by summer.
All the fabrics came from my quickly shrinking stash. The interlining flannel was left over from a Christmas project I never got around to making and the chevron zig zag lining I bought last year for an idea I had to make several little girls dresses to sell that I also didn't get around to making.
Can anyone say sewing ADD ?
I was tired of seeing that zig zag fabric lying in my bin and I'm glad I finally put it to good use. Don't you love that?
 The wool I actually found at the thrift shop on half price day  and the buttons were bought at a yard sale where I found a big shoe box of vintage buttons for three dollars.
Total cost: about $ 6. 50.
 I have been using up my stash at a rapid rate. Good thing because I am going to the garment district tomorrow with a friend. Now I can start hoarding up all over again!

I bought these "Made By Mom" labels in a French fabric shop,
C'est jolie, n'est pas?


Pin It Photobucket

Tuesday, February 21, 2012

Learning About Tailoring


Prince Philip who has his suits made by Norton & Sons of Savile Row
Tailor, Tailoring
Two words that have always intimidated me. Words that conjure up English gentlemen on Savile Row, the bearers of generations of secret sewing and fitting knowledge. The domain of the elite wealthy, those who live in the rarified world of bespoke suits and it's sister,Haute Couture. 
Tailoring was discussed in hushed tones in Fashion School and we never did delve into the intricate details of a tailored suit although we did learn how to draft jackets and drape them. But all the intricacies of the work involved to create a hand-tailored garment? There was a special class for that but since I was 20 and interested in making clubby mini dresses I stayed away from it. So years later, I have yet to make a fully tailored garment. 
Tailors tools circa 1900

To add to the mystique of the tailor, here is a description from one of my favorite sewing books written for the home sewist,"The Better Homes and Gardens Sewing Book from 1961"
"Custom tailoring requires great patience, and precision. It takes years of apprenticeship to master it. This book doesn't attempt to make a tailor of anyone. Only years of working directly with a skilled tailor can accomplish that."
I think words like that would definitely put most home sewists off of the idea of ever trying to make a tailored garment!They create a divide between the home sewist and the trained tailor or fashion designer. But there are a few stalwart souls that might decide to ignore unencouraging advice like this, to say the least.
I can compare tailoring a coat to cooking. The tailored suit is like a really fancy holiday dinner that you plan for weeks and spend  days cooking. The average person does it maybe once a year. There is no reason that with a little self-education that the average person can't cook this way as well. Of course, it might not taste as good as a professional, but it can come close.
 Like gourmet cooking,tailoring is not something you want to rush through and a project can take weeks to complete. Just take it slowly, do a little everyday, and you will eventually finish!The traditional bespoke coat is 85% made by hand so it will take you awhile!
Of course,your first tailored jacket isn't going to be anywhere near as well made as a professional the first few times. But the knowledge you will learn from trying the traditional tailoring techniques will add to your sewing arsenal. 
In working with commercial jacket patterns you can add these steps to create a much better fitting and well made jacket. Most pattern directions won't tell you about all these details and you will have to use a sewing book with a tailoring chapter instead of following the directions in the pattern.I recommend some of the older sewing books as they seem to have more extensive chapters on tailoring.
Here are some common characteristics of the bespoke or custom made blazer or coat. There are many but I will stick to the most common and basic aspects that I have learned about in my study on tailored garments. You can adopt some or all of these techniques to improve your own jackets and coats:
  • Custom fitted and designed pattern for each customer. You can achieve this in your home sewing without pattern making knowledge by simply making a muslin of a store bought jacket pattern and spending some time making adjustments on it so it fits perfectly.
  • Hand sewn canvas or horsehair interfaced facings tacked down by hand with a pad stitched area at the part of the lapel that folds over called the roll line.This helps the lapel lie flat.
  • Two pieced sleeves with hand made pads at the sleeve head and a horsehair strip interfaced to the sleeve hem to make it more stiff.
  • An under collar made of hard flannel cut on the bias and with a center seam.Often the under collar will be interfaced with horsehair canvas as well.
  • Corded or bound buttonholes.Hand worked keyhole buttonholes are also acceptable depending on how casual of the jacket.
  • A full lining attached by hand. Often there will be a smaller pocket on top of a larger welt pocket, called a ticket pocket.
  • Angled welt pockets or hand attached patch pockets.
  • Buttons that are attached by a tiny button on the other side to make the attachment stronger.
If you would like to try your hand at tailoring here are a few patterns that would be great to start with:
Burdastyle # 105 from 10/2011
Burda# 122 A from 9/2011
Burda# 6049 The Ehren for men

I just finished my first tailored jacket.I chose to make a coat for my two year old from a vintage pattern from 1942. I figured that If I made mistakes they wouldn't look as obvious on a tiny garment!
So how about you readers? Have you ever tried a tailored project or is it something you have avoided for years as well? 


Pin It Photobucket

Saturday, January 21, 2012

I Love Lucy : Du Barry 5667 from 1942


If you are visting from Project Run And Play, welcome to Sew Country Chick! Although I used a pattern fo this dress I can assure you I do know how to make patterns if I am chosen. I just enjoy the feeling of working from vintage patterns. I think I can bring a fun flavor to the competition.
Happy weekend! I'm sorry I didn't post Sew & Tell Saturday today. I had a cold and then started organizing  my sewing closet last night and the whole project extended well into the morning and I was tired! But my stuff is organized now and that is a great feeling.
It's been awhile since I have made a vintage pattern and I really enjoyed working with this pattern , Dubarry 5667 from 1942. 
Lily was excited to get a new dress since I haven't made her one since Halloween.
She wanted me to curl her hair for the photos. She looked so cute with the rollers on that we took the pictures with them still in.
 After this shoot we went downtown to have some coffee and chocolate and she still had her rollers on. She got some funny looks but she didn't seem to mind one little bit.
I love vintage children's patterns. Just looking at them makes me feel happy. Children were so innocent and cute looking in the old days. I think Du Barry patterns have some really sweet designs for children. I wonder when they went out of business? Do any of you vintage mavens know?
Something about reading these old directions and making something old new again is fun.
I used my vintage notions. I have a huge collection of metal zippers and buttons bought at yard sales.The fabris new and double sided with ginham on one side and plaid on the other.i bought it for a dollar a yard on the street in The LA Fabric District. It appears to be a cotton rayon blend.
These are tissue patterns, which are surprisingly strong for being 70 years old. They aren't marked at all but the directions are explained really well on the sheet that comes with the pattern. The three large dots on the sleeve represent the grain line. You can also see the dart marks. You are supposed to thread trace them or you can mark through the holes with a water soluble pattern marker.
Pin It Photobucket
Related Posts Plugin for WordPress, Blogger...