
 Here is how to make one of those cute gathered skirts sold in shops like Anthropologie. I am going to try to explain how you can make one without a pattern.
Materials needed:
A sewing machine
a yard of fabric
thread to match a yard of 1/4 inch wide elastic
1/4 yard of interfacing
a tape measure
marking pen
 1. Take your measurement around where on your abdomen you want the top of your waistband to fall. I wanted my skirt to fall just above the belly button. That measurement will be likely larger than your true waist which is up higher. Take that measurement for instance 30 inches and divide it in half for your waistband front and back measurement. Add 1 inch to the front waistband measurement to allow for seam allowance that would be 16 inches for my example. For the back waistband piece which is going to be gathered with elastic so you can get it on and off easily you need to add 4 inches for the elastic to widen and 1 inch for the seam allowance. My example's measurement is 20 inches
 1. Take your measurement around where on your abdomen you want the top of your waistband to fall. I wanted my skirt to fall just above the belly button. That measurement will be likely larger than your true waist which is up higher. Take that measurement for instance 30 inches and divide it in half for your waistband front and back measurement. Add 1 inch to the front waistband measurement to allow for seam allowance that would be 16 inches for my example. For the back waistband piece which is going to be gathered with elastic so you can get it on and off easily you need to add 4 inches for the elastic to widen and 1 inch for the seam allowance. My example's measurement is 20 inches
2. Take some paper wide enough for your largest waist piece measurement. Draw one piece with your 20 inch measurement width and 4 inches long. This will be your pattern piece for the back waistband piece. The front waistband pattern piece is a little trickier. My examples measurement is 16 inches so I drew with my ruler a 16 inch wide by 4 inch long piece. In the exact middle of the pattern piece i marked 1/2 inch below my width line. then I lowered the top width line 1/2 inch also and drew a curved piece with my ruler. If this part is too confusing you can just draw a straight pattern piece. Notice the curved front waistband piece above
 Unfortunately some of my pictures I took for this tutorial were deleted. Sometimes these things happen when you share a computer with your kids. So I will try to give you clear written instructions but if you are a strictly visual person like myself it might be a little tricky.
3. Take your pattern pieces and trace them along the top edge of your fabric. Trace two front waist pieces and two back waist pieces. Cut your four pieces.
4. Take the pattern pieces and trace one front waist piece and one back waist piece on your interfacing and cut out pieces.
5. Iron on interfacing to two of the main fabric waist pieces. The interfaced parts should face the inside of your waist when the skirt is finished because sometimes interfaced things get a wrinkly look when you put them through the washer and its best if that part is facing inside.
Sew the front and back interfaced pieces together along the top width edge. Sew the other two waist pieces together the same way.
6. Now sew your two sewn together waistbands together at the side seams. Press side seams open. Turn the fabric right side out and press down along the top edge. Your waistband is almost completed.
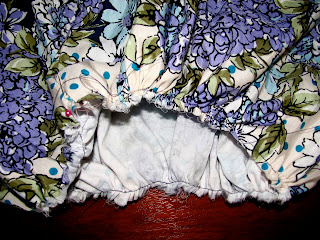
7.Cut 5 pieces of elastic half the width of your back waist band piece. Trace 5 even lines across the inside of your back waistband piece evenly spaced apart. Stretch the elastic pieses and stitch to the lines zig zagging over the elastic. Your waistband will now be gathered.
 8. Cut out your skirt piece. Decide how short you want the skirt to be. I chose 16 inches long. Now just draw two 16 inch lengths along the width of your fabric and cut. I added a lining because my fabric was pretty sheer but you don't have to. Now just sew the two skirt pieces together with a 1/2 inch seamline. Press side seams open. You won't need to finish the seams because you cut your skirt across the whole width of the fabric which means you will be sewing the selvage pieces together and they won't fray. Now press the hem up 1/2 inch and then press another half inch and stitch along the hemline.
 9. Gather your skirt until it is about the same width as the waistband. To gather sew a basting stitch across the top of the skirt. Make sure you backstitched the beginning of the stitch but don't lock the stitch when you come to the end. Pull the end of the thread up gently until the skirt is gathered to the right width. Try not to break the thread or you will have to start over.
 10. Pin the right side of the skirt to the right side of the waist band to together at the side seams and adjust the skirt gathers so they are even all around. Make sure your elastic will be facing inside when the skirt is finished.
 8. Cut out your skirt piece. Decide how short you want the skirt to be. I chose 16 inches long. Now just draw two 16 inch lengths along the width of your fabric and cut. I added a lining because my fabric was pretty sheer but you don't have to. Now just sew the two skirt pieces together with a 1/2 inch seamline. Press side seams open. You won't need to finish the seams because you cut your skirt across the whole width of the fabric which means you will be sewing the selvage pieces together and they won't fray. Now press the hem up 1/2 inch and then press another half inch and stitch along the hemline.
 9. Gather your skirt until it is about the same width as the waistband. To gather sew a basting stitch across the top of the skirt. Make sure you backstitched the beginning of the stitch but don't lock the stitch when you come to the end. Pull the end of the thread up gently until the skirt is gathered to the right width. Try not to break the thread or you will have to start over.
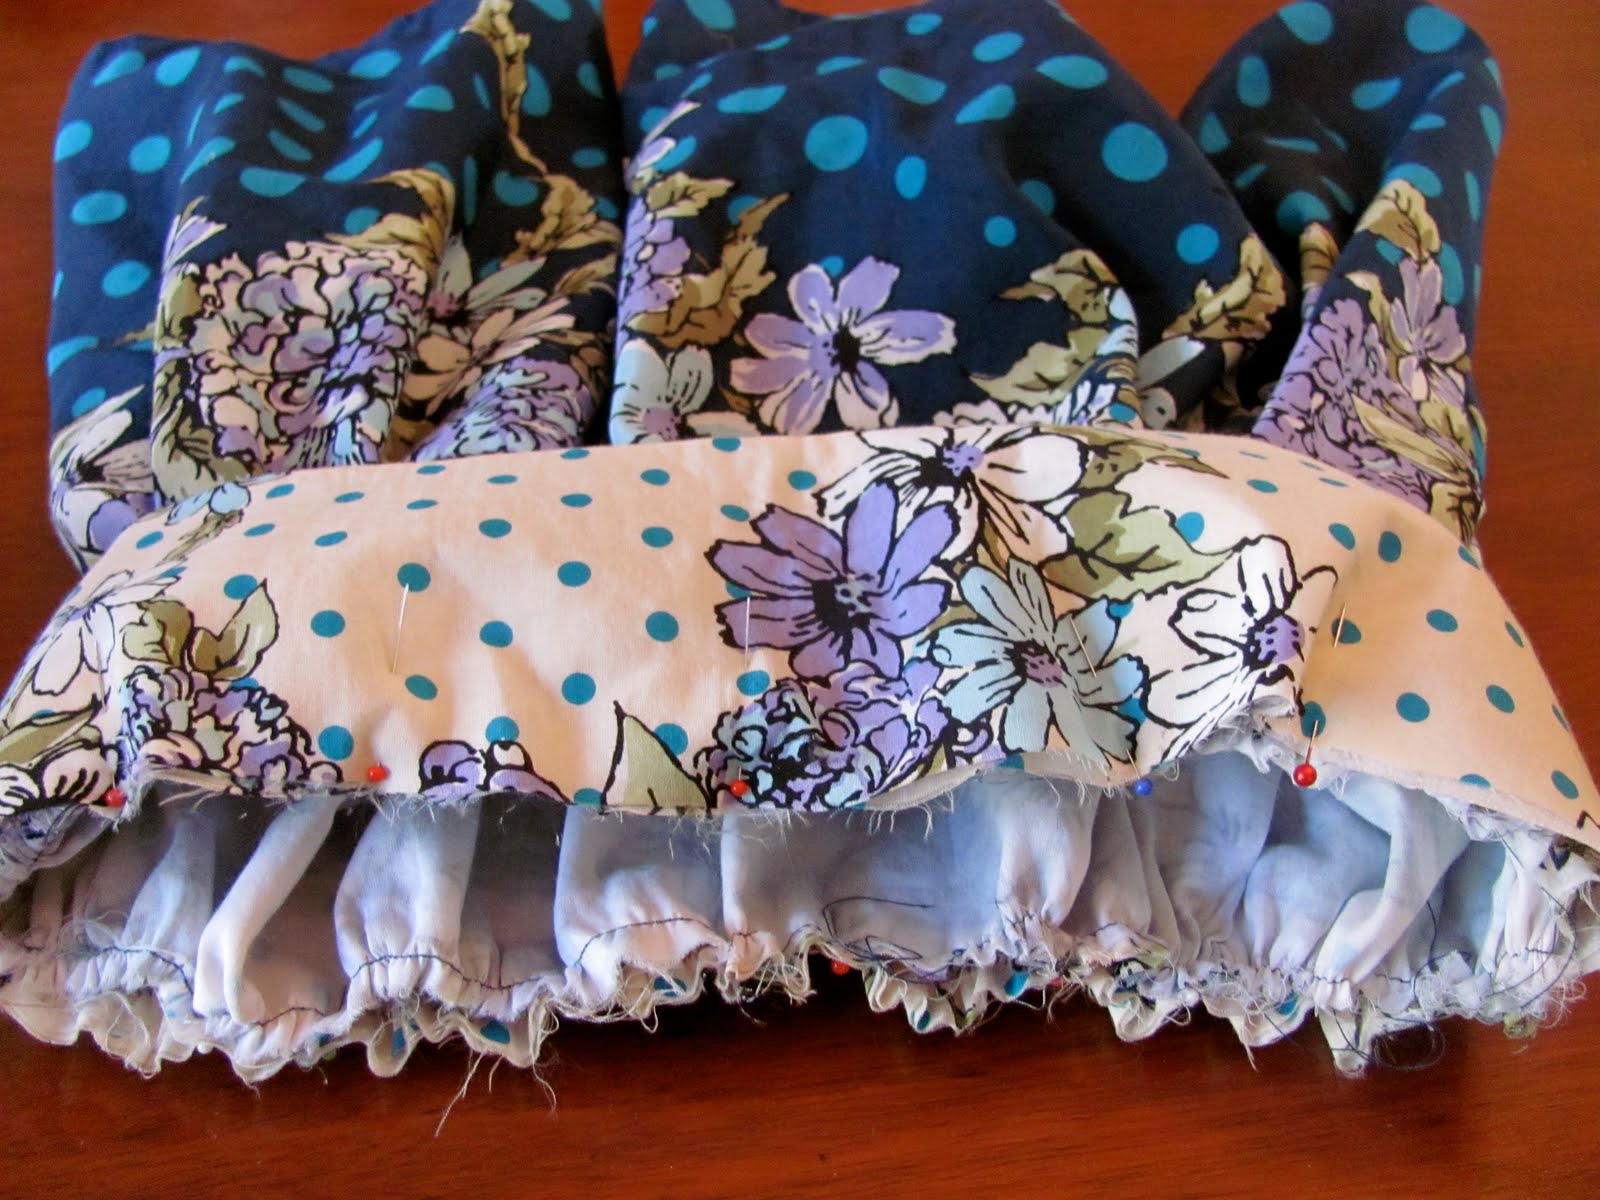 10. Pin the right side of the skirt to the right side of the waist band to together at the side seams and adjust the skirt gathers so they are even all around. Make sure your elastic will be facing inside when the skirt is finished.
 11 . Sew along the edge as shown in the photo above with a 1/2 seam.
 12. I added some bias tape to the inside waist seam allowance to prevent fraying. You could also use pinking shears and zig zag the seam allowance or serge it if you have a serging machine. I have a serger but the thing is such a hassle to use because it takes forever to rethread it when a thread breaks that I just prefer to do everything on a plain sewing machine.
 Voila, You are finished with your skirt! Notice the gathered waist above.
This looks really great! I like the bias tape on the inside waistband - good finished touch. I'm going to try that.
ReplyDeleteWhere did you get the fabric - that's the best part!!
I just about flipped when I saw how gorgeous this skirt was. Thank you so much for sharing with SewSet. It was featured as one of today's top patterns. Just lovely!
ReplyDelete- Jess, SewSet.com
where oh where did you get that fabric?
ReplyDeleteI'd love to hear from you if you have time!
heatherainetrim@yahoo.com
Wow I love the fabric, it really makes the skirt! I love how simple the skirt is too, it really lets the fabric shine through.
ReplyDeleteI never wear skirts but I would wear that one if I had that fabric. So cute!
ReplyDeleteNormally not a skirt wearer but if I could get fabric like that I'd be cutting it out already! So cute!
ReplyDeleteNormally not a skirt wearer but if I could find fabric like that I'd be cutting it out already! So cute!
ReplyDelete.Why would you sew the interfaced pieces together at the top (in your instructions)? Is that a misprint?
ReplyDeleteThanks for the tutorial - cute fabric!
ReplyDeleteBut why would you sew the interfaced pieces together at the top? Wouldn't you sew the fronts and backs together, and then sew them at the sides?
Did I miss the width of the skirt piece for the bottom part? Please, help. I want mine to be as cute as yours,
ReplyDeleteMaria