 , a fancy photo sharing thing.

Friday, July 23, 2010


Paris for Gigis first birthday June 2010

I thought I would post a few of my favorite photos from my Paris trip in June.
Travelling alone with a baby does have its downsides, like being stuck on the plane in a center seat with my squirming 12 month old baby on my lap, next to a man who for some reason was diligently working on an antique Chinese abacus that Gigi could not keep her hands off of. I finally had to tell him that if he didn't want it to be broken and he wanted my baby to stop lunging at him he'd better put it away. He actually ended up being a very nice man even, if he was a Beverly Hills plastic surgeon.
But alas, like a failed love affair, once a trip is over you always remember the magic of the trip and conveniently blur the rougher edges of the adventure.
Above was a photo taken during an evening picnic I shared with one of my best friends' Monique, her husband Jean Christophe, and our babies at the Champs de Mars.

A photo of Genevieve's lost shoe. She lost this shoe many times on the trip and someone would always point it out to me . This shoe was lost after visiting the Yves Saint Laurent exhibition at the Petit Palais. It took me ten minutes of walking to find it and it looked so lost and forlorn on the path I had to take a picture.

Monique , Kissa, Myself and Genevieve at Notre Dame Cathedral.

Genevieve in front of a statue of her namesake, Saint Genevieve,at the Jardin Luxembourg. Need I tell you Saint Genevieve drove the Huns out of Paris in the 9th Century? I couldn't name my daughter after your garden variety martyr! No victims for her!

A Citroen in the road with a flat tire.
I wonder how long it has been sitting there?

The bill at a cafe. It was raining outside and I was alone with my baby.
Au Revoir, Paris!
Monday, July 19, 2010
Kids Sewing Class: Nintendo ds or i phone case
 My best friends' daughter really wanted to learn some new sewing skills . Her little brother asked her to make him a case for his Nintendo DS. We weren't sure how so we found the dimensions of the game cosole on the internet and drafted a pattern.
 This is a great project for tweens because it teaches them some solid sewing skills, for example, pockets, applique, batting , and basic straight seams.
 Above are my calculations for this simple pattern.
Materials needed:
1/4 yard checked fabric.
Scrap of red fabric for 2 1/2 inch pockets and a small shark applique
A piece of cotton batting about 13' by 8 inches
sewing machine and thread
scissors
pins
4 inches of velcro
marking chalk
The nintendo game unit measures 6 inches wide by about 31/2 inches long and 1 1/4 inch deep.
I drew up a pattern for a flap wallet style measuring 7 inches wide by 13 inches long to allow for the flap and the depth of the game unit.
 1. Take your pattern piece and cut 2 pieces from fabric and one piece from the batting.
 2.Sew the batting to the wrong side of one of the pieces
 3. On the unpadded piece mark down one inch across the width with a ruler and draw a line. This line will be for the velcro of the flap. Mark down 31/2 inches from the top width for where the case will fold. Draw a line for the fold.
 4. Make a little patch pocket pattern 3 inches by 2 1/2 inches. Cut 4 pocket pieces.
 5. Iron top of pocket pieces 3/8 inch down to wrong side. Sew two pieces together to make a pocket. Repeat with the other two pieces.
 6. Turn pockets right side out . Use scissors to sharpen the corners. Press.
 7. Sew velcro on the corners of the case along the line you drew one inch down. Sew it more than 1/2 inch from the from the corners to allow room to sew your side seams when you put the two large pieces together. 8. Sew the patch pockets below the fold line open sides facing up towards the velcro.
 9. Fold your case with the top facing you. Measure this area for the applique. Keep in mind you need 3/8 inch all around empty, thet's what the seam allowance will be.
 10. Bo wanted a shark so we pulled one up off the internet pressed control + to magnify it and traced it. Then Amelia cut the shark out of felt.
 11. Pin the shark to the area of the case that was folded facing you.
 12. Sew your applique on the padded part of the case. You can use a straight stitch, a zig zag stitch or a satin stitch. Also at this point figure out where the inside bottom pieces of the velcro should go on the padded piece when it is all put together. Stitch down velcro pieces now.
 13. Pin the two pieces together with the stitches facing this way when pinned right sides together.
 14. Sew together with a 3/8 inch stitch leaving a two inch opening to allow the piece to be turned inside out.
 15. Turn right side out , sharpen corners, and press. Stitch opening closed with a slipstitch or the sewing machine.
 16. Sew down the sides of the case
 17. Close and go!
Friday, July 16, 2010
Farmhouse pic of the Week: Chicken Family
 Daddy rooster and Momma Hen
 Here is a photo of one of our Momma Chickens with her babies. Above is a photo of those same babies before they were hatched. We don't know if this Momma is actually the real Momma or not because we took some eggs that were in a few nests and she just started laying on them until they were hatched. She could probably lay on an ostrich egg and not realize it wasn't hers. She is very sweet with the chicks. We have to keep them separated from the other hens who roam freely because the other hens would peck the baby chicks to death because even though those baby chicks might actually be theirs, sadly they will never know it and creating a pecking order is their first priority. That's why we have to wait till the babies are big enough to defend themselves before we can introduce them to the rest of the group. And I won't even go into what a jerk that rooster can be. If there was a Domestic hotline for chickens this guy would tie up the line. For a long time we didn't have a rooster because hens will still lay their eggs whether or not a rooster is around. For some reason though they seem to lay more when the fella is there. Richard was over at this old Mexican Rancher's place named Alfonso. Alfonso grows mostly cactus to sell in the local markets to eat but he also has a side business selling chickens. I guess Richard is surrounded by too many girls having four daughters and a yard full of hens so he brought the rooster home.
Tuesday, July 13, 2010
Gathered skirt tutorial
 Here is how to make one of those cute gathered skirts sold in shops like Anthropologie. I am going to try to explain how you can make one without a pattern.
Materials needed:
A sewing machine
a yard of fabric
thread to match a yard of 1/4 inch wide elastic
1/4 yard of interfacing
a tape measure
marking pen
 1. Take your measurement around where on your abdomen you want the top of your waistband to fall. I wanted my skirt to fall just above the belly button. That measurement will be likely larger than your true waist which is up higher. Take that measurement for instance 30 inches and divide it in half for your waistband front and back measurement. Add 1 inch to the front waistband measurement to allow for seam allowance that would be 16 inches for my example. For the back waistband piece which is going to be gathered with elastic so you can get it on and off easily you need to add 4 inches for the elastic to widen and 1 inch for the seam allowance. My example's measurement is 20 inches
 1. Take your measurement around where on your abdomen you want the top of your waistband to fall. I wanted my skirt to fall just above the belly button. That measurement will be likely larger than your true waist which is up higher. Take that measurement for instance 30 inches and divide it in half for your waistband front and back measurement. Add 1 inch to the front waistband measurement to allow for seam allowance that would be 16 inches for my example. For the back waistband piece which is going to be gathered with elastic so you can get it on and off easily you need to add 4 inches for the elastic to widen and 1 inch for the seam allowance. My example's measurement is 20 inches
2. Take some paper wide enough for your largest waist piece measurement. Draw one piece with your 20 inch measurement width and 4 inches long. This will be your pattern piece for the back waistband piece. The front waistband pattern piece is a little trickier. My examples measurement is 16 inches so I drew with my ruler a 16 inch wide by 4 inch long piece. In the exact middle of the pattern piece i marked 1/2 inch below my width line. then I lowered the top width line 1/2 inch also and drew a curved piece with my ruler. If this part is too confusing you can just draw a straight pattern piece. Notice the curved front waistband piece above
 Unfortunately some of my pictures I took for this tutorial were deleted. Sometimes these things happen when you share a computer with your kids. So I will try to give you clear written instructions but if you are a strictly visual person like myself it might be a little tricky.
3. Take your pattern pieces and trace them along the top edge of your fabric. Trace two front waist pieces and two back waist pieces. Cut your four pieces.
4. Take the pattern pieces and trace one front waist piece and one back waist piece on your interfacing and cut out pieces.
5. Iron on interfacing to two of the main fabric waist pieces. The interfaced parts should face the inside of your waist when the skirt is finished because sometimes interfaced things get a wrinkly look when you put them through the washer and its best if that part is facing inside.
Sew the front and back interfaced pieces together along the top width edge. Sew the other two waist pieces together the same way.
6. Now sew your two sewn together waistbands together at the side seams. Press side seams open. Turn the fabric right side out and press down along the top edge. Your waistband is almost completed.
7.Cut 5 pieces of elastic half the width of your back waist band piece. Trace 5 even lines across the inside of your back waistband piece evenly spaced apart. Stretch the elastic pieses and stitch to the lines zig zagging over the elastic. Your waistband will now be gathered.
 8. Cut out your skirt piece. Decide how short you want the skirt to be. I chose 16 inches long. Now just draw two 16 inch lengths along the width of your fabric and cut. I added a lining because my fabric was pretty sheer but you don't have to. Now just sew the two skirt pieces together with a 1/2 inch seamline. Press side seams open. You won't need to finish the seams because you cut your skirt across the whole width of the fabric which means you will be sewing the selvage pieces together and they won't fray. Now press the hem up 1/2 inch and then press another half inch and stitch along the hemline.
 9. Gather your skirt until it is about the same width as the waistband. To gather sew a basting stitch across the top of the skirt. Make sure you backstitched the beginning of the stitch but don't lock the stitch when you come to the end. Pull the end of the thread up gently until the skirt is gathered to the right width. Try not to break the thread or you will have to start over.
 10. Pin the right side of the skirt to the right side of the waist band to together at the side seams and adjust the skirt gathers so they are even all around. Make sure your elastic will be facing inside when the skirt is finished.
 8. Cut out your skirt piece. Decide how short you want the skirt to be. I chose 16 inches long. Now just draw two 16 inch lengths along the width of your fabric and cut. I added a lining because my fabric was pretty sheer but you don't have to. Now just sew the two skirt pieces together with a 1/2 inch seamline. Press side seams open. You won't need to finish the seams because you cut your skirt across the whole width of the fabric which means you will be sewing the selvage pieces together and they won't fray. Now press the hem up 1/2 inch and then press another half inch and stitch along the hemline.
 9. Gather your skirt until it is about the same width as the waistband. To gather sew a basting stitch across the top of the skirt. Make sure you backstitched the beginning of the stitch but don't lock the stitch when you come to the end. Pull the end of the thread up gently until the skirt is gathered to the right width. Try not to break the thread or you will have to start over.
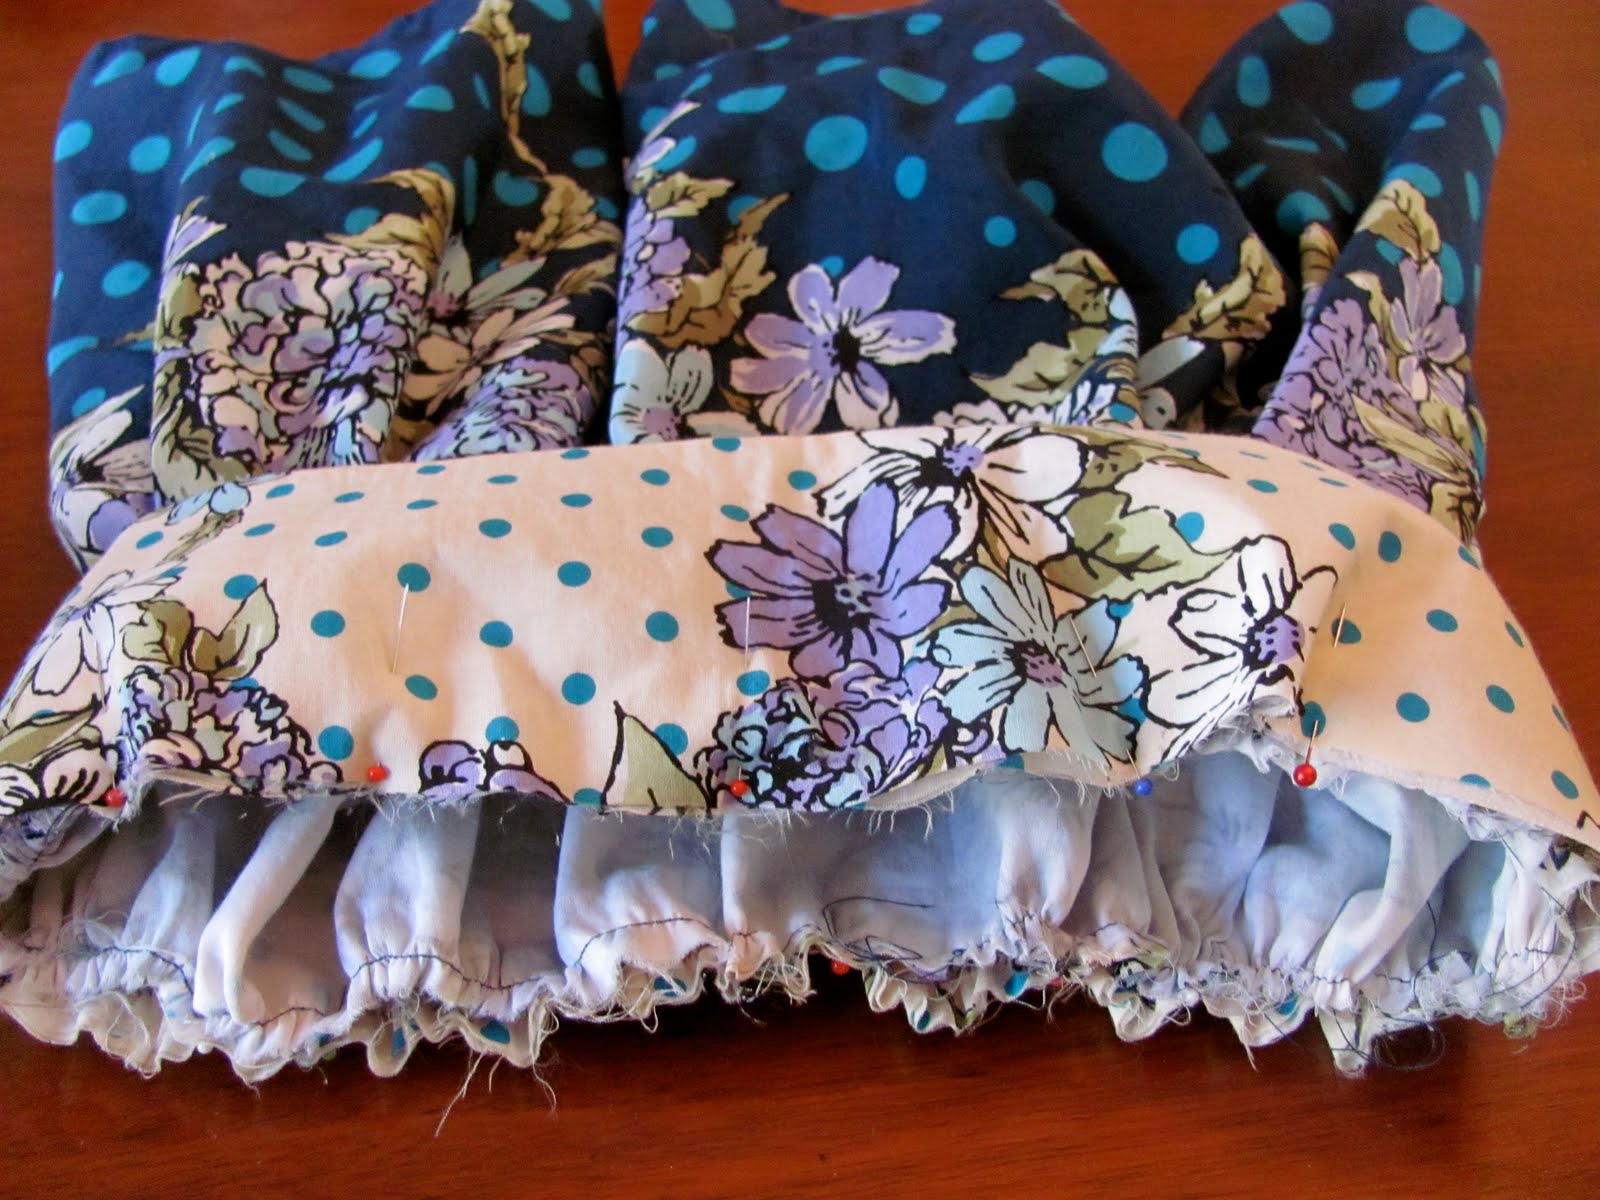 10. Pin the right side of the skirt to the right side of the waist band to together at the side seams and adjust the skirt gathers so they are even all around. Make sure your elastic will be facing inside when the skirt is finished.
 11 . Sew along the edge as shown in the photo above with a 1/2 seam.
 12. I added some bias tape to the inside waist seam allowance to prevent fraying. You could also use pinking shears and zig zag the seam allowance or serge it if you have a serging machine. I have a serger but the thing is such a hassle to use because it takes forever to rethread it when a thread breaks that I just prefer to do everything on a plain sewing machine.
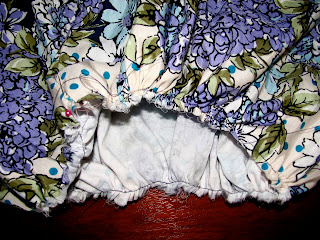
 Voila, You are finished with your skirt! Notice the gathered waist above.
 12. I added some bias tape to the inside waist seam allowance to prevent fraying. You could also use pinking shears and zig zag the seam allowance or serge it if you have a serging machine. I have a serger but the thing is such a hassle to use because it takes forever to rethread it when a thread breaks that I just prefer to do everything on a plain sewing machine.
 Voila, You are finished with your skirt! Notice the gathered waist above.
Sunday, July 11, 2010
Dawes Concert at The Getty Center.

Last night we ventured out to Los Angeles to see a free concert at the Getty Center in Los Angeles. To anyone in the area I would highly recommend these events at the Getty Center . Itsits on one of the highest hills in Los Angeles. Unfortunately, it was very cloudy last night so we couldn't enjoy the views. The band Dawes are an Indie Folk band. They are described as having the Laurel Canyon sound and are very Urban Woodsy. The Doors lived in Laurel Canyon. After the concert my two teenagers met the band and here is a picture. Aren't they cute?
Some playclothes I made
 I thought I might share a few more things I made for the girls today. Above is a simple a-line skirt made from a 60's fabric I bought at the Rose Bowl for two dollars a yard. The skirt is really simple.You can make your pattern right on the fabric.It's also cut on the bias.i will share the directions in an upcoming post.
 Here we have a Gigi modeling an incredibly chic and slimming polka dot maxi dress with a flirty ruffle on the hem! The halter neckline is incredibly flattering, don't you think? Tres chic Gigi!

On the left is a simple t-shirt dress made with a t-shirt from the thrift shop with an attached skirt made from the width of 3/4 yard of fabric. I just sewed the panel with one seam in the back , gathered the skirt and sewed it onto the t-shirt. I added trim and an applique from the remnant. On the right is a sweet little pullover dress made from a Modkid pattern called Frida.
Subscribe to:
Posts (Atom)
