

A few posts back I posted about making the Diana Messenger bag from Burdastyle. Well,it was really simple to download this PDF pattern it and it's a great , easy bag that you can make in various styles and the pattern is only a dollar . But I found the directions on the site to be pretty meager so I decided to write my own tutorial for it.
You will need about a half a yard of fabric for the bag or 1/3 a yard each if using two fabrics, and 1/3 a yard canvas or flannel or cotton batting that comes in sheets for the bags' underlining. I don't like using iron on interfacing for bags because it can start to peel off after awhile and gives an ugly rippled look. I prefer sewing an underlining to the bag.

Click Burdastyle here to buy the pattern and download it. If you haven't been to Burdastyle .com yet, you should check it out. There is so much inspiration to be found on that online community for sewists.You will then print the pattern out in several pages and have to tape it together. Cut the papers at the outer borders and tape them together.

Cut out the patterns. Don't pin them to your fabric and cut them at the same time like you would with a tissue pattern. This will dull your sewing scissors. You never want to cut normal paper with sewing shears. My kids have ruined a few pairs in the past. If you have kids, HIDE your sewing scissors!

I just traced the pattern like this. A ruler placed along the edge can help keep your lines straight.

You should have cut: three flap pieces cut: 2 of fabric and one of underlining: six main bag pieces: two for the inside bag fabric, two for the outside bag fabric, and two for underlining you will sew to the inside bag fabric. You will also have one strap and one strap underlining piece.
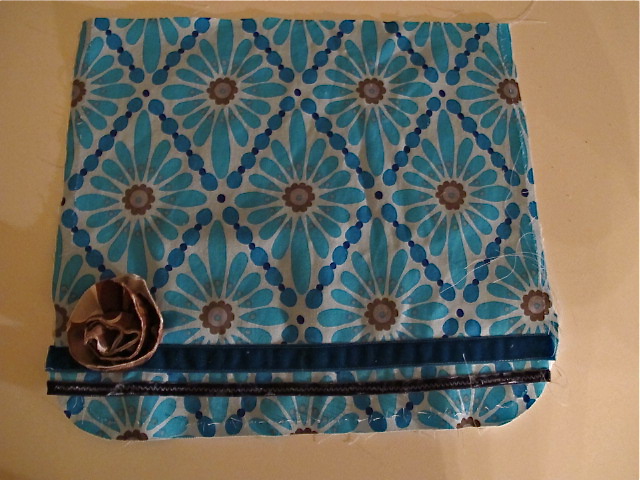
If you are going to embellish the bag flap, now is the time. I sewed on some velvet tape and a bias rose which I have a tutorial for here.

The pattern doesn't include a pocket but I wanted one for the inside so I traced a book two times, cut and sewed the pocket pieces together right side to right side and left a little gap to turn the pocket right side out. Once you turn the pocket right side out, iron it flat and topstitch it to the bag inside.

The topstitched pocket. I actually sewed this on after I sewed the bag pieces together but it's easier if you sew the pocket on first.

Now sew the underling pieces to the wrong sides of the inside bag fabric. Sew the underlining to one of the wrong sides of one of the flap pieces and also to the strap.

Sew the little darts that will give your bag a molded shape on the bottom so your bag doesn't just look like a grocery sack. I cut the darts out of the pattern and used it as a template to draw the darts on the bag because you can't really trace with this thick paper. Sew up the darts on the corners.

Now you are ready to put all your bag pieces together. After you sew the strap.

Fold your strap in half lengthwise and iron it AFTER you have stitched the underlining to the wrong side of the strap. Now stitch up the straps' length.

Use a really sturdy safety pin to pull the strap right side out. If you use a wimpy safety pin it will bend and open. Iron the strap flat and TOPSTITCH it.
Turn the OUTSIDE bag pieces right side out now and iron them flat. Turn the flap piece right side out now, iron flat and TOPSTITCH around the edge.

Pin the flap to the bag so it is pointing DOWN like the photo with the embellished part facing toward the bag. It will flip to the right side later. Now pin the strap to the bag so it is pointing down and under the bag too.

Take your inside bag piece that is still inside out and slip it over the entire bag , making sure you don't twist the strap as you do this part. Stitch around the entire top edge, leaving about three inches unsewn so you can flip the bag right side out through this little gap.. Pull the ENTIRE bag through this opening you left. WOW! Everything should be facing in the right direction now, your strap will be going up and over the bag and your lovely flap will be in the right direction too.

Iron the top edge of the bag flat and then TOPSTITCH the edge to close up that gap.

Topstitching bag top edge.

VOILA!
Tutorial featured on:


Oh my word, I am so glad you commented on my blog today, otherwise I never would have seen this awesome tutorial! I'm a total sewing dunce, but I recently picked up some books and determined to learn. Thanks so much for the detailed instructions on this!!
ReplyDeleteCute bag! I really like it!
ReplyDeleteI am so excited to have found this tutorial! I agree with the instructions being meager, and am super happy to have your directions to follow! Thanks.
ReplyDelete