Image Map
Showing posts with label guest posters. Show all posts

Monday, August 27, 2012

Guest Posting At Cation Designs!

Hi everyone!
I'm guest posting today about the fashion designer Madame Vionnet and my long term obsession with sewing on the bias at The Cation Designs Sewing Blog Today!
Cindy has a very cool blog.
Last month she did a fabulous post here about sewing with thrifted bed sheets so today I am visiting her blog.
I love guest posting.
Stop on by!
Just click here.

Pin It

Sunday, July 22, 2012

Guest Post Scattered Thoughts of a Crafty Mom

  Hi readers! 
Today my guest poster is Jamie from Scattered Thoughts Of A Crafty Mom.
You may have seen her featured here before on my link party. Jamie is a genius at making children's clothing and writing tutorials for sewing her adorable and fun kids' designs.

Welcome Jamie!

Hi Everyone! My name is Jamie from Scattered Thoughts of a Crafty Mom.   I am so happy to have an opportunity to guest post here at Sew Country Chick.  Justine is such a talented seamstress, I just love to looking at all of her fabulous creations and of course linking up at her link party every Saturday!  
  My blog, Scattered Thoughts of a Crafty Mom is all about sewing, crafting, and fun family recipes. I would love for you to stop by sometime to check out some of my projects.
 
 
Today I am sharing one of my favorite projects, these upcycled patchwork shorts I made for my son.
 
 
Do you have a pile of outgrown t-shirts just sitting around, waiting to be given away or tuned into rags?  Well don't get rid or those tees!  Make something new out of them instead!
 
The shorts may look complicated, but they really are a fun and simple project.  The best part is since you are using knits, you don't have to finish any seams! 
 
To make these shorts you need:
  • 5 or 6 old tees (you could use more or less depending on the size of the shirts and variation you want.)
  • Ruler
  • Rotary cutter/cutting mat
  • Your favorite shorts pattern (If you don't have a short pattern, I will include instructions to draw your own pattern at the bottom of the post)
  • 1/2 inch elastic
  • Ball point needle (always use a ball point needle on knits!)
  • basic sewing supplies
Step 1: Cutting your fabric squares and assembling the fabric panel.
Cut your t-shirts apart at the seams and use your ruler to cut out 4 inch squares.  Pay attention to the designs on the shirts, you may want to center your squares over certain areas to preserve a design or word.  (Depending on the t-shirt and where I placed the 1st cut, I was able to get 12 to 18 squares from each shirt,   I cut fewer squares on the shirts where I tried to preserve a design or word.)   After cutting the squares, arrange them into a pattern you like.  Use your shorts pattern to determine how big the fabric panel needs to be.  
 
Start sewing your blocks together, using a 1/4 inch seam allowance.
 
I pulled the shorts out of the dryer for this photo. (It is one year later and the have held up very well.)
Step 2:  Cutting the shorts pattern from the fabric.
  Very Important!!!  When cutting shorts you need to make sure your fabric lays either right or wrong sides together when cutting the 2 front and 2 back pattern pieces.  You can do this two ways.  Either lay your fabric panels out wrong sides together and cut 2 at once (this is what happens when you fold your fabric in half) or lay your fabric out side by side and flip the pattern while cutting one at a time.  That is what I did in the photo below:
 
 
Cut out the 2 front pieces and 2 back pieces.
 
Step 3:  Assembling the shorts.
Step 4:  Creating the casing and hemming the shorts.
To create the casing, fold the top edge of the shorts over 1/4 inch and press.  Fold the edge over another 3/4 inch and press again.     Sew along the folded edge, leaving a 1 1/2 inch opening to slide the elastic through.   Cut a piece of 1/2 inch elastic.  (start with the waist measurement plus 1 inch.)  Attach the elastic to to safety pin and run through the casing.  (To ensure a good fit, I always try the shorts on before sewing the elastic together.)   Sew the elastic together using a zig zag stitch, taking care to ensure the elastic is not twisted.  Then stitch the opening closed.
  To hem the bottom of the shorts, fold the bottom edge over 1/4 inch, press, fold over another 1/4 inch and press again.  Sew right along the folded edge. (I used my new ball point twin needle for the bottom hem. I love this needle, the knit fabric did not stretch out at all when I sewed the hem!)
 
  How fun are these shorts?  If you make anything with this tutorial, I would love to see your results!  
  
 
  Instructions on making your own shorts pattern:   Fold the shorts you’re using for pattern tracing in half, with the back of the shorts facing out.  Make sure to flatten out the back crotch seam as much as possible.  
  Trace around shorts on to the paper.  Extend the top of the shorts up, in a straight line as shown above.  
  After you have traced the shorts, add a 1/4 inch seam allowance along the sides of the pattern. Add 1 1/8 inches to the top of the shorts for the elastic casing and 1/2 inch at the bottom for the bottom hem. 
  Fold the shorts over so the front side is facing out, and repeat these steps for the shorts front pattern.   Cut out both patterns.  
  If you like this tutorial, be sure to visit my blog to see what else I have been up to.  Thanks again, Justine for letting me share this project with your readers!


This concludes my guest posts for now!
A big thank you to Jamie from Scattered Thoughts of A Crafty Mom for this cute shorts tutorial above.
Cindy from Cation Designs for her post about tips for sewing with sheets
and 
Melissa from Melly Sews with her Sabrina inspired post
Having these talented ladies share their work here has been very exciting to me and I hope you have enjoyed their posts.
I am so happy that they agreed to post at my humble blog here!

Friday, July 20, 2012

Melissa From Melly Sews: The Sabrina Tank

I am so excited to have the talented Melissa from Melly Sews over today! Many of you may be familiar with Melissa who has been very busy lately!  
Lets's see..... she hosted the 30 Days of Sundresses Series that I was lucky enough to be a part of, she was a contestant recently on Project Run and Play, and she has been featured all over the place! She also has a small line of cute sewing patterns so do drop by and visit her.

 Tell her I sent you....


Once upon a time...somewhere in blogland...there was a very, very large contest...which went by the name of Project Run and Play.  And I was a contestant, and the theme was "Let's Go to the Movies" and I was hard at work embroidering fabric for a Sabrina inspired dress. But then I got eliminated, and I never made the dress, preferring (selfishly) to keep the hours of embroidery for my own wear.

Hello, Sew Country Chick readers! I'm Melissa, and I blog over at Melly Sews.

I LOVE the movie Sabrina. Especially Audrey Hepburn's voiceover in the beginning.

Once upon a time... 

on the north shore of Long Island... 

not far from New York... 

there was a very, very large mansion-- 

almost a castle-- 

where there lived a family by the name of Larrabee. 

And over the garage... 

there lived a chauffeur by the name of Fairchild... 

imported from England years ago... 

together with a Rolls-Royce... 

and a daughter named Sabrina. 

In the moonlight 

When the shadows play 

When the thought of what could happen 

Takes your breath away 

Sighs and whispers 

Quiet laughter in the air 

Can make it seem that love is everywhere 

Among other things... 


So the story I led with is true - this fabric was originally intended to be a dress for a 2 year old. The embroidery was done with my embroidery machine, and even though it's machine made, the embroidery on this tank took over 10 hours. 


And then, since I did the embroidery with a 2 year old and gathers in mind, I had to draft and redraft and make muslins until I could cut the embroidered fabric to perfectly show it off and to flatter me, a girl whose curves are (mostly) in different places than a 2 year old's.

But here it is to share with you (and I wonder if I should have just gotten the Colette Hazel pattern that Justine has done such pretty things with?) 


And I have to say, the fact that I get to keep and wear this lovely embroidery myself makes up a tiny bit for being eliminated in the first place. 

Thanks for having me! You can also find me in these places if you want to say hi.


Wednesday, July 18, 2012

Sewing With Thrifted Sheets!: Cation Designs Guest Post

Today's guest poster is Cindy from Cation Designs. I love reading Cindy's blog and discovering her innovative and creative sewn creations, as well as enjoying her humor and wit. Cindy is a science teacher by day and a sewing diva by night!
We share a love of sewing dresses from vintage patterns and thrifted fabrics. Cindy has been such an inspiration to me with her many dresses made from thrifted sheets. And they fit her so well too!
Read on......... I hope you will stop by and pay Cindy a visit after reading!

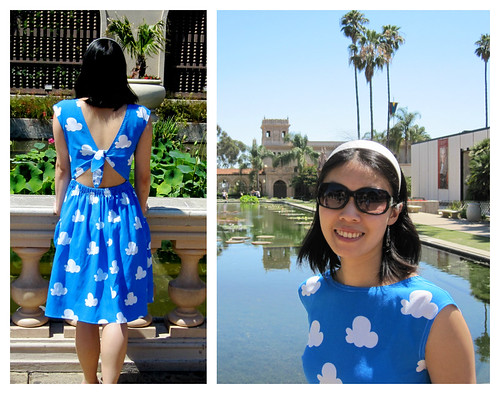
My very first sheet dress, which still gets worn!

I remember my heart speeding up when I opened my email inbox and saw Justine's message inviting me to be a guest poster here at SCC; this is the first time I've ever had the honor of contributing to somebody else's blog content! She asked me to write about a favorite summer sewing project. Unfortunately, if you ask anyone who knows me, I have a very difficult time picking my favorite anything, so instead of picking just one project, I thought I'd talk about my favorite source of sundress yardage, which is coincidentally also my signature fabric: vintage sheets from thrift stores! In the past year or so that I've been sewing seriously, I've made almost two dozen dresses out of sheets that I've "rescued" from the thrift store. And while several were made from plain solid-colored sheets, most were made from fun (and occasionally ridiculous) prints.

I realize, of course, that many people get the hibbly-jibblies at the thought of wearing clothes made from somebody else's old sheets, but I'm here to tell you that I've been wearing sheet dresses for a year now and have yet to show symptoms of any communicable diseases! Honestly, the amount of yardage for the average price just can't be beat, even if one is armed with Jo-ann's 40% coupons. Add in the fun patterns that can't be found anywhere else, and I think the negligible risk is totally worth it. So if you're interested in sewing with vintage sheets, here are some helpful tidbits that I've picked up in my adventures:

Finding sheets: The best places to find sheets are large thrift stores. Many smaller secondhand shops may not even have a home goods sections, instead focusing on clothing and shoes. It may take some poking around, but I assure you they're out there! You may also need to visit fairly regularly, as some weeks the sheets might all just be stained, polyester pill-monsters. Be patient, though, and eventually a gem will show up! If you are having trouble finding worthwhile sheets in large city stores, chances are surrounding small towns will have a better, less picked-over, more unique selection. For example, when I was living in San Diego, I didn't find much in the city proper, but regularly brought treasures home from El Cajon and Poway. My friend Shayna, who brings me my best sheets, found my Star Wars, Spiderman, and Seamstress' Rendering sheets in the small town of Yucaipa.


I was lucky enough to find these sheets in their original packaging!

Worth bringing home? When you do find a sheet that you like, unfold it as best as you can and check for stains, bare patches, holes, or rips. If there are trouble spots, you'll have to decide if you can work around them. Twin sheets may not be worth the fussy cutting, but the increased yardage of queen sheets (and the greater likelihood that they're been gently used by adults, not abused by toddlers in potty-training) is usually worth it. Oftentimes, fitted sheets will have worn thin in the middle, but the flat sheet is still in good condition. Once you've decided that the sheet is worth getting, expect to pay anywhere from $1 on a good day to $8 in a more upscale store. I average about $3/sheet, and many places will not charge more for a larger sheet.

Cleaning and storing: Once you bring the sheet home, you'll want to wash it as soon as possible. I've made the mistake of leaving them in my stash, and the thrift store smell only intensifies. Wash the sheet on hot to get rid of any ickiness, and if it smells extremely strongly, throw a cup of vinegar into the rinse water. If there are any stains or dirt on the sheet, you can try pre-soaking the spot with either dishwashing detergent, hydrogen peroxide, or a cold saline solution. However, chances are that you won't be able to remove it, as the sheet may have already been dried with the stain in it, thereby setting the stain in the fibers. I like to dry my sheets in the sun when I can, as the UV rays will kill any lingering germs. When you're sure that the sheet is dry, you can fold it up for storage with the rest of your stash. Or you can sew with it right away because you're so excited to use it!


Here's an example of a fun kid sheet that worked well for a sundress.

Fiber content and care: Most vintage sheets are 50/50 cotton-poly blends, so they'll be difficult to get a good crease on when pressing. The flip side of that is that they'll also resist wrinkling to a certain extent. Since they're usually tightly woven, you can even get away with just pinking the seam allowances if you don't have a serger. My Nothing But Blue Skies dress has held up just fine through many, many washes, and even then it was a fairly loose weave to begin with. The other good thing about sheet dresses is that they're meant to be machine-washable and be able to stand up to regular use and wear! Unless your sheet is especially threadbare or fragile, you can usually just toss them into the washer and dryer with no worries. There's also no shrinking or dye bleeding to worry about, either, since somebody else has done that work for you!


This very soft, Art Nouveau-esque queen sheet made an

Sewing clothes: Depending on your sheet's drape and hand, you'll need to pair it with your pattern appropriately. My older, smoother, obviously well-cared for adult sheets are drape-y enough for circle skirts and looser, body-skimming cuts, but kids' sheets are often "crunchy"-feeling because of coarser threads and weave, and are best suited for structured bodices or very full, gathered skirts that are meant to have a lot of body. Sheets in general also don't have a lot of give, so be careful to factor in enough ease to move your arms and breathe! Speaking of breathing, since most sheets have a pretty high polyester content, you may want to consider lining your dress with thin cotton if you don't want to have the poly next to your skin. 

Suggested wear: It's easiest to find pastel and bright-colored floral sheets; these make great sundresses, especially in vintage styles from the 50s and early 60s. Sheets from the 70s with more geometric or funky patterns may need to be sewn into a sleeker, less full dress in order not to overwhelm. And don't be afraid to work with crazy kids' sheets! I know not everyone is into superheroes or other media franchises, but I'm always excited to find boys' sheets at the thrift store because it's a way to make clothing that shows off my geeky side. And of course, if you really can't find Star Wars sheets at your thrift store, you can always buy new at a big box store (I must confess to being seriously tempted by the thought of an X-wing dress!).


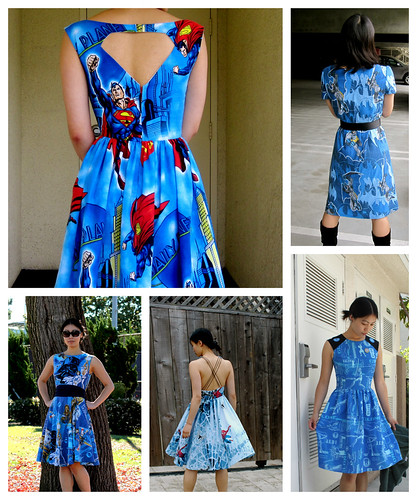
All the geeky dresses I've ever made from boys' bedsheets: Superman, Batman, Star Wars, Spiderman, and Clone Wars.


Other: I know I keep blathering on about sheets, but don't overlook the possibilities afforded by curtains! It can be trickier to find them in breathable fibers, but it's not impossible.


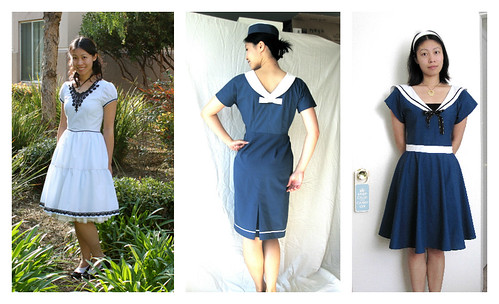
And lest you think sheet dresses must always be crazy prints, here are some examples
of dresses I've made from plain blue sheets: Alice, Pan-Am, and Ondine.


I hope my tips and pictures of past projects help you feel empowered and inspired to use old sheets as a fabric source! I love how this unlikely fabric can be so helpful to so many parties at once -- to the thrift store beneficiaries (they are often run by charities that help various disadvantaged groups), to the environment (since you are reusing old fabric instead of buying new), and to your wallet (it usually ends up being about $1/yard, which is pretty hard to beat!). And as a bonus, you are unlikely to ever run into anyone else wearing the same dress!

Thanks for having me here at Sew Country Chick, Justine. I hope you enjoy your vacation!

Pin It

Monday, July 16, 2012

Mie From Sewing Like Mad: Culottes Shorts Pattern Hack !

My first guest blogger this week is Mie from Sewing Like Mad.
I discovered Mie in one of my linky parties. Her clothing was so well made and professional looking. Mie has only been blogging since April and she already has several great projects. Mie had her own clothing line in Denmark but now she is a stay at home mom in North Carolina. Welcome to Sew Country Chick Mie!
Today Mie is going to explain how to turn a normal shorts pattern into a pair of those super cute wide shorts seen in many shops recently......
Cullottes from the Gap.

The following post is part one on how to create the wide legged shorts pattern.
To see part two on how to sew the reversible culottes shorts, click here!
I was trying to figure out what these wide legged shorts are called and then I remembered the word is Cullottes!

Hi everyone, Mie here from Sewing Like Mad with part one of a guest post about reversible skirt like shorts.
Thank you Justine for letting me invade your cool blog.  
Part one will focus on drafting the pattern for the shorts. And when you are through here you can head over to Sewing Like Mad and read part two that focus on the sewing.....and see photos of the shorts' other side. Uhhh, the suspense.
I will hurry up and admit that these (very wide) shorts are a GAP knock off. Normally I am against copying BUT when it comes to copying enormous companies like GAP, H&M, Zara and so on I am more relaxed. These companies are making a lot of people happy (including myself) but what they are doing is selling clothes based on here and now trends and these trends comes most of the times from original (and much more expensive) designers. In my opinion there is nothing wrong with that because most people can't afford buying the original designer clothes anyway BUT that also mean we can copy them a little bit here and there, right!


Here you see the 'original' GAP shorts.

To make the pattern I started thinking whether I already had a pattern I could use as a base for these shorts and I was in luck. Do you remember THESE shorts? The pattern for those shorts is what you see above. What you need to use this tutorial is any pair of shorts with an elastic waist. So to make the skirt like shorts we need to add much more width in the legs - kind of logic, right!

It is obviously a big help to have the item you are copying liking so much that you want another one, in your possession. I measured the GAP shorts and compared it to my base pattern. I started by adjusting the side seams, then the curve of the waist and finally elongated the crotch seam.  


What we have done up to this point is added width to the crotch area and we obviously want width in the whole shorts leg. And the way to get that is what you see above. I needed to add 8 cm / 3.1 in to the back and 9 cm / 3.5 in to the front pattern piece. If I would have needed to add more width I would have cut up the pattern more but for these numbers I only cut each pattern 3 times. You cut all the way up until there is like 1 mm (in inches? Very little ;-) left and then spread the pattern part till you get the desired gap (you can see the numbers on the photo above). 

Then you fill out the gaps by putting paper under and draw your new and now curved lower shorts edge with lots of width and you are now ready to cut and sew your shorts.
I have put on the measurements on the pattern parts for a size 3T* on the photo above and I hope you will be able to make them yourself. 
Please note that the measurements above are WITHOUT seam allowances so please add that in the drafting process.
*You might wonder why I am showing you a pattern for a size 3T and then showing you photos of my 4.5 year old daughter who use size 5T. Weeeell, ideas has been flowing between Justine and I and originally I made a pair for my 2.5 year old who uses size 3. In the end we decided to focus on the (reversible) pair that Wilma is showing below. Don't worry though I will show Evelyn and her pair of skirt like shorts next week.
Since I also own the GAP shorts in size 5 (yes, at least I did pay for the product and then copied liked so much I had to make more) I compared the size 3T and 5T and the only difference was the length of the legs that was 1.5 cm / 0.6 in longer than 3T. I decided to extend them further and make them 3 cm / 1.2 in longer than size 3T. Otherwise I kept  them exactly the same.

And now it is time to head over to Sewing Like Mad for part two of this post that focuses on the sewing.


Thanks again Justine for playing along and coming up with some great ideas for improving this double post.

But first a couple of her cute designs from her blog....
Mie's self designed skirt which was featured at Crafter Hours recently.


Related Posts Plugin for WordPress, Blogger...