Image Map

Thursday, August 9, 2012

Aqua/turquoise shabby painted table tutorial: Another humbling experience

This is humbling experience of the week number two....
I love how my aqua turquoise table turned out in the end but I took a few wrong turns getting there.

I had an old, unfinished pine coffee table in my TV room for the longest time....
Because it was unfinished, there were crayon marks, stains and all sorts of gunky things collected in the cracks.
After about three years of looking at this sad little table and trying to remove staining spills from my kids who totally abused it, I decided to something about it....

Because that's how I roll when it comes to home DIY projects.

Slow and steady wins the race.

This tutorial has some tips telling you what NOT to do as well as what to do.

For instance,
Don't paint water based paint over oil based primer.

Don't listen to the guy in the paint store who tells you water based paint adheres just fine to oil based primer.
It doesn't.
It didn't make sense to me but I went ahead and followed the guys instructions.
He was an older fellow who looked to be very knowledgeable in all things painting related.......

After sanding the table andpriming it,  this was what happened after I painted on top of the oil based primer:
The paint peeled off like cheap nail polish, just as I suspected it would.


What was supposed to be a simple DIY project turned into a few days work...
I had to sand all of the paint off the entire piece with my orbital sander.
I started again.....

This time I didn't prime the piece at all.
I painted it with a mixture of two colors of paint from Martha Stewart.
Sea Glass and Aegean Blue.
I used two small sample bottles for this project.
BTW sample size paints are often the perfect amount for smaller projects...
I left the top of the table unfinished because I was going to stain it later.

Then I sanded the edges of the blue painted parts lightly.
I rubbed some stain from MInWax in the Provencal shade into the sanded parts to make the piece look weathered. 
Then I stained the top the provencal color.

There were little specks that I couldn't remove from the primer I had painted on the top before. I was told they gave the piece character so I just left them alone.
I finished the piece with a couple of coats with Minwax rub on polyurethane varnish.
We lost the knobs that came with the table a long time ago.
So I bought some bin pulls at the nearby Restoration Hardware outlet for 4 dollars each.
The total cost of refinishing this piece?
About twelve dollars.


I had a little paint left over so I painted this step stool too.


Pin It

Tuesday, August 7, 2012

The Blythe Dress

When I was staying at my friend's house in Charlotte, I did a little babysitting for her while she taught some of her yoga classes. The girls were busy playing so I decided to make her little girl a dress.
Her  mom had some cute quilting fabrics and a sewing machine in her craft room, so I scoured the net for some inspiration.
I have many girls sewing tutorials collected from the net on my Girls sewing tutorials Pinterest board.

If you read kiddie sewing blogs you may recognize this gathered pocket tutorial 
from MADE.
However, I lined the pocket instead of hemming it.
I didn't want two lines of stitching on the pocket once I sewed it down.

The bodice was inspired by the spring ruffle top tutorial at Made By Rae.
As designers, we are inspired by so many other sources and tutorials.
I have always wondered, if you are inspired by someone else's tutorial, use it but then change it, do you consider it a new design?
I do sometimes.
I asked that question years ago to my design teacher at FIDM. She told me that in the fashion industry something is a new design when it is changed only 10 percent. 
Personally, I think it needs to be more like 30%.
1She explained that there really are no original designs in the fashion industry. Everyone is inspired by something else. Design just evolves.
There are those who seem to notice the trends before others and get them out there first.
That's what we were aiming for back then. 
To get the styles out before everyone else.
It was a lot of pressure.
I see so many bloggers who start out with say, a Colette pattern, but then they change it so completely that they create a whole new design. 
What they have done is use that pattern as a design block to make a new design.
It's become their own, original design at that point.
If you do this often, well then you are a designer too, my friend!

Not that there is anything bad just being a seamstress.

When I watch shows like Project Runway I am 
always a little miffed when they call someone "Just a seamstress".
It's so arrogant.
Anyone who picks their own fabrics, trims, and patterns to go with them is essentially designing their own original dress as far as I am concerned.

Drafting your own basic dress and design blocks isn't very hard. 
Especially for children's designs.
I am considering doing some tutorials about drafting your own blocks so you can create your own original designs.
Tracing patterns, cutting them out and sewing them up only to find the fit is off is such a drag.

But I'm not giving up on patterns.
They are fun to work with too.
I have an Oliver & S sailor pant and top on my shelf calling my name!
It's just nice to have an alternative to having to use other people's patterns for everything.

This is a super easy dress pattern to draft up. It's all based on the chest measurement.

If you would like to see a tutorial to make this pattern for yourself, stop by later this week. I'm working on another one for Gigi.

So what do you think about my thoughts on when does a design become a new design ?

I took these photos at the Hominy Grill in Charleston. 
If you watch that travel show with Anthony Bourdain called No Reservations, you may have seen the restaurant featured.
Their specialties are Southern Soul Food.
OMG, it is the best!


Pin It

Sunday, August 5, 2012

New Look 6122:A Humbling Experience


Once in awhile a sewing project comes along that gets the better of me.
It's usually a project that upon examining, I consider easy.
"Oh, I can knock this out in a couple of hours."

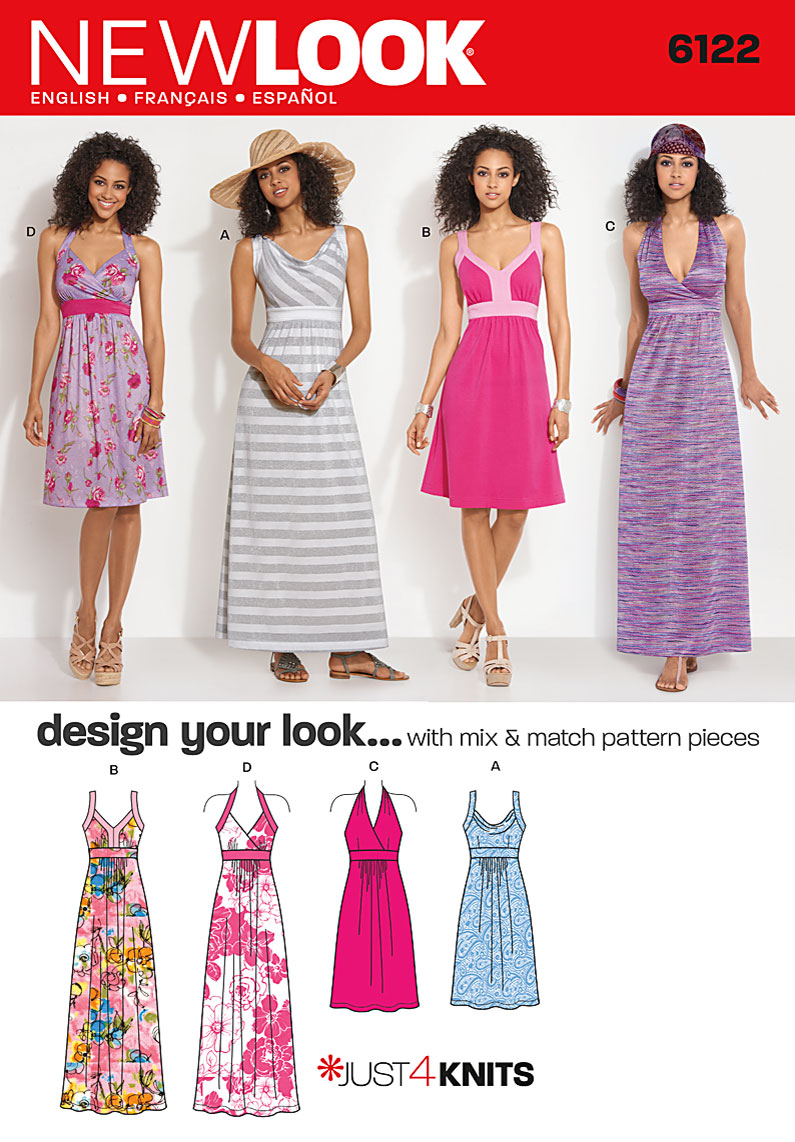
That's what I thought about New Look 6122.
The whole experience was almost a disaster, but in in the end, I saved the dress.


But sewing can be a humbling experience....

So where do I start explaining the many mistakes that were made?

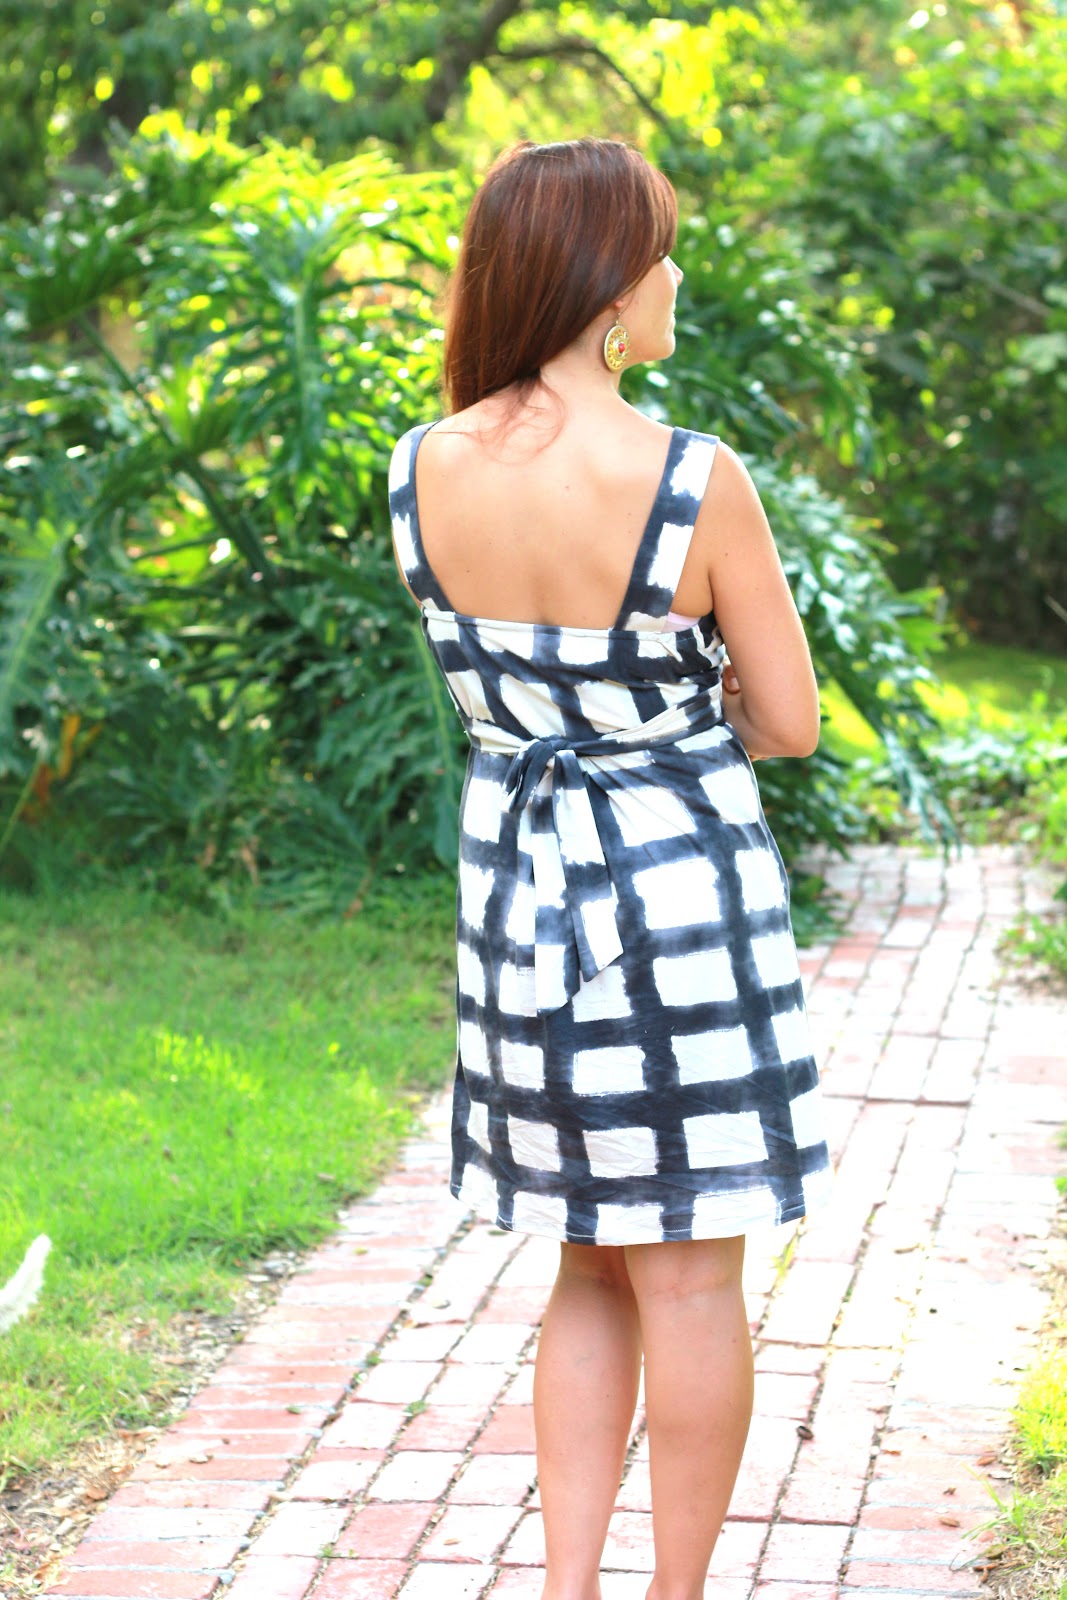
First, I made the mistake of only buying two meters of this interesting cotton knit on my trip to Tokyo. It was only two dollars a yard, too! I should have bought at least three yards, considering how narrow it was.
New Look 6122 was supposed to be the maxi dress with the lovely draped neckline. 
Once I cut out the first half of the maxi skirt I realized there was no way I was going to have enough fabric for the other side of the skirt. I would have to make the shorter version which this print didn't have in mind!
I also had failed to notice that the bodice was supposed to be cut on the bias. The pattern has a pretty, draped neckline. When I laid the piece down to cut it out, I realized I didn't have enough fabric to cut the neckline on the bias and would have to cut it on the straight grain. What was I thinking?
It's impossible to get a proper draped neckline on the straight grain as you can see below.


Once again, I had brazenly disregarded the directions on the pattern, thinking I could just wing it,  and soldiering on ahead, as I usually do. 

Was this a metaphor for my life?
I hadn't sunk to sewing depths this low for some time...

No amount of fussing would get this neckline to lie down flat.
I had to take the whole bodice apart and reshape it, creating a totally different style from what I wanted.
Yikes, this new bodice combined with this print gives me a bit of the dreaded mono boob look!

While I think this fabric would have looked fabulous as a maxi dress, I wasn't sure if it worked as a knee length dress.
To avoid looking too frumpy, which I worry more and more about lately, I hemmed the dress a couple of inches shorter than my knees.
But now I think I may like it better at the longer length.
I didn't think I like the dress very much, but yesterday I wore it to the beach with some flip flops and I think it makes a good casual sundress.

Just not the showstopping draped neckline maxi dress I was hoping for!


Pin It

Friday, August 3, 2012

Sew & Tell Saturday August 3, 2012


Welcome to Sew & Tell Saturday!

Photobucket


Below are the featured projects from last week.

I was excited to see some items made from vintage patterns. They are so much fun to work with and the designs are often so unique.


This dress made from a vintage sheet and a girls vintage sewing patterns Kelley Highway is so cheery and mod!

There was a lovely quilt made at A Couple Of Craft Addicts. Someday I will make a quilt

I fell in love with these sailor pants made from a 1940's pattern by Rosy at Sewing Adicta. I want a pair. Now.

Let's see what you have been sewing!


Pin It

Super Easy Resin Flower Bobby Pins And Rings


I know you have probably seen these little resin flowered accesories a zillion times already but this is a really fun and easy project to make with girls!

Buy the flowers in bulk from Etsy or Mindy Mae's Market like I did. I paid ten dollars for a hundred.

I bought the ring and bobby pin blanks from Pick Your Plum but you can also find them really cheap on Etsy.

Just glue the little flowers to the bobby pins and rings with some strong glue like D5000 or Goop.

We were also painting frames outside for another project. Since Gigi was too small to do any gluing, I put her to work painting some frames to go with a coffee table project I am working on.

Happy weekend!

Pin It

Thursday, August 2, 2012

I'm in Altered Couture and Romantic Homes magazines! My blogging journey


 I didn't know what a creative blog was in June of 2010. 

I had started sewing again for my fourth baby who came along a bit later in my life. I had not touched my sewing machine much for about 15 years. A failed line of vests I had made in the nineties from thrifted mumu's had hammered the nail on the coffin of my children's clothing design dreams.
 I had visited  a few sewing websites and I was very excited about this renewed passion of mine.
 That specific day of which I am speaking, my 6 year old daughter was having a playdate at a schoolmates home. I was killing some time while my baby napped in her stroller at the Barnes & Noble magazine aisle when I saw a magazine called Artful Blogging.
I started to thumb through the magazine and I became instantly mesmerized by the stories from women who were writing and taking beautiful photographs, chronicling what seemed like fabulous, creative,and inspiring lives. I wanted to be one of those creative women doing something creative with my life, too!

I would start a blog!

 But where was I to start? I didn't even have a digital camera and could barely figure out how to upload a photo on the Kodak website! I didn't have very good computer skills and used the web only for shopping and making travel plans. I would have to figure it out. 

 I bought my copy of Artful Blogging and another book called Blogging For Dummies and went home and immediately started visiting all of the blogs from the magazine. I opened up a Blogger account and chose Sew Country Chick as my name since I wanted to blog about life as a transplant to the country and I wanted to sew things. I have always had a love/ hate relationship with my blog name! I learned blog design, html, and how to take photos, and of course I am still learning. 

Photography is so crucial to telling your story. All of my favorite blogs have one thing in common: great photos. This year, I invested in a DLSR, a Canon Rebel, and it has made a world of difference. I don't know how I functioned without my 50 mm 1.8 f stop portrait lens.
Altered Couture Summer 2012

My Dandelion Dress

This past week was very exciting for me when I got my copy of Altered Couture in the mail with my dress featured inside. 
Like Artful Blogging, Altered Couture is a Stampington Publication. These are thick, beautiful, and expensive magazines.

 It was so exciting to see my Dandelion dress in the sister magazine that had first inspired me!

 If you would like to be featured in Artful Couture too, they have a page on their website that explains their submission guidelines and deadlines. I sent them photos and then the clothing pieces they were interested in publishing. Hopefully I will get them back before Gigi outgrows them. 
Romantic Homes Magazine July 2012

Last November I wrote and photographed a piece on the Rose Bowl Flea Market and submitted it to the editor of Romantic Homes Magazine. To my surprise, a few months later, the editor contacted me and told me they were going to publish my article in the July 2012 issue. 
Yesterday I went to the bookstore and bought the magazine, expecting to see perhaps a condensed blurb. My article was on two full pages with all of my photos on it. 
My 16 year old doesn't get impressed easily but she showed all of her friends!
She actually thinks I 'm cool now!

So how about you?
Was there a moment when you decided you were going to stop standing on the sidelines and just jump into something too?

Wednesday, August 1, 2012

Fruit Preserving Time! Butter Spiced Nectarines


Things have been busy at the farmhouse since I got back from my trip.
You see, My teenagers and husband stayed home on the last trip I took. 
As you can imagine, things were very yucky around here when I got back.
I can't say they didn't try to keep things tidy, the dishes were done.

But there seemed to be a thin layer of grime on everything.

Isn't it weird how you see all those little annoying things about your home upon returning after being away?

When we live in a place we often stop noticing all of the things that need to be done, but when we go away for a time and come back, suddenly they become noticeable again.

We see our homes through the eyes of a VISITOR.

Plus, the fruit on the trees was ripe when I got back and I had no time to waste!
I tied on my apron and got right to work cleaning and canning.
I have been cleaning closets, canning, and painting furniture all week!


I bought this cute woodblock print in Portland.


Last year I made way too much jam. Unopened jars still wither away on the shelf.
So this year I decided I would preserve sliced fruit instead.
How great is it to open a jar of fruit you canned in winter time?

Today I am sharing a recipe for butter spiced nectarines

Materials
Canning Pot
Caning funnel
Canning Tongs
Two quart jars and lids, sterilized in boiling water

Ingredients
4 pounds pitted and quartered nectarines
1/2 cup sugar
1/2 cup butter
1/2 cup water
2 tablespoons lemon juice.
1 teaspoon cinnamon
1/4 teaspoon cinnamon
1/4 teaspoon nutmeg
1/4 teaspoon cloves
1 teaspoon vanilla

How to make
Slice up and pit nectarines. 
Keep them in a bowl of vitamin C water in the meanwhile so they don't turn brown.
In a heavy pot, melt sugar and butter together. Add the nectarines and cook for a few minutes. 
Add the spices, lemon juice and water. Bring to a boil for one minute.
Ladle into two quart jars. Fill to the top with the melted syrup mixture.

Now lower your jars into your boiling water bath and boil for 15 minutes. Make sure water covers your jars by one inch or more!
Pin It
Related Posts Plugin for WordPress, Blogger...