Image Map

Friday, November 30, 2012

Pattern Draft Along: The Button Down Shirt

Welcome to the design it yourself clothes draft along! 
Today I will show the process I went through to draft the button down shirt front and back.
next week I will be drafting the collar, cuffs, sleeves and making a muslin.
If you would like to visit some of the posts from this draft along I will list them below.

Today is the last day of the Celina Mancurti fabric giveaway. Stop by and enter if you haven't yet. I love this fabric.

 I followed all of the steps from the book to make the button down shirt pattern and took photos illustrating all of the steps. I'm looking forward to having a proper button down shirt! To tell you the truth, I have never sewed one.. ....Tomorrow I am going to an estate sale with fabric! Maybe I will find just the right fabric for it..... perhaps a Liberty of London print. I can always dream....

The Button Down Shirt Pattern shown in the book Design It Yourself Clothes.
Click here to read a short tutorial from Cal Patch about drafting the button down shirt.

Before I show you my drafting process I would like to discuss functional ease. You will need to add some ease to your shirt pattern since unlike the t shirt this is a pattern for wovens and you won'y be able to move if you don't add some.
However, I like wearing my clothing very fitted so I am adding the minimum amount of ease recommended for a button down shirt and that is 2 inches throughout the bust, waist and hips. Since I am drafting the pattern on the quarter pattern I am adding 1/2 inch to each quarter pattern piece.
Got it?
Before you get started make sure you take all of the measurements you will need for your shirt pattern.


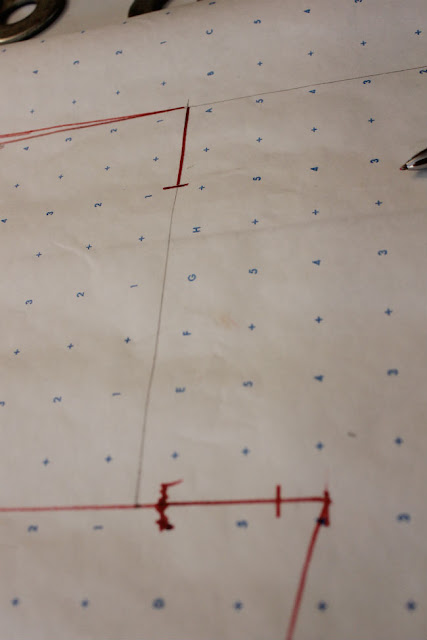
Draw your center front line lengthwise and your placket line 2 inches to the left of it on your paper.


Draw half your shoulder measurement, then measure down the paper to your length measurement. Measure down from the shoulder your HSP waist measurement you took. Craw your quarter waist and quarter hip measurements.

To find where your bust line should be use the armhole depth measurement you used for the t shirt and add an inch or two to it. My measurement for my t shirt was 7 inches so I added only an inch. I want my shirt more fitted. Connect the lines.

I measured down here from the shoulder than drew my bust line shoulder across at that height.

Measure down two inches from the shoulder edge and draw a straight line. Measure in 1/2 inch from side seam bustline and draw a straight line.

Draw your armhole curve from those lines with the curve ruler.

Mark half your neck measurement on the shoulder line. Mark your front neck drop on the center front line.

Draw the neckline freehand. Raise the shoulder 1/4 inch at the neckline to make the shoulder slope a little.

Make the hip curve at the hem. Use the ruler and hold it perpendicular to the side seam line until it intersect with the hem line about 2/3 the way over to the left. Draw the line 

Smooth out all of your seamlines.

I added 5/8 inch seams and a 1 inch hem and 1/4 inch at the neckline.

Making the back pattern piece:
Lay your front pattern down on more paper and trace it, omitting the front placket extension.

The back pattern will be almost the same except for the back neckline which will only have only a one inch drop from the shoulder line. Add the seam allowance

That's it for today! If you have any projects from this draft along you would like to share post them down below on my linky!



Follow my blog with Bloglovin

Wednesday, November 28, 2012

Handmade Sewing Cards: Keeping Little Hand Busy:


My little one loves to do projects. Projects, projects, and more projects.
A crafty soul is born.
So what is a mommy to do?
Keep her little hands busy making things.


 She wanted to sew so last night I cut out some felt circles and gave her a chenille needle threaded with embroidery floss. In & out we went, my hand on hers, until ouch! She poked herself!
I had to figure out a safer way for her to learn about sewing!


 Gigi loves to paint too, so I made this little project to keep her busy.
First I cut out some shapes from cardboard with scissors. 
She painted each side of the cut out shapes.
Then my son cut out little holes all around the cards. Sons are good for stuff like that.
I put some tape around some yarn so she could thread the yarn through.
Look, she is sewing!


Monday, November 26, 2012

Oliver & Olivia Nautical Peacoat


Today I'm participating in the Peek A Boo Pattern Tour for the second time. I participated last summer when I made the red white & turqouise Santa Monica bikini for Gigi. I loved how it turned out!
I really enjoy working with Amy's designs from Peek A Boo Patterns. The fit is good and most importantly Amy's directions are excellent.


 I've made coats before, but this was by far the simplest and fastest coat I have ever sewn up. I followed Amy's directions and this coat took me four hours to make including my cutting time. I have had a lot of problems with collars and linings in the past and this time I just seemed to get it without having to consult a plethora of my sewing books for further advice.


I used some ticking fabric but was a little short so I added the grey sleeves and the grey collar. The lining is cotton flannel and the buttons were bought on Etsy. I think they are Japanese.


This little jacket was made entirely by machine. I was sort of in a hurry since I just started it yesterday and only had a few hours to make and finish it because I had to get things ready for my sons birthday dinner. I can't believe he is 19....!


If I had had more time I would have done a few things by hand like the sleeve hem.
Visit some of the other bogs on the tour!
Here is the schedule:
Monday:
Tuesday:
Wednesday:
Thursday:
Friday:


Now, would you like to win the WHOLE PATTERN LIBRARY of Peek A Boo patterns? 

I would. But I can't, since I am hosting the giveaway......but I would love for one of you readers to win!

Enter the Rafflecopter giveaway form below to enter!
Also, you can get 25% off Peek A Boo Patterns if you use the code hohoho should you decide you want to order some patterns in the shop.
P.S. Don't forget to click the little box on the form to like Sew Country Chick on Facebook!
Shameless plug I know, but what's a girl to do?


http://www.rafflecopter.com/rafl/display/fb967940/" rel="nofollow">a Rafflecopter giveaway

Gilded Doily Ornament


This week I have been making a ton of Christmas decorations. I noticed something interesting about myself. When things get stressful I suddenly get an urge to make more things than normal.
My beloved mother in law has been sick for a very long time and she passed away the day before Thanksgiving. Even though we knew it was inevitable, it was still an incredibly sad day as we all loved her so much.
Since the family had all come to town to say goodbye to her, we went ahead with our plans and had our Thanksgiving dinner at my house. I think Grandma Teena would have loved that we all spent the evening looking at old pictures together and telling stories about her.
I will be posting all of the projects I made over the weekend over the next couple of weeks. There are a lot of them! The first up are some ornaments I made from crocheted doilies, Mod Podge, and some platinum gilding liquid I was dying to try out. Doilies have been an "in" crafting medium and I have a small collection.
 What did people use them for originally? I think you were supposed to put your perfume bottles on them on your dressing table or they were used to  put vases on.

I watered down some Mod Podge and soaked the doilies in them to harden the.
Then I painted the edges with the Martha Stewart gilding liquid.
Easy Peasy!

Follow my blog with Bloglovin

Saturday, November 24, 2012

Block Printed Fabric Celina Mancurti Fabric Giveaway

Hi readers!

This month, the eco friendly linen and fabric designer company,  Celina Mancurti, contacted me to review some of their fabric. After sewing with it I can tell you I absoulutely love this hand printed linen fabric.
 I was sent another piece to give away today!

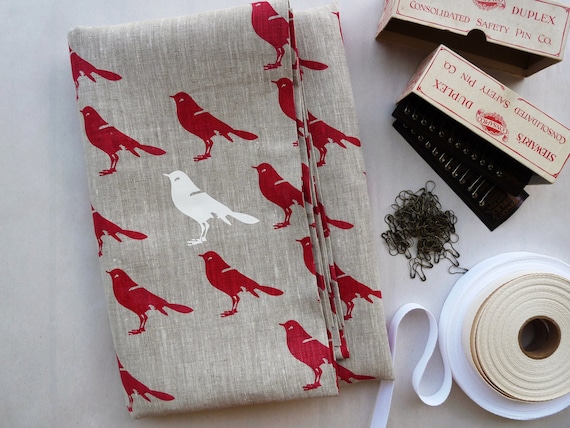
It's a half yard of hand blocked natural color linen with bird stamps on it. What can you do with 1/2 a yard? I think this fabric would make lovely Christmas stockings, tea towels or potholders. I'm sure you will think of something if you win it!

Celina is a trained textile designer from Argentina who makes her own screens and hand prints her fabrics herself. She was a project manager at a textile company and taught fashion design at a University before she decided to go into business making fabric and linens. Celina uses water based inks on organic linens and organic threads. Her methods are eco friendly and create much less impact than mechanized printing processes. I love the idea of buying hand printed fabrics. Many of the fabrics we use to sew with are made in factories in countries with no environmental restrictions.


Celina does beautiful work and sells gifts as well. Stop by her Etsy shop and pay her a visit!

I shared my bird printed skirt I made in my draft along post yesterday but in case you missed it, here is another picture!

I washed the fabric a few times before I sewed it. I love the quality of this linen.
Enter the giveaway below!

a Rafflecopter giveaway


Friday, November 23, 2012

Design It Yourself Clothes Sew Along: Tips from Cal Patch about drafting knit patterns

Welcome back to the Draft Along. I hope those of you in the US had a lovely Thanksgiving yesterday.
Ours was filled with lots of family, food and love and it was a special day. I have a lot to be thankful for, that's for sure.

I finished my final versions of my T shirt and A line skirt yesterday and I would love to share the photos with you. I ironed out the issues. 
But first,I have been emailing back and forth with Cal Patch, the author and she has some important  information to share with us about pattern making today!

Below are her thoughts on pattern making the knit t- shirt pattern. She has some valuable information here that you won't find in the book! I had some questions for her about the fit of my last t shirt and wondered about adding ease to knit fabric patterns. Here are her thoughts:

"I have a couple thoughts that might help the dropped-sleeve issue, which is a common problem, because of the stretch of knits in the crossgrain and the fact that the big hole (aka neck) allows the whole shirt to grow a lot across the shoulders. It can be good to draft the shoulder width a little on the narrow side; basically putting in some negative ease to compensate for the stretching. You might also want to sew twill tape, seam tape, or anything non-stretchy into the shoulder seams so they don't stretch. Adding the neckband or FOE or some other finish that prevents the neckline from stretching too much would also help (I know it's the muslin and I love unfinished and serged raw edges, i'm just noting that a band does help the stretching somewhat). also, from the picture it looks like perhaps your sleeve cap height is a little on the short side? or maybe it's just foreshortening in the photo. Is it about 2/3 the height of the armhole?

As for the side seam shaping, yes, I usually tell students to add a couple of inches of ease to the waistline, especially if they have a big difference from hip to waist, because most shirts don't curve in nearly that much and it can look weird if it's too extreme. Adding a couple inches should be more flattering in the belly zone because the shirt will *skim* instead of cling...

The stretchier the knit, the smaller I would make the pattern (assuming you still want a close fit). it may not be necessary with a firm cotton/lycra jersey, but definitely in something like a rib or thermal, if the pattern isn't reduced (negative ease), the shirt will seem too big.


Also, a general principle I like to remind people of when I'm teaching patternmaking is that just because knowing how to draft gives you the ability to use your msmts and draft for a perfect fit, it doesn't mean everything should fit like a glove! so for example, adding a little of what i call "stylistic ease" through the waist/hip/hem of a t-shirt is generally more flattering, especially in a longer, tunic-y style t-shirt. I remind my students to go into their closets and take some msmts from favorite clothing items, and they might be surprised at how often something has a crazy amount of ease which is for the style of it, and possibly what makes them love it. like you might have a 34" chest but your favorite dress might have like a 46" chest if it's gathered around a yoke or something.

Also, with knits, they can vary so widely in both stretch (and whether one-way or two-way stretch) and recovery. I always say that you can make a T-shirt pattern, then cut it out in 4 different kinds of knits, and get 4 completely different fits. Ideally when you draft a T pattern you know exactly what kind of knit you plan to use, and how much stretch it has. In the book, I talk about using pretty much one's exact body measurements as is (no positive or negative ease added) with the intention of using all-cotton.

I hope Cal's information about drafting patterns for knit fabrics was helpful for you. I know it was for me!

Below are are some photos of my t shirt and skirt I made from the patterns I have made so far.
 I added pockets to the skirt and used this beautiful fabric that was sent to me by the fabric designer Celina Mancurti. Her fabrics are hand printed and made with organic fabrics. I love them! Stay tuned for a little giveaway of some of her fabric on Saturday.


 I fixed my armhole issues and the fit for the t shirt was good, but I do wish I had taken Cal's advice and added a little ease to my pattern. I used red ribbing piece for the neckband , trying to match the red birds on my skirt.
Below are some finished projects I would love to share with you today.

This cute hand painted chevron skirt was made by  Diya at The Hobby Harbor. What a beautiful job she did drafting for a perfect fit and she painted those chevron stripes too! Stop by her blog to see how she didi it!
Kaitlin from Wunderbar life  made her a line skirt in a herringbone tweed.

 Jamie from Stitch & An Occasional Bitch had the same armhole issues I had earlier in the week. I hope Cal's advice will help you figure it out Jamie! I think the bust width looks too wide. I took my bbust in 2 inches and then it fit perfect.

Jennie from Byrdie Couture made a cut a line skirt. The fit looks great Jenny!

If you have been working on a project from the sew along we would love to see it!


Tuesday, November 20, 2012

Adventures in Pattern Drafting! Fitting The Basic Tee Pattern

So I left off on Friday saying I was only going to post on Fridays about the Draft Along and here I am on Tuesday posting about it. There is just too much information to fit into only one post a week I think.

I finished my muslin for my t shirt draft and it looks pretty much OK in this photo. Of course, it's not actually muslin. I am using the term to mean a practice garment. I have so much unused fabric that I just go ahead and make my practice garments out of it. A good friend came over and helped me organize my fabrics and I gave away two large trash bags full of it! I hope it finds a good home. My friend owns a preschool so they will use some of it for collage and other fun projects. She is amazing. If you live near Malibu, California, you should sign your kids up at her preschool, the Center Of Ocean Learning. Deanne is the best. I considered posting photos of the big clean out but I am actually too embarrassed to show the world what a pathetic fabric and craft materials hoarder I am.

Anyway, this is a lightweight sweater knit I bought awhile ago on sale with some matching metallic green pleather which I  have never had an occasion of which to use it for. Hmm.. somehow country living doesn't really give a reason to wear a metallic green pleather anything. 
There was only one yard of this mystery fabric sweater knit so it was perfect for my t shirt. I used to have a bad habit of only buying a yard when I would find interesting fabrics. I have since realized that it's better to buy two or three yards. You can't make much with only a yard for adults except maybe a simple top or an A line skirt, and if you make a mistake you are out of luck because you won't have enough fabric to cut a new piece of anything. Well, actually you can make a lot of things with only one yard of fabric, but definitely not a dress... and I love to make dresses.

I left the binding off the neck, finishing it and the hems with my rolled hem feature on my serger. I wasn't sure how the top would fit so I didn't want to invest too much time in finishing the details! I just have to mention how much I love my serger. I think it is the most money I have ever spent on a piece of machinery besides my car, but I don't regret it. It's a Babylock Imagine with a feature called Air Threading. It is so easy to thread  and you can thread it in any order. Plus, it has automatic tension adjusters built in so it readjusts tension for different weight fabrics. I never used to use my old serger because it was such a nightmare to thread and I was always getting the tension messed up.
Upon closer inspection of my working muslin, you can see here that I made a glaring pattern making mistake. Look how far my side seams and armhole extend out! Boy did I do a bad job taking my own measurements. This armhole is really cut badly so I had to shave off about an inch and a half from my pattern at the armhole. I also removed 1/2 inch at each side seam at the armholes on the bodice pieces.
After making my pattern adjustments I stapled my lightweight paper patterns to my manila paper, then cut around it so I still have my original pattern on top. I really like this lightweight paper because it is a little transparent so I can also use it to trace patterns from pattern books. I have been working on a Japanese pattern for myself and used this paper to trace the pattern out of the book. 
So now that my pattern is all fixed and ready to go I can sew up a new t shirt and I have some grey striped knit fabric ready to go. 
If you are participating in the Draft Along, don't forget to stop by Friday to post your photos of your projects and progress!
I will be starting on the basic button down pattern draft. That one has me biting me nails! 

Sunday, November 18, 2012

Gigi's Turkey Tee and planting seeds for winter


I was inspired to make a turkey appliqued t shirt this year for Gigi after we had so much fun doing her handprint turkey on paper project. Of course, her T shirt will probably have stains all over it by Thanksgiving, but that's OK!
Kids will be kids.
We, meaning mostly my husband, have been getting the garden ready for our winter vegetables. Yesterday my husband and son tilled all the beds and today he is planting the winter seeds. Cabbage, lettuces, carrots, onions, broccoli, beets, and other stuff.

Richard likes to make long mounds to plant the seeds in. Our two younger girls will each have their own row to take care of. The bigger kids aren't too interested in gardening anymore. Hopefully they will like it again when they grow up!


Little ones love to garden and it's so good for them to plant something and watch it grow.
Don't step on the seeds Gigi!
Up there on the left is a 5,000 gallon water tank we have. Our water comes out of a well across the road under the river.
There are a few scraggling plants left from the summer garden. Some peppers and zucchini and dying tomato plants.


This is a fun and easy top to make. I started with a plain, white, turtleneck from Target and dyed it yellow with Rit dye.
Then I ironed some double sided applique paper onto the back of some orange fabric scraps I had. I traced Gigi's hand and cut out four handprints. Then I used the applique paper on some brown fabric and cut out a turkeylike body, very basic.
I peeled off the second layer of protective paper from the applique and ironed the design to the t shirt.
I sewed a running embroidery stitch around the whole turkey to make it pop and keep the applique secure.
She loves her turkey top.
You should make one too if you haven't tried a turkey tee. They are a lot of fun to make!

Related Posts Plugin for WordPress, Blogger...