Image Map

Thursday, March 31, 2011

Wedding Dresses : Vintage Designer Showcase

So this is my last post for a while on the subject of wedding dresses. I just got so obsessed with everything having to do with them that I have to share some of my discoveries. I bought my own wedding dress at a sample sale off the rack. I was only 23 and was really strapped for cash. I had no idea what type of dress I wanted as I had never really envisioned myself married and sort of just  jumped into the whole thing. Richard and I were only together six months when we got engaged and we were married within a year! 
So if I could do my dress thing over again what would I do now? I don't know if I would have the energy to make my own dress with all the other things that would be on my mind with an upcoming wedding but if I had a few thousand dollars to spend on a dress I might buy something vintage. If you have never heard of The Frock then I must tell you that they are the absolute best when it comes to vintage bridal gowns. Here are a few of my favorites:


I think the one above is my favorite.
read more...

Wednesday, March 30, 2011

Wedding Dress : Finished !


 I finally finished Maria's dress. I didn't get any photos of her in it but it does looks beautiful on her. I'll have to wait for the wedding pictures. 

I added horsehair braid to the hem of the lace to make it more crisp. Everything that was made on this dress was learned either from an article, class , or tutorial online. I had no idea how to make this when I told Maria I would do it. To see my tutorials 
I used go to my tutorial page on my sidebar and click
"wedding dress tutorials"


Sleeve lace applique with hand beading.

Randomly pleated sash with bodice overlay. I added some more pearl beads to the bodice scallops after I took this photo.


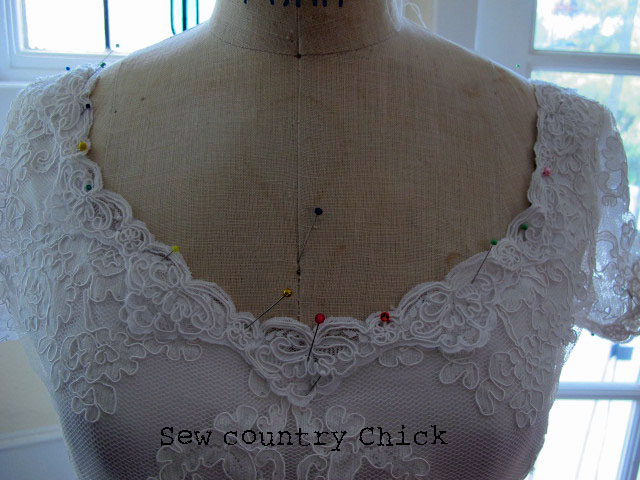
The applique lace on the sweetheart neckline. I like the little fringe on the edge. you can never know the hours I spent worrying how to do the lining on this bodice!


The back with the train down. There is a lapped zipper under the fully functioning button and loop closing for extra security. I hope to God the zipper or buttons stay on all day! There will be a low bustle which I still have to finish sewing in but first I have to search the internet on how to do it.
it was a huge amount of work but you never know what you are capable of until you try , do you? I was so afraid it would be a disaster because I didn't think I could sew something like this. Thanks for giving me the opportunity Maria and 
I know you and Matthew will have a great life together!
I guess I pulled it off!
On to the next project.....

Tuesday, March 29, 2011

Wedding Dress Patterns Through the Decades

 I thought it would be fun to post a little retrospective of the many styles of wedding dresses that were available to home sewists over the last several decades. This would be the ultimate retro sewing project!
 These patterns can be found on Etsy of course!

Here is a rare 1930's pattern. Bias cut skirts influenced by the Great Madame Vionnet were de rigeur in this period. Madame Vionnet had a universal influence on fashion in the 1930's. Her bias cut gowns were widely copied and sewing patterns of the time reflect that. I recently made a wedding gown with a charmeuse skirt cut on the bias. The fit is actually quite sexy.

An example of a wartime 1940's pattern above. Women were urged to save fabric during the war and many shorter trainless styles and short sleeved styles were made.


Another 1940's pattern .


Late1940's. Very modest indeed. Note the use of more fabric after the end of the war.


Another long sleeved 40's pattern. It's rare to see a wedding dress now with sleeves, let alone long ones. Although, we are already seeing a return to them on the heels of  Pricess Kate's wedding gown reveal. I for one am happy to see sleeves again. There is nothing more annoying than tugging up an ill fitting strapless gown all evening.
A gorgeous 1950's confection above. It reminds me of Grace Kelly.
I love the elegance of the many gored panels on this 50's pattern.


A late 1950's pattern. You can see the influence Dior's New Look had on fashion and the re-emergence of the full skirt after the straighter forties styles.


1960's. The Jackie O pillbox hat says it all.
Very modern and chic  60's headpieces to be worn for the bride or bridesmaids.


Late 50's or early 1960's. This is obviously before the later swinging sixties look. Very sweet and demure.


Here we have the late 60's look. My mom had a haircut just like the model in the yellow dress. Very Mary Quant and stiff.


This and the next two patterns are from the 70's. So folksy!


70's again. this is for the modern woman. The Charlie Girl. I could see Lauren Hutton in this. She was the ultimate 70's icon to me.


Let's not forget the eighties where sleeves got really big ! Leg of Mutton sleeves, they were called . I don't think this look has been out long enough to be appreciated yet!
So would  any of you consider sewing yourselves a wedding gown from a vintage pattern? And have any of you ever tried making one before?


Monday, March 28, 2011

Wedding Dress Tutorial Links

Hi everyone. Well, I have wrapped up my wedding gown project and will be posting some final pictures soon and I'm ready to move on to something else. I did want to share with you some great links and tutorials on wedding sewing I have found during my wedding dress sewing process. If you should happen to be making a wedding dress now or in the near future you should check these out because they helped me . I hope these tutorials can be a help to you!
How to make your own Crinoline  from fabricate and Mira
tea dying lace from me!
working with tulle from sew for dough
fixing boning problems from sew for dough
removing stains from gowns also from sew for dough
creating a french bustle from sew for dough
putting gussets in bustiers from sew for dough
sewing with bias from Threads
randomly pleated sash  from Project Run and Play
sewing darts in lace from Sew News
How to applique lace from Burdastyle
More on boning from Fehr Trade
Making a ruched sash a discussion on patternreview

Wednesday, March 23, 2011

Wedding Gown update: Pleated sash tutorial

So making this wedding dress has at times made me  question my sewing skills in a big way. But I've had a great time and I would probably do it again. I especially enjoyed the fittings with Maria and her beautiful sisters and mother. Their home is like  a modern day version of Little Women. They don't own a TV, instead listening to opera music or reading classic novels together in the living room in front of the fireplace.
This project has been a humbling experience, from not making the lace overskirt correctly and messing up the lace applique seams on it, to making a lopsided sash and sewing on the buttons crooked. A crash course in couture sewing. First we couldn't find any patterns that looked like the dress Maria wanted so I had to make my own pattern and make sure all the little things like armholes and princess seams and bias skirt seams were all lined up correctly. That took about three muslins to do. Then I had the fiasco with the lace overskirt being too baggy. Thank god I had enough lace left to drape the skirt on top of the bias skirt making it much more fitted. I used the old skirt front for the train and I had just enough of the border left to apply around the edges. Then there was about 8 to 10 hours of racking my brain over how to make a sash look like the Oscar De La Renta dress which was impossible since I didn't have a good close up photo to study or directions on how to do this type of pleating.
Just remember.... making a wedding dress the first time is like remodelling your house. It takes twice as long as you think it will!
Well, I wouldn't give up on the pleated sash idea so I posted a desperate plea on the wedding sewing boards of patternreview and an angel by the name of Susiestitcher came to my rescue and linked me to this tutorial at Project Run and Play and I finally figured it out. Third times the charm I guess. I have to say without those boards at patternreview I would have been lost because the wedding contruction book I have is from 1993 and didn't have enough information about a lot of things. Here some some photos of my progress:

The first sash I made. I thought is was tacky. Looks like a cheap prom dress.


If I worked with this shirring technique for awhile I may have succeeded with this.


Here was the second sash. The pleats looked good at first...


But they didn't line up in the back and look at those buttons! It looks like I was drunk when I did it! I can laugh about it now, but I can assure you I was almost in tears at this point. I had to remove the sash and in doing so, remove the buttons and zipper to redo the whole thing.

Here is that last sash after being on the dress form for a day. As you can see the pleats have taken on a sad, lopsided air to them.


Here is the method I learned last night from the Project run and Play tutorial. I ironed the pleats down like I did the first time. Last time I stitched each pleat down which gave the whole thing an overworked look. This method was a lot easier. I started with silk three times the width I wanted to end with.


When i finished ironing, I  flipped the whole piece and ironed on some interfacing to the wrong side, making sure the sticky part was facing the fabric. I trimmed the interfacing to size. This keeps all the pleats glued down.

I cut another piece of the same fabric the same size as the finished sash and ironed it right side to right side, leaving the end open so I could attach it to the back of the dress. Flip it right side out again and press.


Here is the result.

This is the dress after re-draping the front skirt which was too big before because I used the pattern and didn't drape it over the bias skirt instead.

Her is the new sash and the appliqued neckline. I added a different trim there.

I used the old front piece of the skirt to make the train. Note the Fisher-Price telephone on the floor. And how I keep this dress clean with a one year old around? I throw a white sheet over the whole thing and pray nothing happens!

  I appliqued  the border pieces to the bottom hem and train. I'm considering adding a horsetail trim to the underside so the lace has more body on the bottom.

So the next steps are reinstalling the lapped zipper and buttons and loops. I also have to trim the sleeves and hem the underskirts.


Sunday, March 20, 2011

Using Cloth Diapers: The Reality

When we moved to this farmhouse I had this vision of myself in a vintage apron, hanging laundry out to dry on a beautiful clothesline. My children would be romantically running in and out of the sheets with the sun shining through. We did put up a line but we attached it to two trees and I had the joy of going to get my laundry to find the only creatures frolicking amongst the laundry were some ants  who had migrated down from the trees, curious as to what was hanging there. 


Then when I was pregnant with my fourth child I was researching cloth diapering and decided to give it a try. More images of me lovingly hanging things out to dry. Well, the reality of hanging the diapers on the line were a lot less romantic than imagined. Trying to fold and pin a cardboard hard fabric diaper on a squirming baby with myself sleep deprived was not what I had envisioned ! I guess our modern conveniences are just that and sometimes I glamorize the day to day life of the old days. 
21 months later however, I'm still using the cloth diapers even if I don't hang them on the line anymore.


Yes, it is harder washing the diapers  versus just throwing paper ones in the trash . All the diapers and covers are a big investment in the beginning and the high cost of water can make it not that much of a savings in the long run. It's just something I wanted to try. We have a well so I don't have to spend extra on the water to wash them so it's cheaper for our family. And it is satisfying to know there is soft organic cotton next to your babys' most delicate parts rather than paper diapers made in a factory God knows where. A fluffy cloth diapered behind is awfully cute too. Even if it does make your babies' butt look big. No skinny jeans for cloth diapered butts. Too much junk in the trunk!

 If you are considering making the switch to cloth diapers here are a few modern conveniences that make cloth diapers doable:
  1. Buy a diaper sprayer to attach to your toilet. You will need it to spray off solids into the toilet.
  2. Have a waterproof liner and trash can next to the toilet to put the dirty diapers in.
  3. Get the diaper covers with the snaps that are multi sized so you don't have to keep buying new covers as your baby grows. Also babies LOVE to undo their diapers once they figure out the velcro.
  4. Use Snappis instead of pins. They are a lot safer.
  5. Use Charlies Soap which gets all the smell out and doesn't leave any residue.
  6. When you wash the diapers do two cycles. The first is with cold water to rinse all the mess and the second is in hot water to clean them. Use a second rinse on the last cycle.
  7. Also don't feel guilty about using paper diapers when you are out of your house. It's really a hassle to cart stinky cloth diapers around, even if you do have a waterproof wet bag.


Tuesday, March 15, 2011

Tea Dying Lace

So the dress I am working on has a lace in a very subtle off white shade which was very hard to match with store bought trim. I found some pretty trim I wanted to use on the neckline and sleeves but it was a little too white and stiff to shape around the neckline. Here is how I made it work:

If you are only tinting trim or a small amount of lace use a clean bowl. Pans sometimes have flakes of burnt things in them that might come off with the hot water and stain your lace. I used a bag of Earl Grey tea. Pour in hot water and let the tea steep for a few minutes. Add some ice cubes to cool the water.


Dip your lace into the water checking every few seconds to see if you are getting the color you want. Don't let it sit too long or the lace might get too dark.  Carefully remove the lace and blot it with a towel. Lay it flat to dry.

The bottom lace is the lace I was trying to match. It's hard to get an exact match when dying lace but with practice you will get it right. Try only a small swatch first before you dip all your lace in the tea, then you will get an idea how long you need to let the lace steep. The top lace is what I started with and the middle lace is how it turned out after dying it. It's very close to the main laces' color.

This is the lace trim pinned to the neckline. It's a tad bit darker but I think I am going to sew some pearls to it . I sort of like how it stands out a tiny bit. It looks like antique lace now. Also when the trim was still wet I shaped it around the neckline and it was so much more pliable than when it was dry.

I got this information from an out of print book which is known in bridal sewing circles as THE best book on bridal sewing and is available here: It just seems to keep going up in price. I hope they will reprint it.


The next day.. Well Maria came by and we both decided the lace was too dingy so I soaked it to get some of the tea out. Here is how it looks now:

Saturday, March 12, 2011

Raised garden beds and Tractor stealing babes


Raised beds are a good way to plant seeds. You make a long mound and put the seeds in little rows on top. Here we have carrots, radishes , and beets. To be honest I'm not quite sure why you are supposed to make these little mounds. It has something to do with water drainage. Richard spent hours doing it and it looks so neat and orderly. Not surprising coming from a person who organizes the bills in his wallet by denomination and all facing in the same direction. Suze Orman once said people who organize their money this way have a great respect for it and attract more into their lives. Sounds good to me. And have you ever noticed her wacky jackets?


Our compost bin which we use for kitchen scraps. We have been putting stuff in it for three years and have never had to empty it. The scraps just decompose into dirt and there is a little door on the bottom that slides up and out comes the compost fertilizer. It's so cool! Yes the plastic looks a little ugly and some people have built some really nice ones. I have an old wooden rabbit cage with wire sides I'd like to turn on it's side so the doors are at the top. It would make great com poster.compost should get plenty of air and water to break down quicker.


Some of the avocados on the Haas avocado trees are ready for picking. This area used to be called " the Citrus Capital of the World" but farmers can't make much selling oranges anymore so most of my neighbors have planted avocado trees instead. The brown leaf shown here is the result of a frost and freak hailstorm a few weeks ago. Avocados don't like that. I'll have to post Lilys' favorite guacamole recipe.


Gigi climbed up on the mower by herself when I wasn't looking. 
P.S. To share your composting ideas and photos post them on the Sew Country Chick wall by clicking the Facebook badge on my sidebar!


Related Posts Plugin for WordPress, Blogger...