Image Map

Wednesday, December 29, 2010

Vintage and Couture techniques: Underlinings


Pink Silk Shantung vintage style dress


I got this great book at the thrift store Called The Better Homes and Gardens Sewing Book from 1970.


I've been trying to improve my sewing techniques and signed up for an online couture sewing class on patternreview.com and discovered underlinings. It's a couture technique of facing your main fabric with another fabric. You cut the exact same pattern from a fabric which will compliment your fashion fabrics' drape. In reading this old book I learned that most dresses in those days were underlined. It wasn't just a couture technique but something recommended for everything but basic cotton dresses. It gives them an improved drape and gives you a surface to make hems and pin down facings without showing through on your outside fabric. It's not the same as a lining . I decided to get ambitious and make a silk Shantung dress with a home made pattern that would be underlined with a silk organza on the bodice and some old sheeting on the skirt portion. It also was to have a lining from China silk and self fabric facings on top of the lining. Below are some photos and descriptions of the underlining and construction process of the dress :


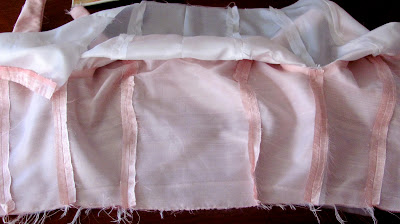
I used an old sheet to underline the skirt to give it more body. I cut two panel widths and fist tried the dress using only one but then decided it wasn't pouffy enough so I ended up using two panels.


This is a photo of the inside of the bodice underlined with silk organza which is very sheer so It's hard to see. The flipped up part is the China Silk lining. 


This is the hand picked hook and eye tape closure. this is the first time I tried this and I love the way it looks.


This is the back of the dress with the skirt draped. I decided it wasn't full enough so I used two panels.


These are the shoulder straps above. You have to leave them open so you can pull the lining and dress through to be right side out.


This is the finished bodice lining with the facing on top. That makes four fabric layers 1) fashion fabric 2) underlining, 3) lining, and 4) the facings.

The back of the finished dress


Ready to knock em dead at the high school dance !

Friday, December 24, 2010

Designing a bridal gown: Part one

So I have been working on designing and making a bridal gown for a bride to be who is getting married this April. She had a photo from a blog pictured below but the photos on the blog didn't show a lot of detail. For instance, I can't even tell where the waistline is or what type of lace fabric it is. I almost said no to making it but then I thought " It's really only an evening style dress which happens to be white." So I ordered  Bridal Couture: Fine Sewing Techniques for Wedding Gowns and Evening Wear from Amazon. This book must be in high demand because it's the first time I've paid over the original retail price for a used book! I also signed up for an online couture sewing class by the Author of this book, Susan Khalje on patternreview.com. Well I finished the class yesterday and here are some things I've learned about making a bridal gown:
  • If you use a delicate lace on the bodice and skirt you should interline or back it with silk organza to make the lace stronger.
  • Your main fabric should always be interlined or backed with another lighter fabric. For instance, I'm using silk charmeuse and I'm going to interline it with china silk.
  • As well as all the above layers, the dress also needs to be lined. That's five layers of fabric. The lace, the organza, the charmeuse and China silk backed to it and the China silk lining
  • As you can see that's a lot of silk fabric. It's going to be expensive. It's a good thing we are buying the fabric from a wholesale jobber in downtown Los Angeles. We would pay about double at a retail store.
  • Have a picture with you when shopping for a pattern. I couldn't quite remember the picture of the dress as I had only seen it online and didn't print it out. As you can see from the pattern I bought it's very different from the blog dress. Once I saw the blog dress again I decided to make a new dress from scratch. I made my own pattern, something I probably should have done in the first place since luckily, the bride is the same size as my dress form.
  • Zippers on bridal gowns are not elegant. The gown should have either buttons or hooks and eyes to close.
  • The finer the gown the more hand sewing required. And you can forget about ever trying to use a serger on a wedding dress.


The blog dress photo.


The first pattern I tried.

The dress with a princess seamed skirt.

The bodice, nothing like the photo and it has a raised waistline.

The new design with a sweetheart neckline and natural waist.
It also has a one piece skirt which can fit the lace without having a lot of seams which are hard to do in lace.


The back with a scoop opening.

Monday, December 20, 2010

Last minute homemade gift ideas : Potholders!

So my kids were sitting around  thinking about what they would do for Christmas presents for their relatives  today. My seventeen year old decided to make fudge for everyone which should be great since he's an awesome baker, something  he rarely does anymore since having taken up the guitar...  My now newly minted eight year old was wondering what she should make and of course I had to come up with a sewn item for her. " Pot-holders" I said," that would be a perfect gift for your Grandmas and your Aunt and your big sister ".  Big sis has her own place now in the big apple and she actually cooks sometimes.
 So I proceeded to cut out 12 pieces of square fabric and 24 pieces of flame resistant batting which I impulsively bought last Christmas thinking I would do the hot pad gift idea then. ( That's how long it takes me sometimes to get around to  project ideas I have simmering on my back burner, and why am I so obsessed with pot-holders anyway?)
 So along comes dd and looks at the whole project and decides maybe she'll make the ribbon covered glass jars after all! ( See post below) So I guess know I'm going to be the one making pot-holders to give everyone . I probably would have ended up doing a lot of the work on them anyway. If you are anything like me when it comes to your kids then you probably dream up all these ambitious projects to do with y them and then end up doing about seventy per cent of the work. At first I thought it was a really lame idea to give everyone pot-holders to loved ones on my list but then I thought. "It's the sort of thing you buy when you first get married or move to a new house and are obsessed with all those minute details and then years later you go to use this basic but totally necessary item and realize they are all cruddy and falling apart, and yay! That's where my amazing homemade pot-holders will save the day!"

Later that night....

This is the third potholder I made. The first two were pretty wonky looking and I actually considered for a minute giving them to relatives and saying my daughter made them . I thought this was such a simple project I could just eyeball it but it turns out even the simplest things need a plan so here is a good pot-holder totorial from stitch in my side if you should be inspired to make one for a gift or spruce up your own kitchen. Happy sewing!

Tuesday, December 14, 2010

Felt Mittens and Gloves Tutorials

I made a decision I was going to try to do handmade Christmas presents for everyone on my list. OK, well , my kids are exempt because they weren't so thrilled with the idea since I make them things  all the time and they aren't always thrilled with the results. Have you ever tried to knock off a Betsy Johnson dress ? Sometimes it works , sometimes it doesn't. Someday they'll appreciate it.  I will have to add something from Urban Outfitters for my teenagers and my 8 year old wants a Waldorf Kathe Kruse doll or one of those American Girls dolls that always remind me of that talking Kathy Doll episode on Twilight Zone. I don't think I could bring myself to buy an American Girl Doll. First, they are over a hundred dollars and made of plastic and second, they are probably made in China and if you have read one of my previous posts you'll know I don't buy supposedly American Heirloom items that cost over a hundred bucks and are made in China . Makes me feel like I'm being hoodwinked. As far as the Waldorf doll goes I'll have to buy one because I did make her one once and that is another project that should have ended up on Craftfail. Oh and the dog we had at the time decided it was a chew toy a week after poor Lily got it. A month's worth of work up in smoke in two minutes!
Aren't these Waldorf Dolls adorable?


Check out these groovy American Girl Dolls. Ok, maybe I would want one too if I was eight, but I still prefer the Waldorf girl above. 
O.K. back to the point of this post, handmade gifts.  I have a lot of sweaters lying around from the recycled baby sweaters I make for my Etsy shop and mittens and gloves are perfect projects to make from the scraps. I can't wait to get started! With the upcoming birthday party  of my daughter and all the things I have to do to get ready for Christmas there is no way I'll be writing my own tutorial so I am linking to some great projects below I found on the web.


felt mitten tutorial from lucky star lane


Now as much as I love mittens I would actually prefer to have gloves as I need to be able to use my fingers and still stay warm. I think mittens are great for kids but my fingers get fidgety when I wear them. Here are some glove tutorials I found trolling around the internet :
glove pattern from sew.com. This is a full size PDF you can print out if you click on the link. Directions for sewing them are also included. Aren't these bloggers generous? If you make something you should thank them!

Below is a tutorial for making long gloves with a sweater and cheap mittens you can get at the 99 cent store from  craft addictions.


I'll post some photos of my final projects soon!


Monday, December 13, 2010

DIY Birthday Party Ideas

I'm trying to plan a handmade party for Lily who is turning eight tomorrow! Here are some ideas and links I've found for party planning. I wish I could actually do all these projects for her party but I doubt I have time. Why do I always leave everything to the last minute? I have compiled a list of some great tutorials from fellow bloggers below.

Handmade Party Favor Ideas:


headband from foofanagle


Belt for boy guests made from a ruler from The Mother Huddle


Party decor: Friendly forest theme


CUPCAKE IDEAS:
Maybe I'll try these although I have to say I'm probably the worst baker in the family. I should post a pic of the lopsided Barbie cake with wierd smushes all over it that were supposed to be scallops I made for Lilys' fifth birthday. That would be one to post on CraftFail. Perhaps our son can make them..
Here are some Decorating instructions for the woodland cupcakes below.


Here are some other cute cupcake toppers at Party Parade on Etsy:


Group craft ideas:
Fabric flower from green is the new blue


Ribbon covered pencil jar from the long thread


Saturday, December 11, 2010

Vintage patterns and Hats


Which pattern would you make?
I live a few miles down a country road  outside of a little town called Santa Paula. It used to be a thriving town about a hundred years ago. They discovered oil around here and the oilmen rushed in and then discovered it was also a great place to grow citrus and Santa Paula still calls itself the Citrus capital of the world. Union Oil made its headquarters here and the town grew rapidly. It lies along a pretty river valley which empties 20 miles west into the Pacific Ocean where you will find the town of Ventura. Somehow the growth petered out in santa Paula and the town never really came into its own. Union oil moved away and now it is basically an agricultural town. The orange , lemon , and avocados trees are still here  and I feel lucky to live in a place that still looks like the pictures on an old orange crate box. I liked it when we first moved here because I love old buildings and the town is full of Craftsmen houses and has a cute main street with a bell tower that looks like it did back in the early 1900's when it was built. Coming from Los Angeles where things seem to get torn down and rebuilt on a weekly basis it is  a place with some history . If you walk down Santa Paulas' old Main Street today which is three blocks long you will find  four bridal and Quinceanara shops, four Mexican bakeries called panaderias and three  cowboy clothing shops ( vaquerias )  If you are a cowboy with a  daughter turning fifteen and want to have a party and order a cake you are in luck my friend ! The busiest shop in town is the Goodwill Thrift Shop which says a lot about the economy here.
 There is a little shop on Main Street called Schumacher's which is always closed. There you will find beautiful vintage clothing outfits in the windows. If you happen to be passing by on the rare occasion that it's open you have to stop in. Terry who own the place uses the shop mostly for storage since she owns the building. She has been collecting vintage clothes since the 1960's and she has clothing going back to the early 1800's in her shop. The place is treasure trove. Terry is an original hippie who wears a bandana over her long hair and has a beautiful array of silver and turquoise  jewelry. She sells at the good flea markets and the expensive vintage clothing expos down in Los Angeles. She was in her shop the other day so I had to stop in. She gave me a great deal on some vintage patterns and I bought an original unworn petticoat from her to wear with the dresses once I make them. I can't wait to post the dresses on Sew Retro , a website where people who are passionate about making clothing from vintage patterns share their work. She also gave me a record album from the movie Gigi which I was thrilled to get , Gigi is what I call my baby girl. I'll have to frame it for her.

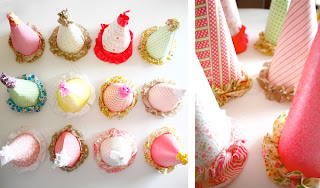
She was telling me about some incredible vintage hats she found  cheap at a local Thrift Store in Ventura and I told her how I had already been there the week before and bought what I thought were the best ones. " I had the feeling someone was already there and got the best ones," she laughed. I have to share photos of the hats with you. Unfortunately my head is too big for them so I can't wear them but they of course look fabulous on my beautiful daughter so she will model them for you. I was cursed with the large head of my Italian grandmother and wear a hat size mens extra large.  : (


Which hat is your favorite?

Wednesday, December 8, 2010

1/2 hour baby sweater pants tutorial

It's winter now and my babies' cotton leggings just aren't warm enough. Living in an old house does have its merits but central heating isn't one of them. Southern California does get cold too, and when I hear the electric windmills going on at night on the ranch next door I know the temperatures have dipped down into the thirties and it's time to bundle up at night. O.K. , so these baby pants might take you more like 45 minutes to an hour to make as they did for me because I  had some fitting issues on my baby as you will see. Under ideal conditions you can make these pants in a jiffy. Those ideal conditions would be having a little baby a couple of months old and not a big cloth diaper wearing eighteen month old. First you have to get an old sweater . The sleeves will become the pants. Cut off the sleeves of the sweater at the seams so they don't unravel. I put my sweater in the washer and dryer to felt it so the pants can be extra warm for winter. It also makes the pants machine washable once the sleeves are shrunk


Lay some pants that fit your baby on top of the sleeves to measure the waistband and inseam placement. Trace onto the sleeves and cut. Cut the curved part off the sleeves so they are straight across at the top. 


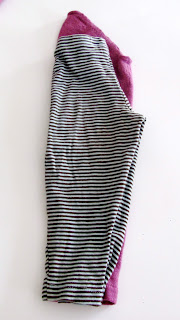
The cut going down the long seam in the sleeve is where you will sew the pants together. The part below it that you didn't cut will become your babies inseam, the seam on the inner leg of the pants. You should make sure they will be the right length before you sew the two cut pieces together. The straight part at the top will become the waistband.


Put the right sides of each pant leg together and sew the two slits you made together, right side to right side.


Sewing the two seams together, above.


 Once you have sewn the two seams together try the pants on your baby. If you have a little baby they should fit. But if you have a baby like mine who  wears cloth diapers you will probably have to add some extra fabric from the rest of the sweater that you cut the sleeves off of. Cloth diapers definitely add some junk in the trunk! Those cute little skinny jeans for babies you find at the Gap aren't going to fit over this butt! Vintage baby clothes are designed for big cloth diapers like my baby wears so they usually fit her.


Measure from the top of the pants to where the waistband should fit on your baby. My measurement was 5 inches.


I cut two pieces the same width as the pants and six inches long to add to the pants. I sewed the two pieces together at the sides which actually becomes the crotch seams on the pants. Line up the crotch seams on both pieces and sew together along the waistband.


This is how the waist area should look. You still have to make the casing for the elastic at  the waist.


I used half inch wide elastic for the waistband and sewed a casing a little larger than a half inch to put the elastic through. Leave a one inch opening to thread the elastic through. When it comes to these kind of home sewing projects for myself I just eyeball it. But if I'm making them to sell or give away, I would do a neater job. I wonder what that means? Hmm..


Measure the elastic around your babies' waist to fit and thread the elastic through the one inch opening you have left in the casing. Sew the elastic together at the ends.


Put them on your baby and she's ready for some new adventures in her warm leggings. As far as getting her to keep her socks on, that's another posting...

Related Posts Plugin for WordPress, Blogger...